
Blog
Search Docs…
ALL TOPICS
COMPARISONS
GAME
PRODUCTIVITY
TROUBLESHOOTING
PRODUCTIVITY
2 Simple Ways To Share Window 10/11 Screen
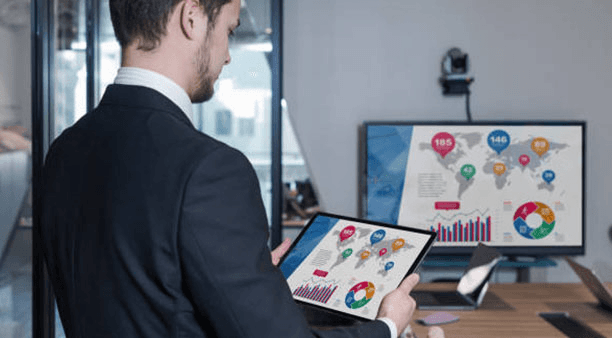
Do you want to share your computer screen with your colleagues during a meeting or project videos/photos onto a larger screen? This article will introduce two simple methods to project your Windows 10/11 computer screen.
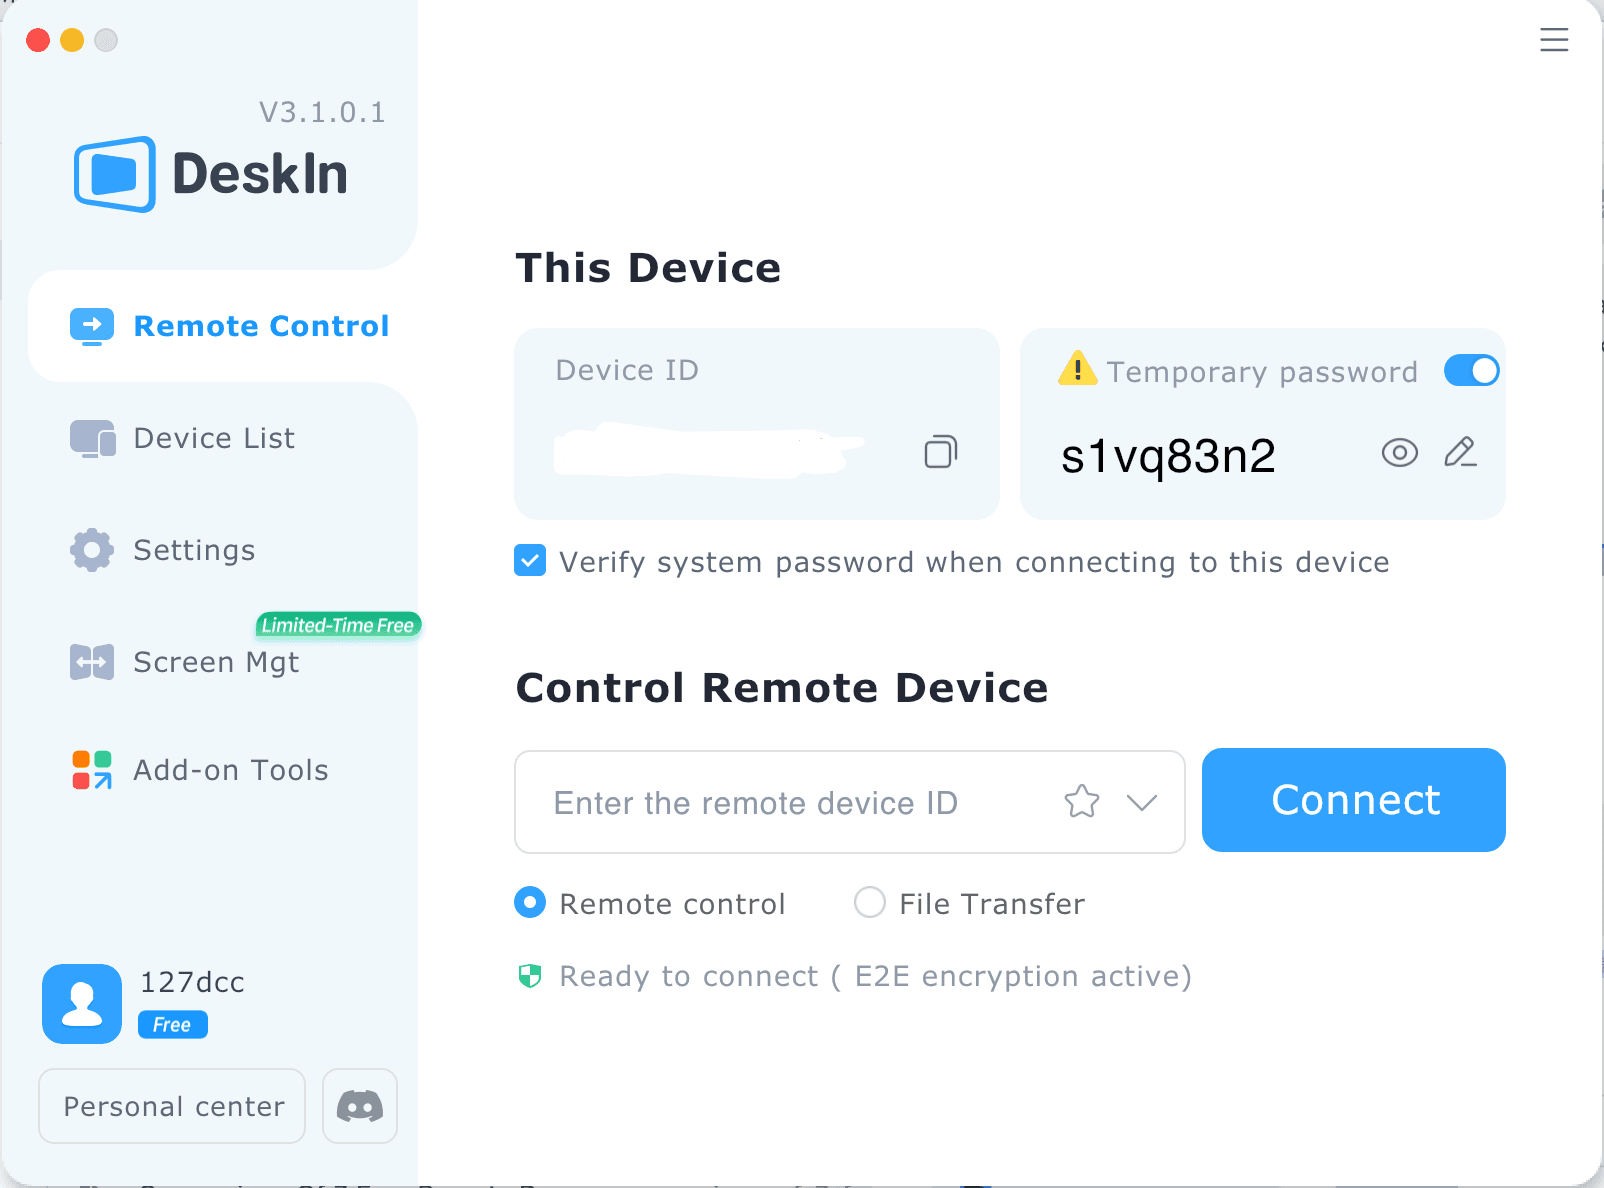
Method 1: Use professional projector app DeskIn to share screen
Advantages of using DeskIn remote desktop for projection:
Cross-platform support: DeskIn supports screen sharing between iOS, Windows, Android, and macOS systems.
No need for the same network environment: DeskIn allows projection even when devices are not on the same network, making it possible to share screens over long distances.
Screen adaptation: You can modify resolution, frame rate, and other settings to better adapt to remote screens.
Secure: DeskIn uses 256-bit encryption to ensure that your projected content remains private and secure.
Easy to use: No complicated setup is required.
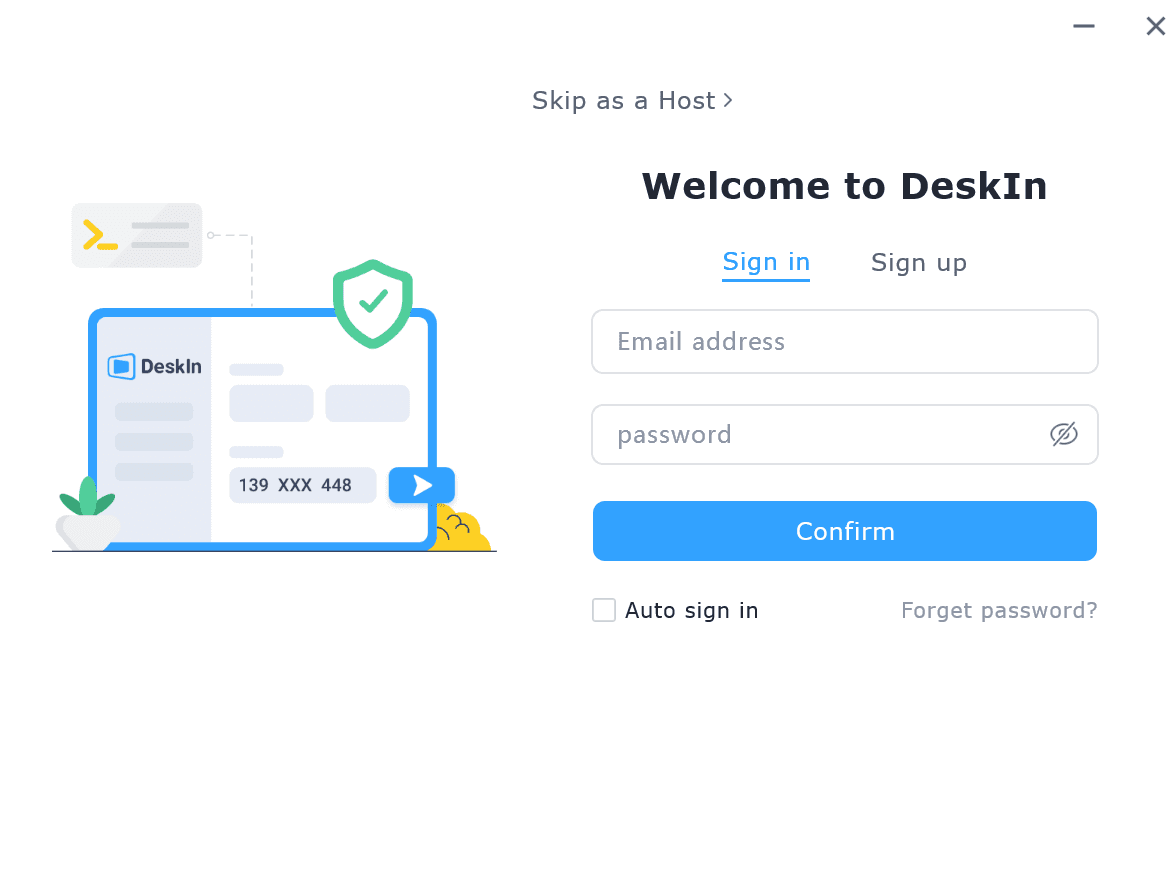
Step 1: Install DeskIn on both your computer and the device you want to share your screen with.
Register for a free account and log in.
Note: On your first login to a new device, you will need to complete an email verification to protect the security of your account.
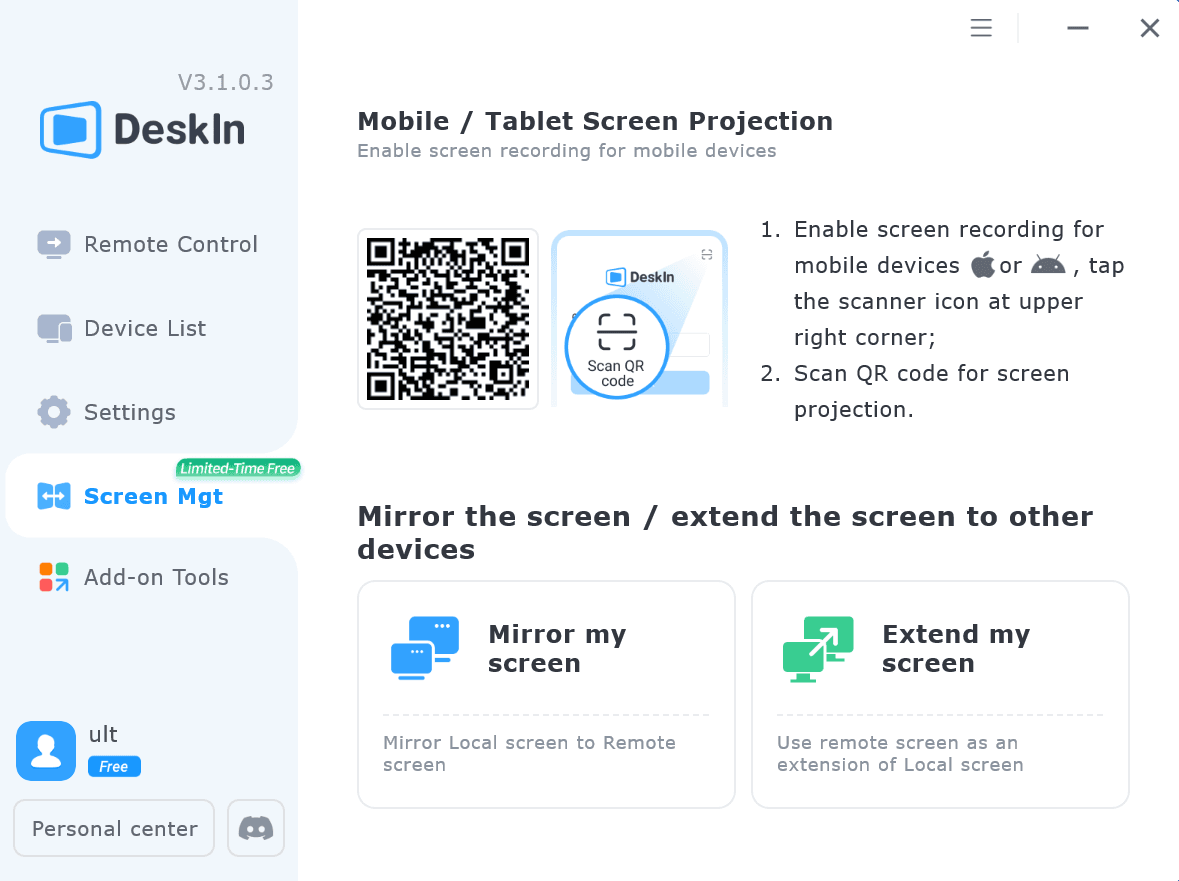
Step 2: Extend your screen
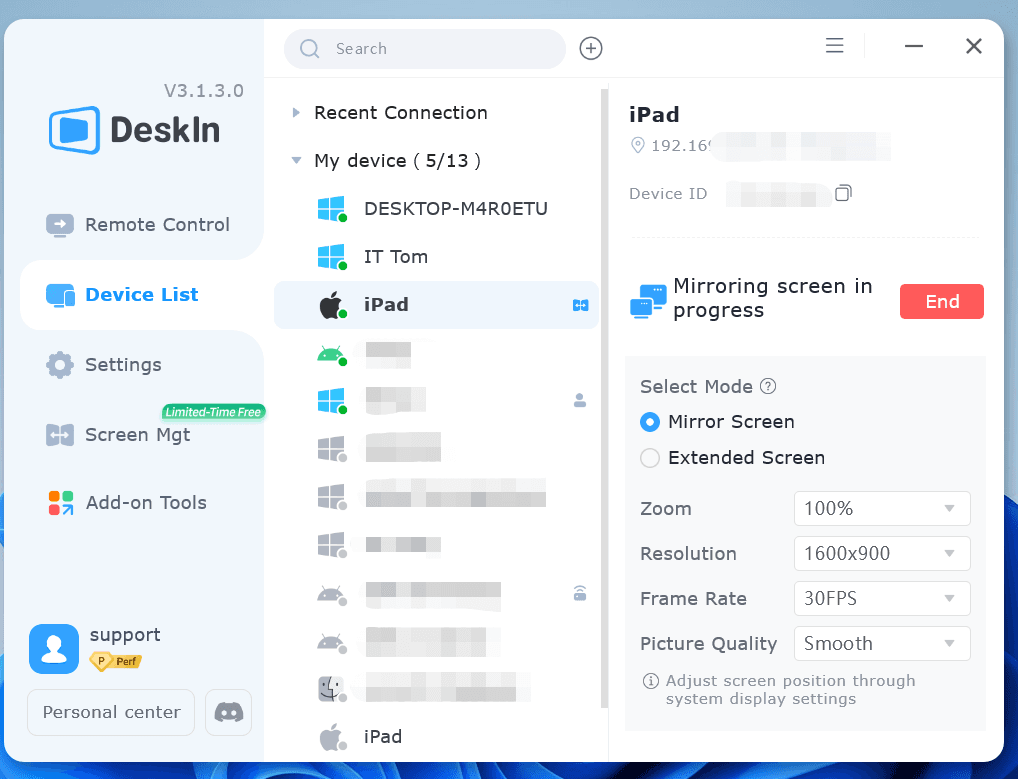
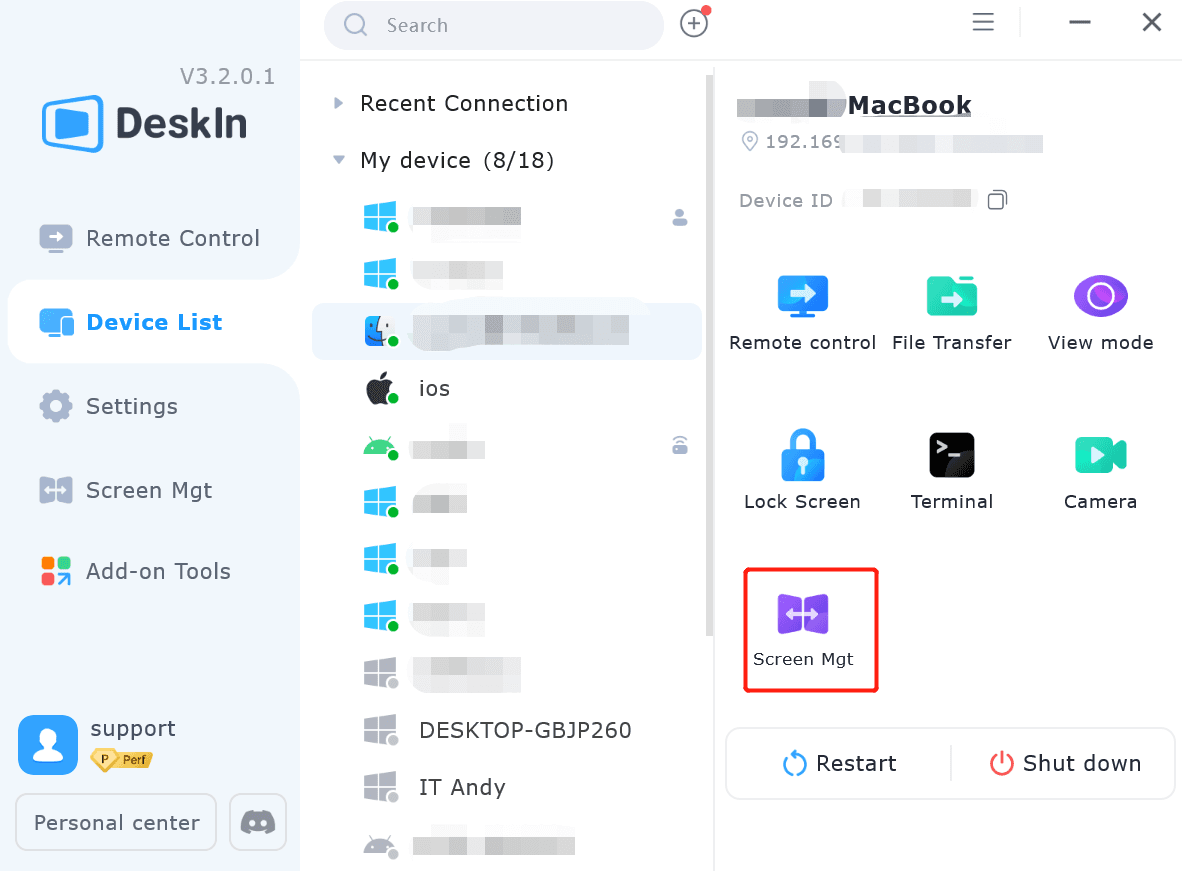
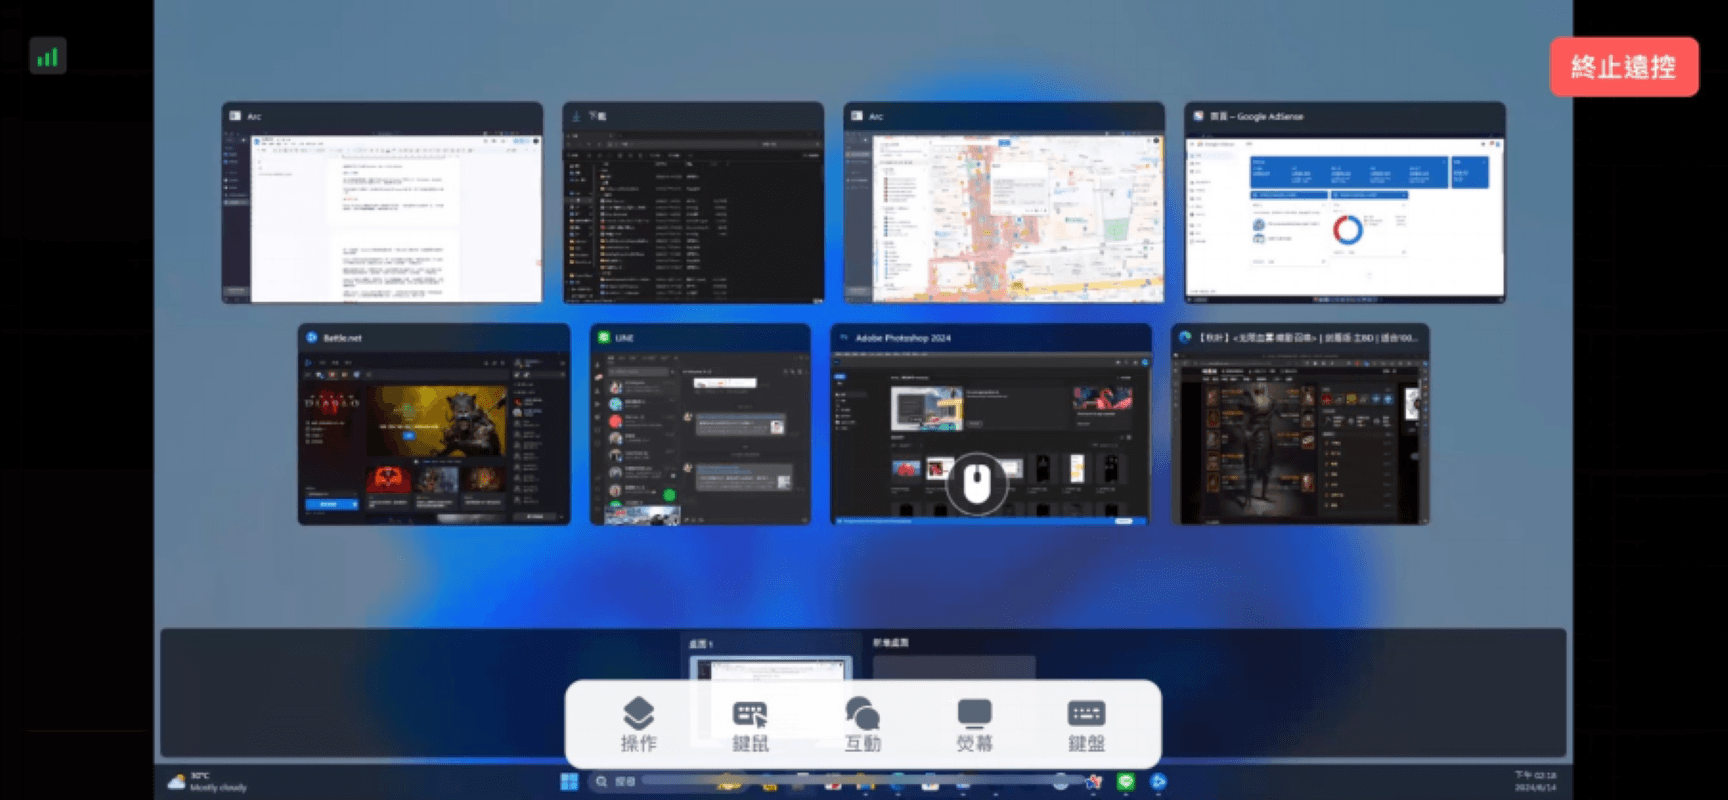
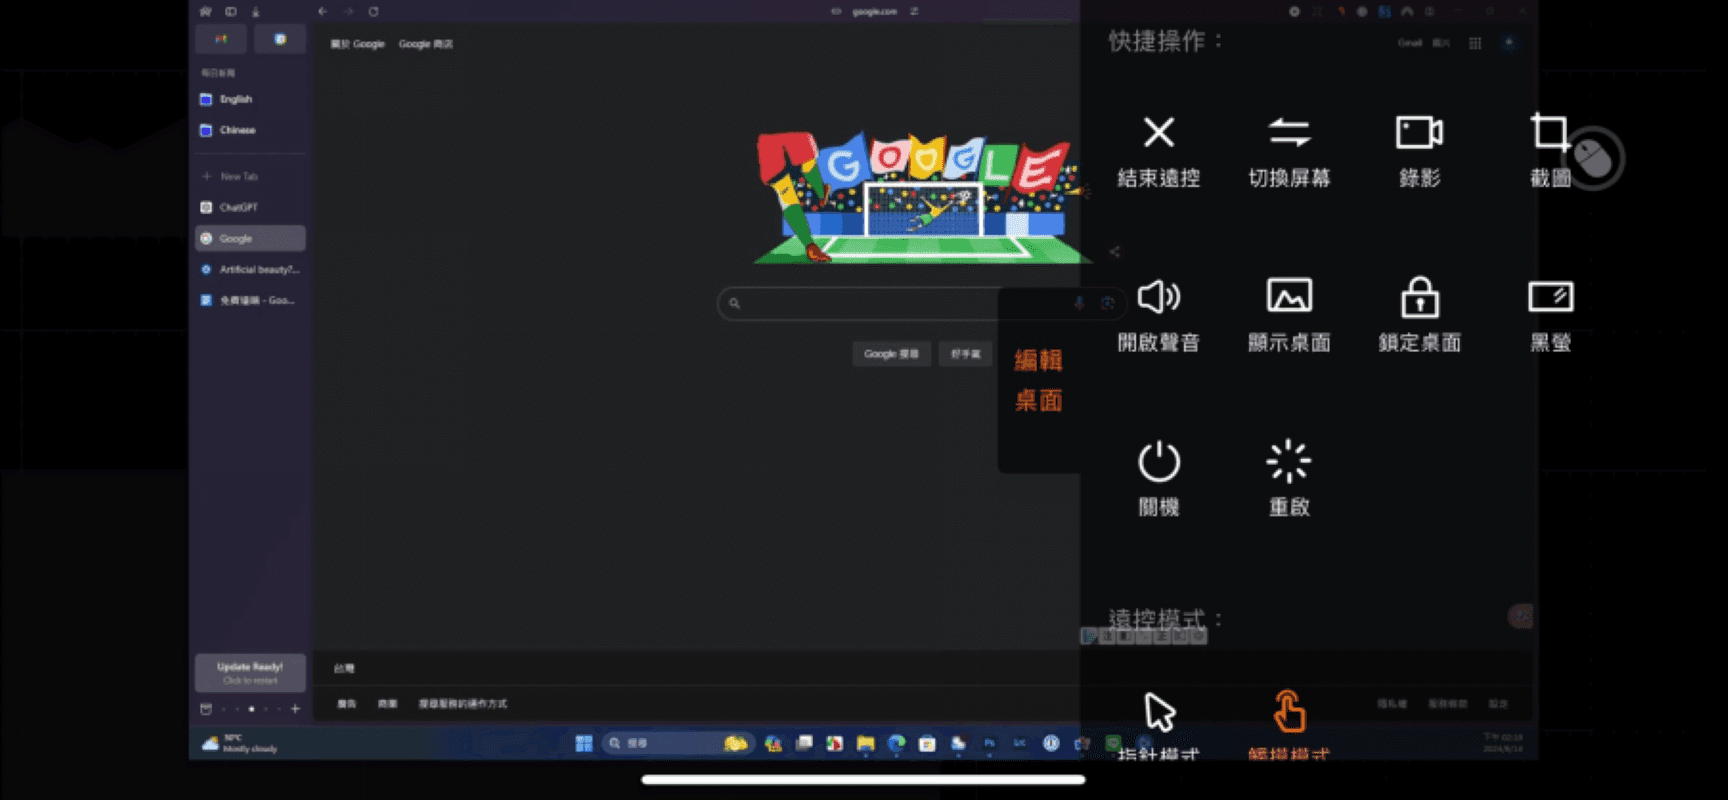
Open the DeskIn app on your Windows/Mac computer >> Go to the "Screen Mgt" tab >> Click “Mirror my screen."
Step 3: Select the device you want to share your screen with and click "Start Mirroring."
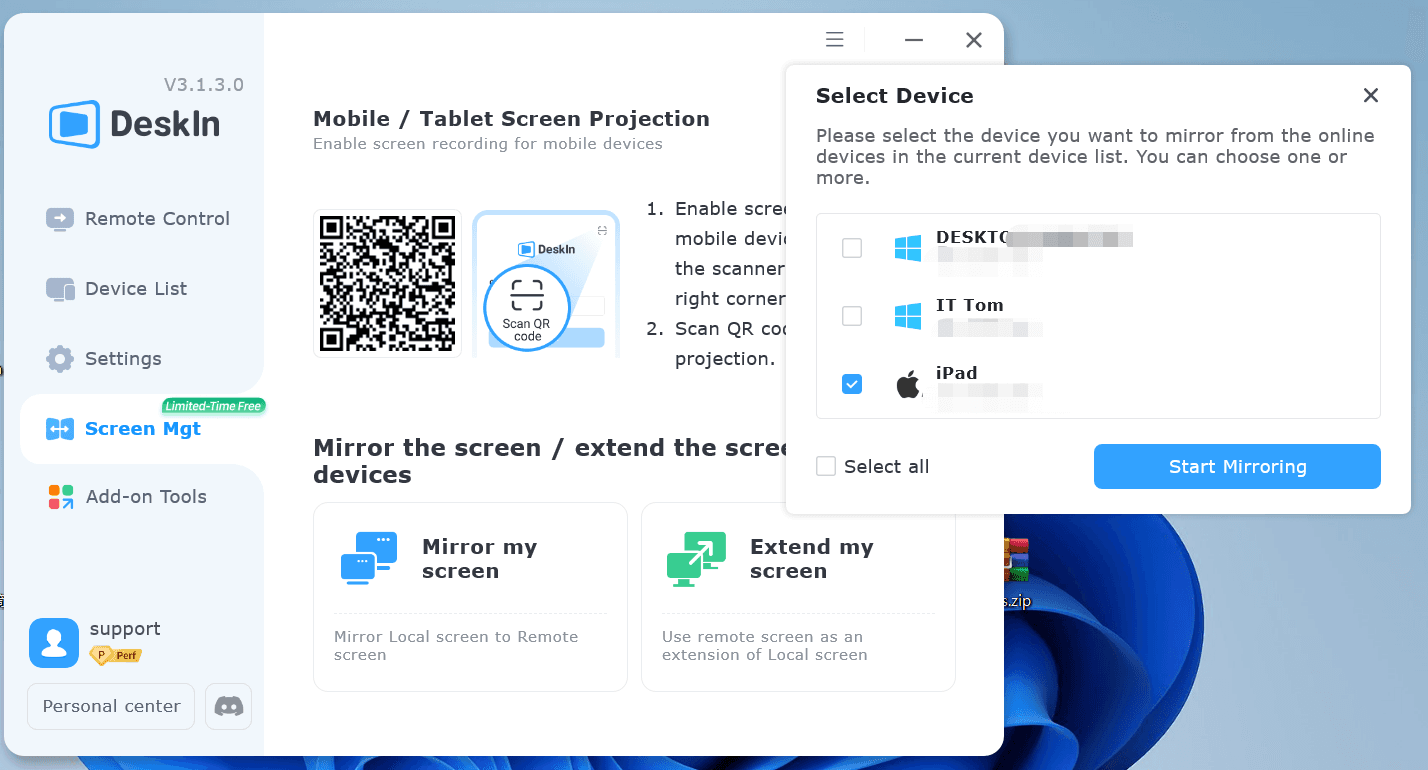
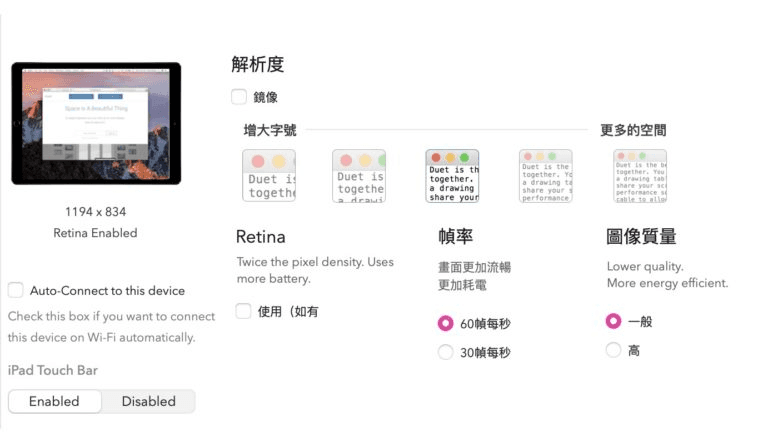
Step 4: You can find the device you are sharing your screen with in the「Device list」and adjust the resolution, frame rate, and other settings as needed.
Method 2: Use Windows Built-in Tool "Wireless Display" to Project Your Computer Screen
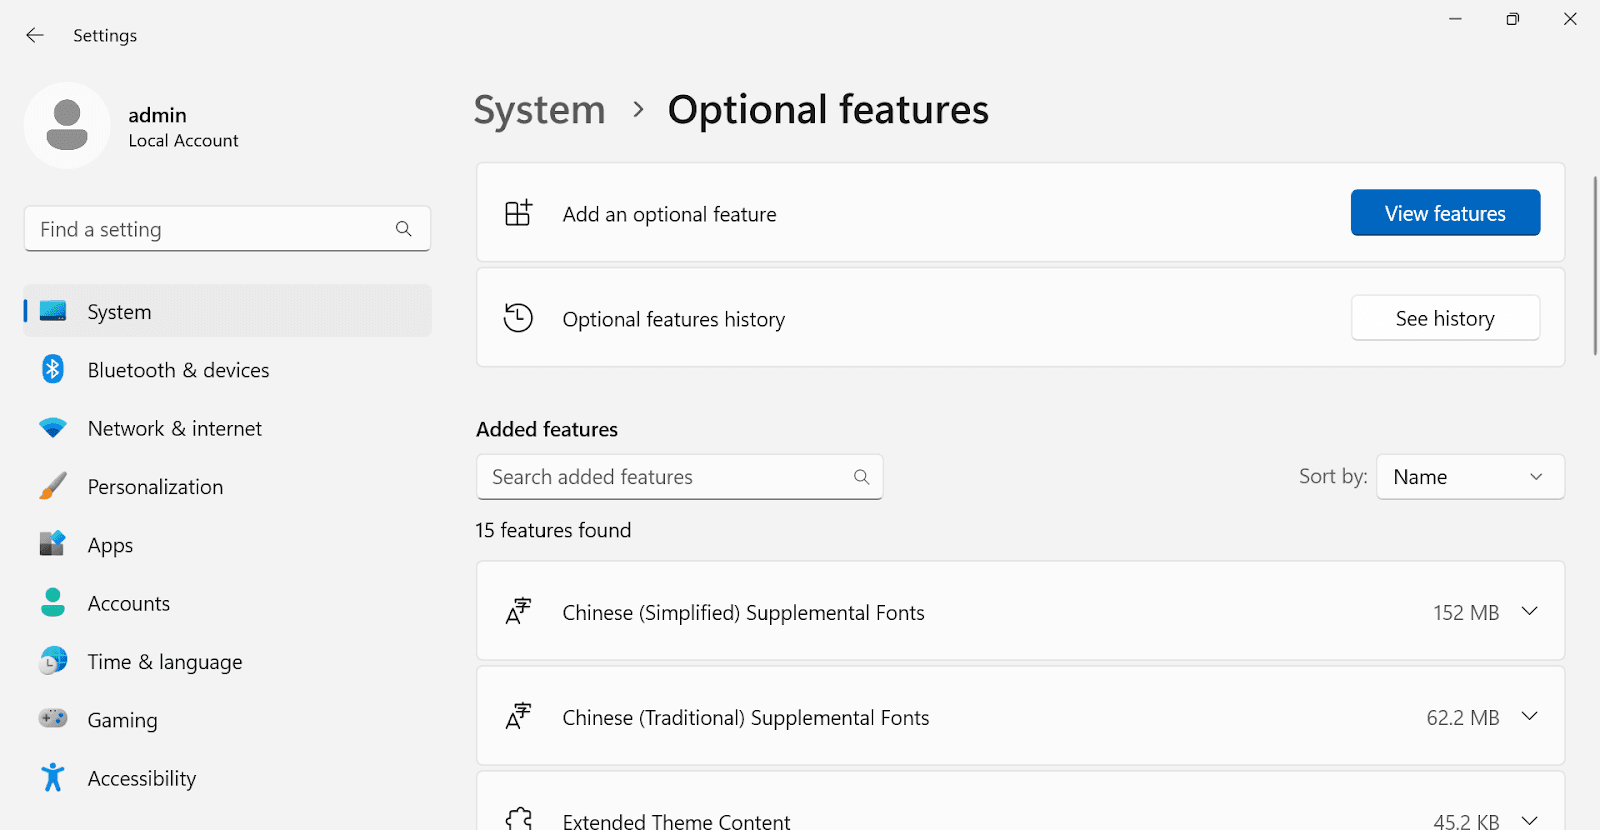
Step 1: On both the computer you want to share the screen from and the one you want to share it to select "Windows Start" >> "Settings" >> "System" >> "Optional Features".
Step 2: On the "Optional Features" page, click "View Features" next to "Add an optional feature.” Search for "Wireless Display," then click and install it.
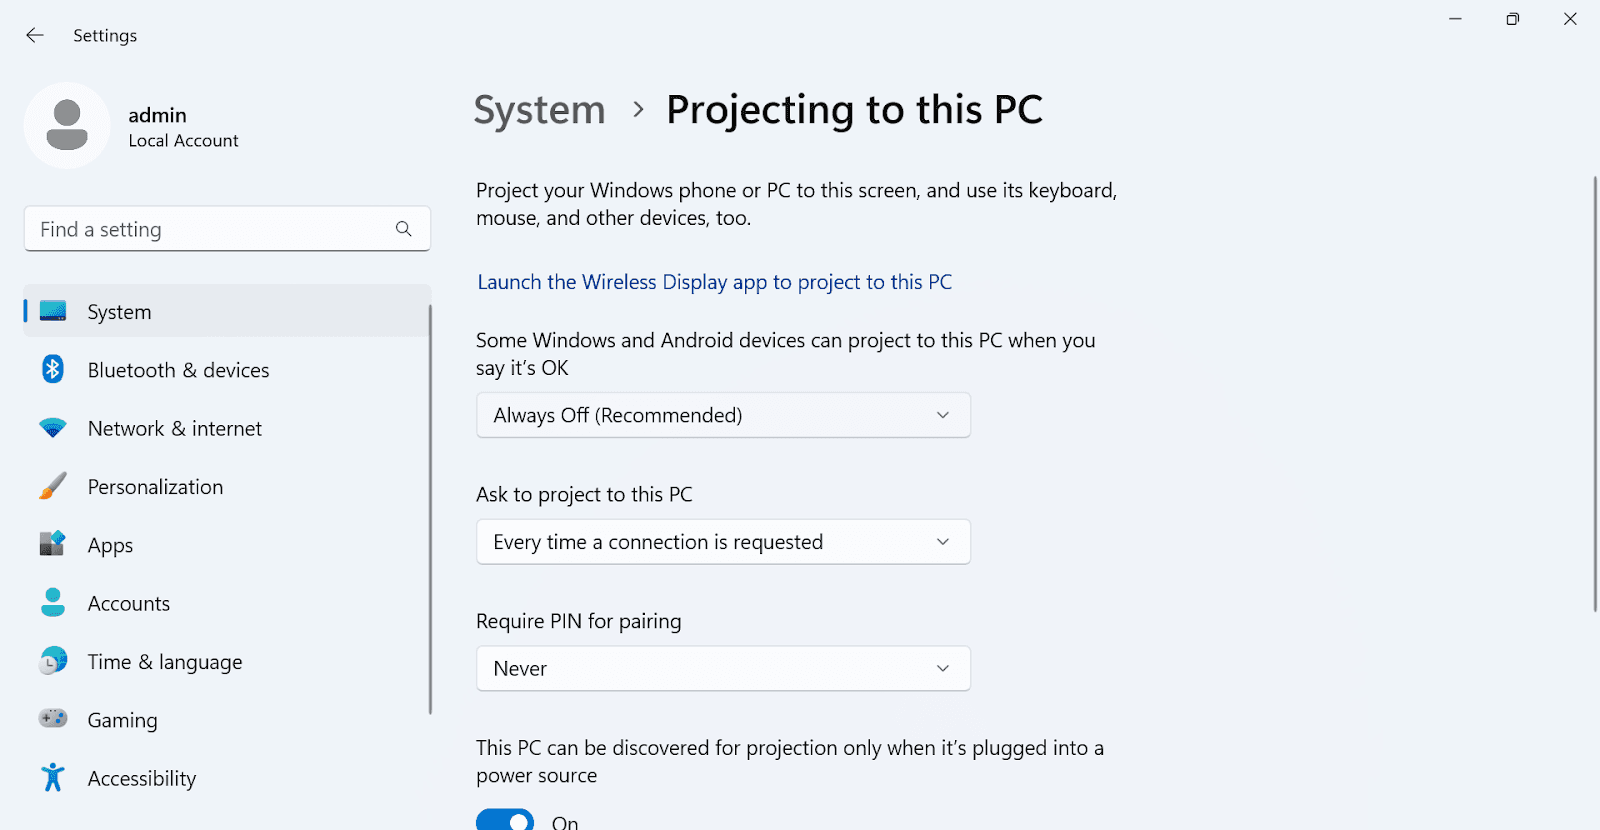
Step 3: Once installed, go back to "Settings" >> "System" >> "Projecting to this PC" to manage your projection preferences.
Step 4: On the computer you want to share the screen to, search for "Wireless Display" in the taskbar search box and launch the app. The device will now be discoverable and ready to receive projected content.

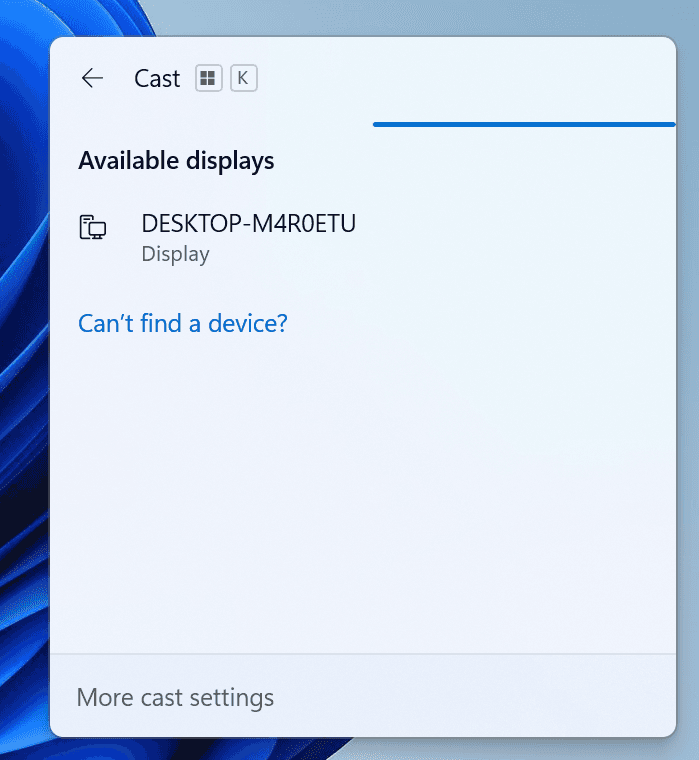
Step 5: Press "Windows+K" on the computer you want to share screen from, select the device you want to share screen to on the device list that pops up.
You can also project your computer screen to a Miracast-enabled TV, projector, or other type of external display.
Conclusion
This article introduced two simple methods for projecting and sharing your screen on Windows 10/11. While Method 2 uses built-in Windows tools, the setup process is relatively complicated and is only applicable to Windows systems or displays that support Miracast. If you want to project your Windows computer screen to any macOS, iOS, Android, or Windows device, we recommend using the remote software DeskIn. It is not restricted by the operating system and does not require devices to be on the same network, making it a versatile solution for all your projection needs.
PRODUCTIVITY
3 Ways To Send Large Files That Exceed Email Size Limits
We usually use email to transfer files, but most email services refuse to accept attachments that exceed a certain size—claiming this helps prevent malicious attacks and reduce risks. Therefore, when sending large files, you cannot rely on this common method. However, there are other equally easy ways to transfer large files. This article will introduce you to three of them.
Method 1: Compress the file before emailing
Email providers often have limits on the size of attachments that can be uploaded. For example, Gmail only allows attachments of 25MB or smaller, and Outlook only allows attachments of 20MB or smaller. To work around this, you can compress the large file to a size that meets the email attachment requirements.
Advantage: Compressing files is the simplest and most direct way to reduce file size to fit attachment limits, allowing you to transfer large files via email directly.
Limitation: File compression typically reduces the file size to only about half of its original size. As a result, this method is only suitable when the file exceeds the size limit by a small margin. Additionally, compressing and decompressing files may lead to data loss or damage. For instance, the quality of videos or images may deteriorate.
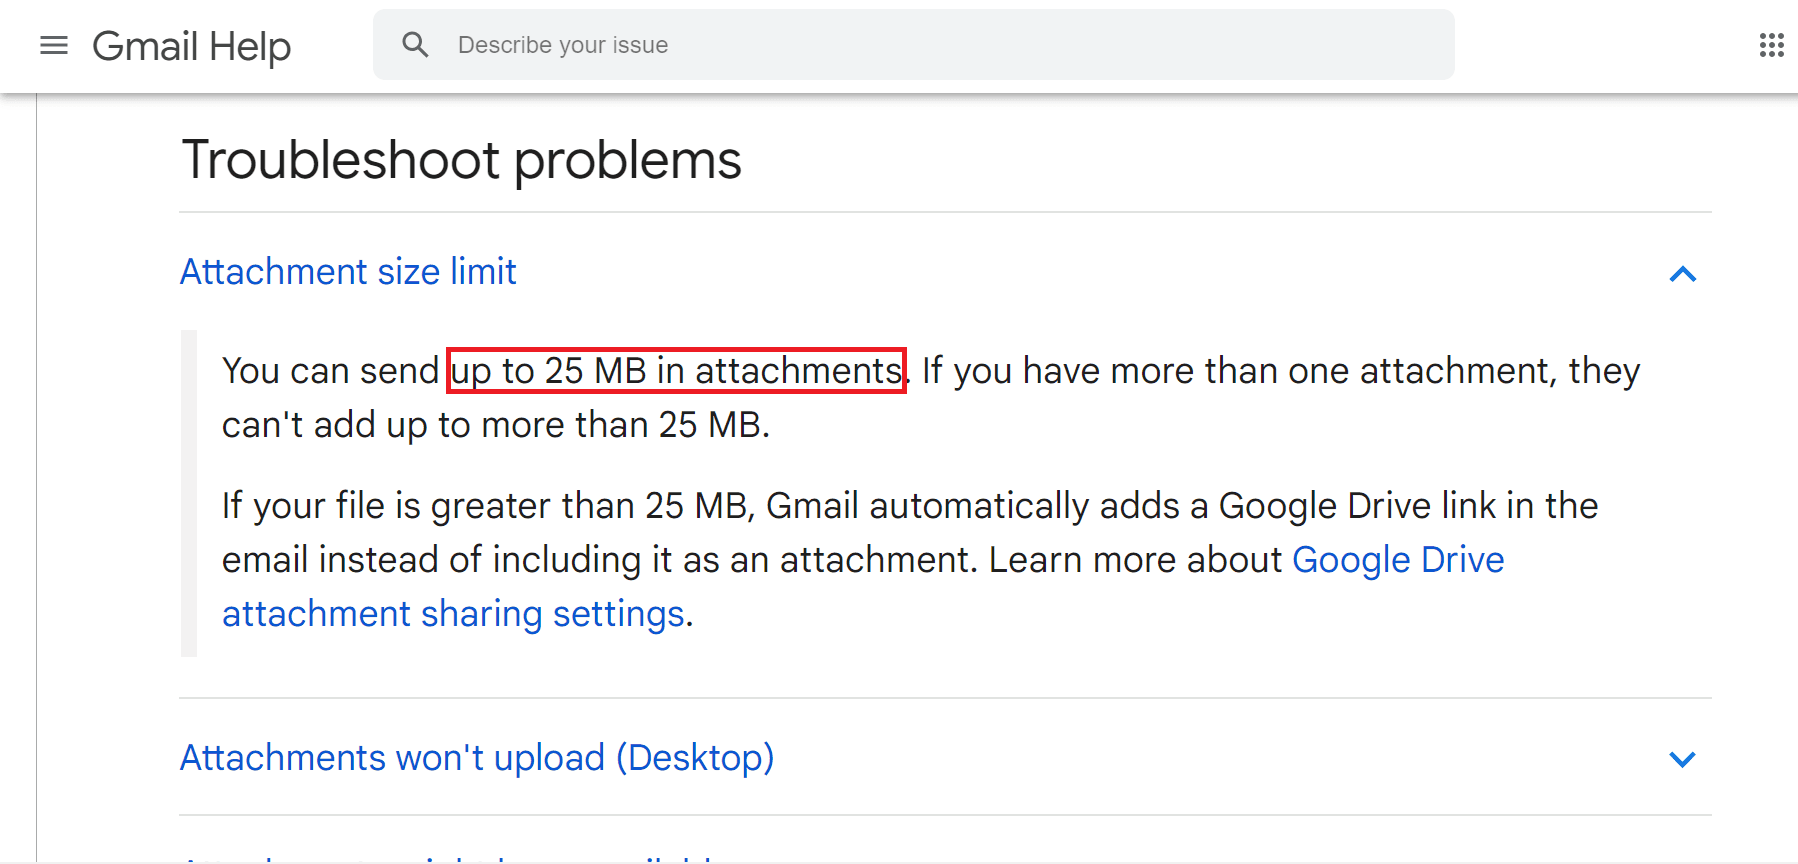
Gmail only allows attachments under 25MB
Method 2: Use a cloud drive to transfer files
In addition to sending via email, there are other ways to send large files, such as using Cloud Drive.
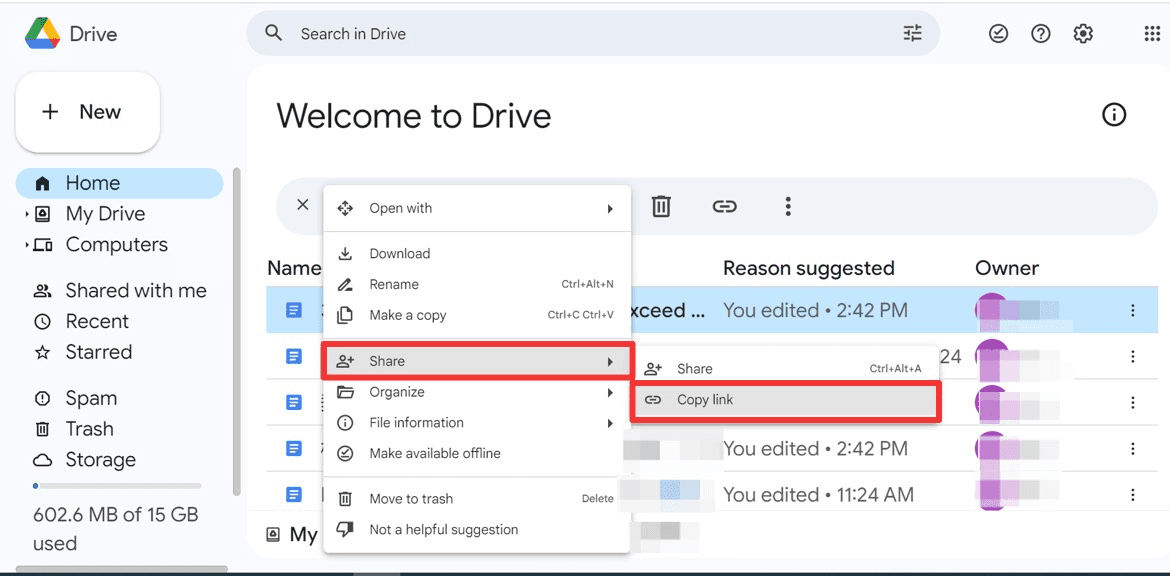
Upload large files to a cloud drive (such as Google Drive), then you can send them to the other party by sharing a link.
Advantage: This method ensures better file quality and allows you to send much larger files compared to email attachments. Additionally, the files are saved in the cloud and can be accessed at any time.
Limitation:1. The free storage space on Google Drive is limited to 15GB. Other cloud drives also have similar free storage limits, so you may need to purchase additional storage space if required.
2.Since the file must first be uploaded to the cloud and then downloaded by the recipient, the transfer time depends on your network conditions. This process may take longer than traditional methods.
Method 3: Use DeskIn remote desktop software to transfer files (Most recommended)
Currently, most remote software on the market supports file transfer. DeskIn has enhanced the standard file transfer functionality to provide an even better experience:
1. The free version already supports file transfer with no limit on size and quantity;
2. Fast transmission speed, up to 12MB/s;
3. Ensure your files remain confidential and protected from unauthorized access using 256-bit end-to-end encryption;
4. There is no need to upload or download files like a cloud drive. You can directly transfer files from one device to another, time-saving;
5.DeskIn supports seamless file transfer between different devices and operating systems. Whether you are using a Windows PC, Mac or mobile device, DeskIn allows you to easily transfer files across platforms.
There are also security risks when using email to transfer files. Even if you enter just one wrong character, your email may be sent to another person and cannot be withdrawn, which may easily lead to information leakage. While using DeskIn, you need to match the device ID and password, or manual passwordless verification from the other party's computer, which avoids transferring to the wrong object.
How to use DeskIn for file transfer?
1.Download DeskIn respectively on the transmitting device and the target transmitting device, register a free account and log in separately. If you are logging in on a new device for the first time, you need to go to the registration email to complete verification.
2. After successful login, enter the device code of the device to be transferred, select file transfer, and then select Connection. You can choose a password or manual passwordless verification method.
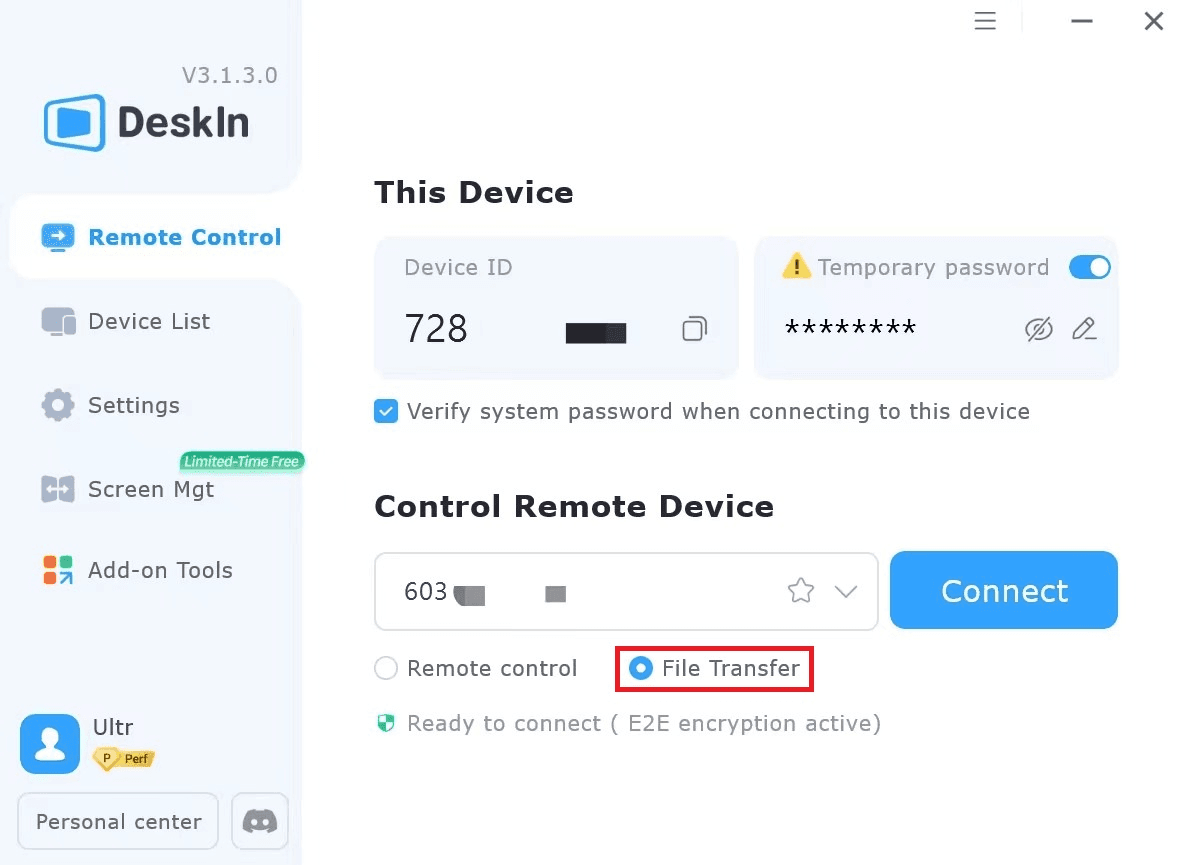
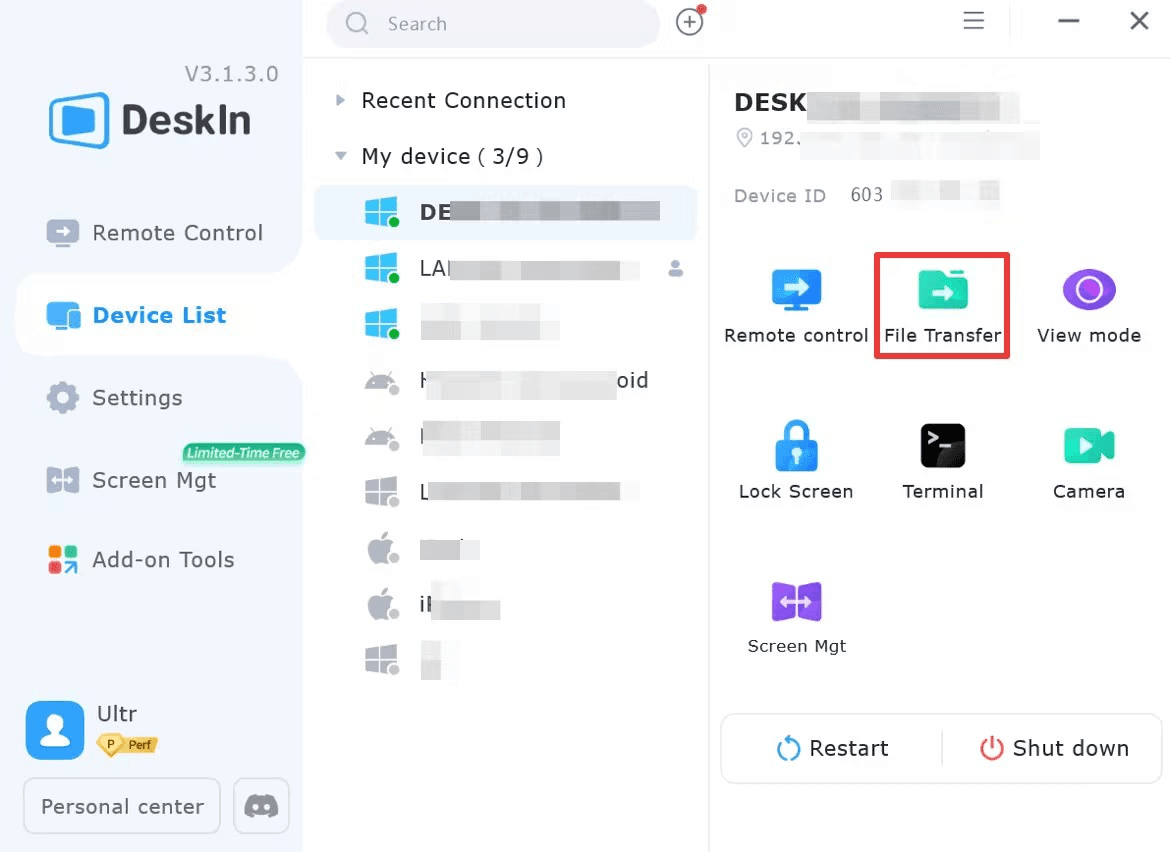
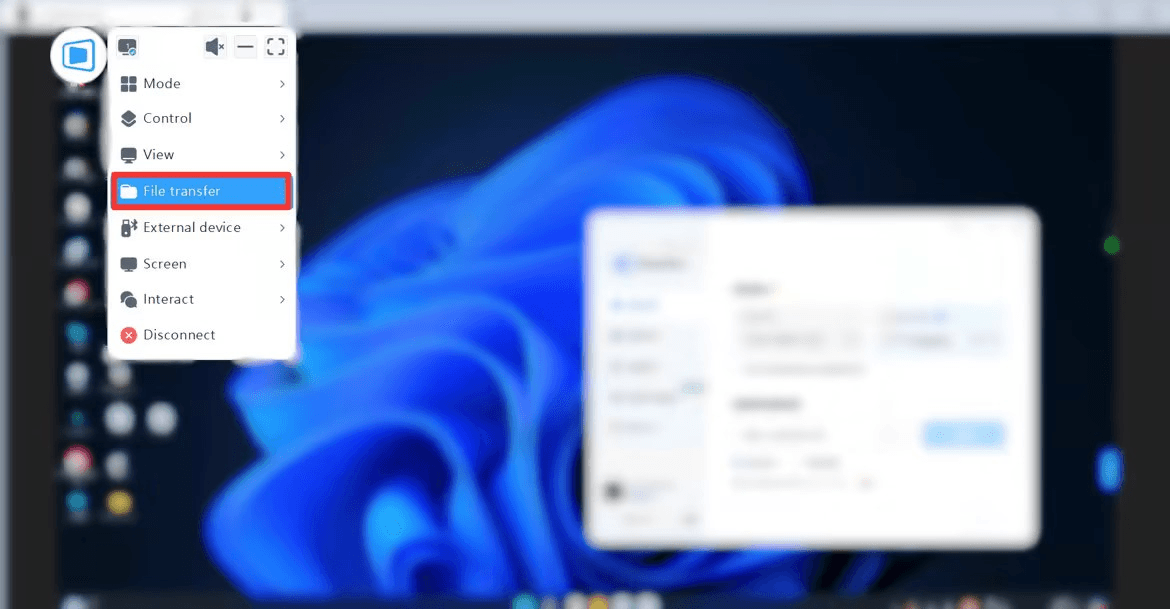
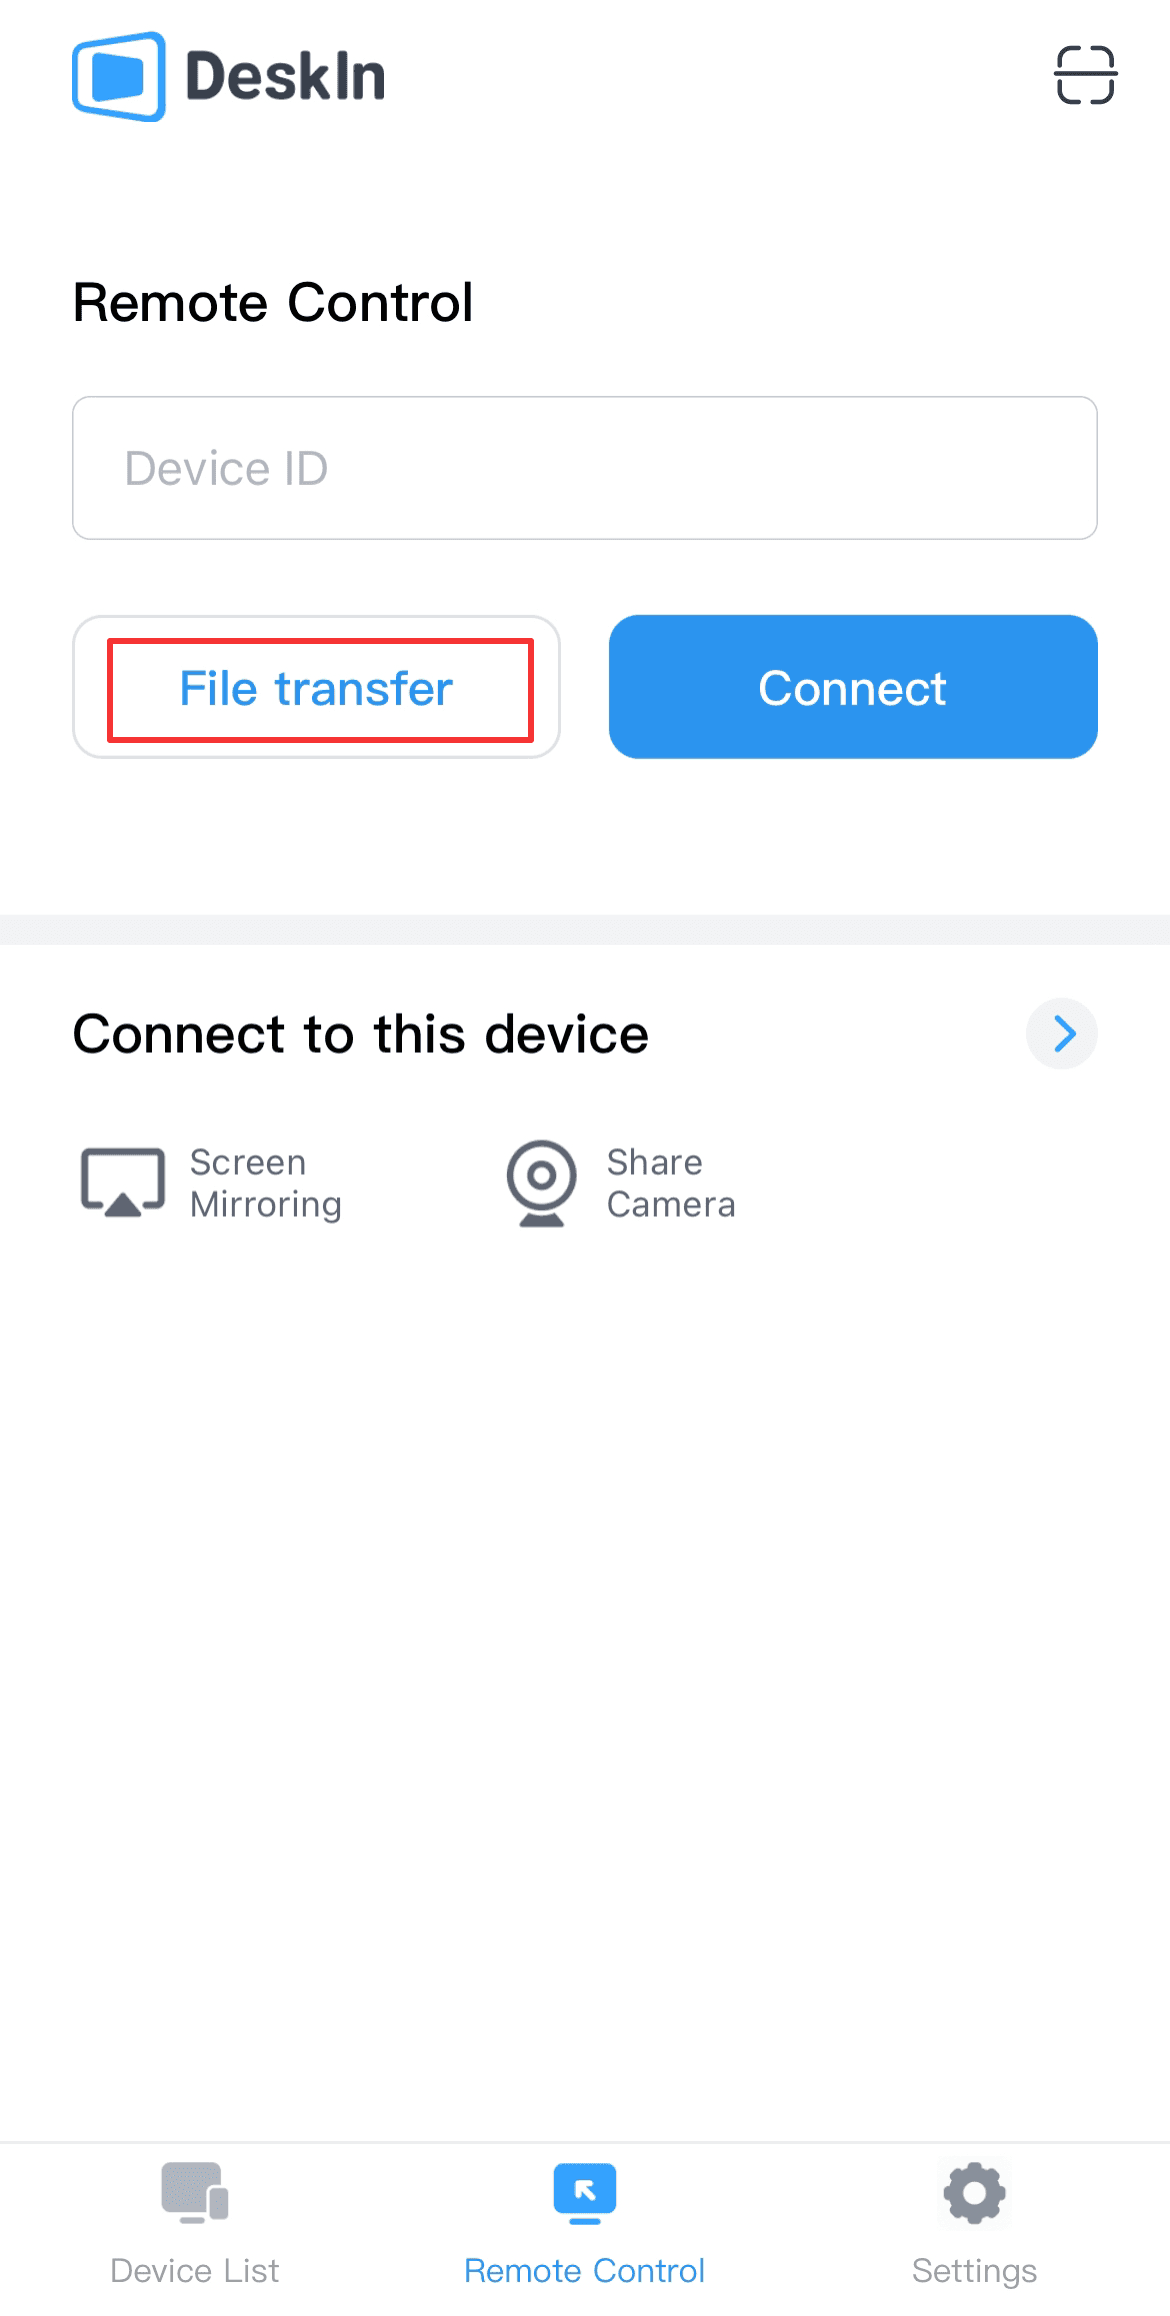
3.Three ways to find “File Transfer” on PC:
(1) In "Remote Control">>”Control Remote Device”>>Select "File Transfer">>"Connect".
(2) Find the device to which you want to transfer files in the "Device List" and select "File Transfer" in the right functional area.
(3) Find "File Transfer" in the toolbar of the DeskIn icon on the remote control page.
After finding "File Transfer", click to connect with password or manual verification. After the connection is successful, the file transfer page will appear.

In the file transfer page, click on the file you want to send, select the destination location for the transfer, and click the "Send" button on the sender to complete the transfer.
You can click “Send” or you can directly drag and drop the files that need to be transferred to complete the transfer.
4.Three ways to find "File Transfer" on mobile devices:
(1) "Remote Control" >> Remote control Device ID >> Select "File Transfer".
(2) Find the device to which you want to transfer files in the "Device List", click to enter and select "File transfer".
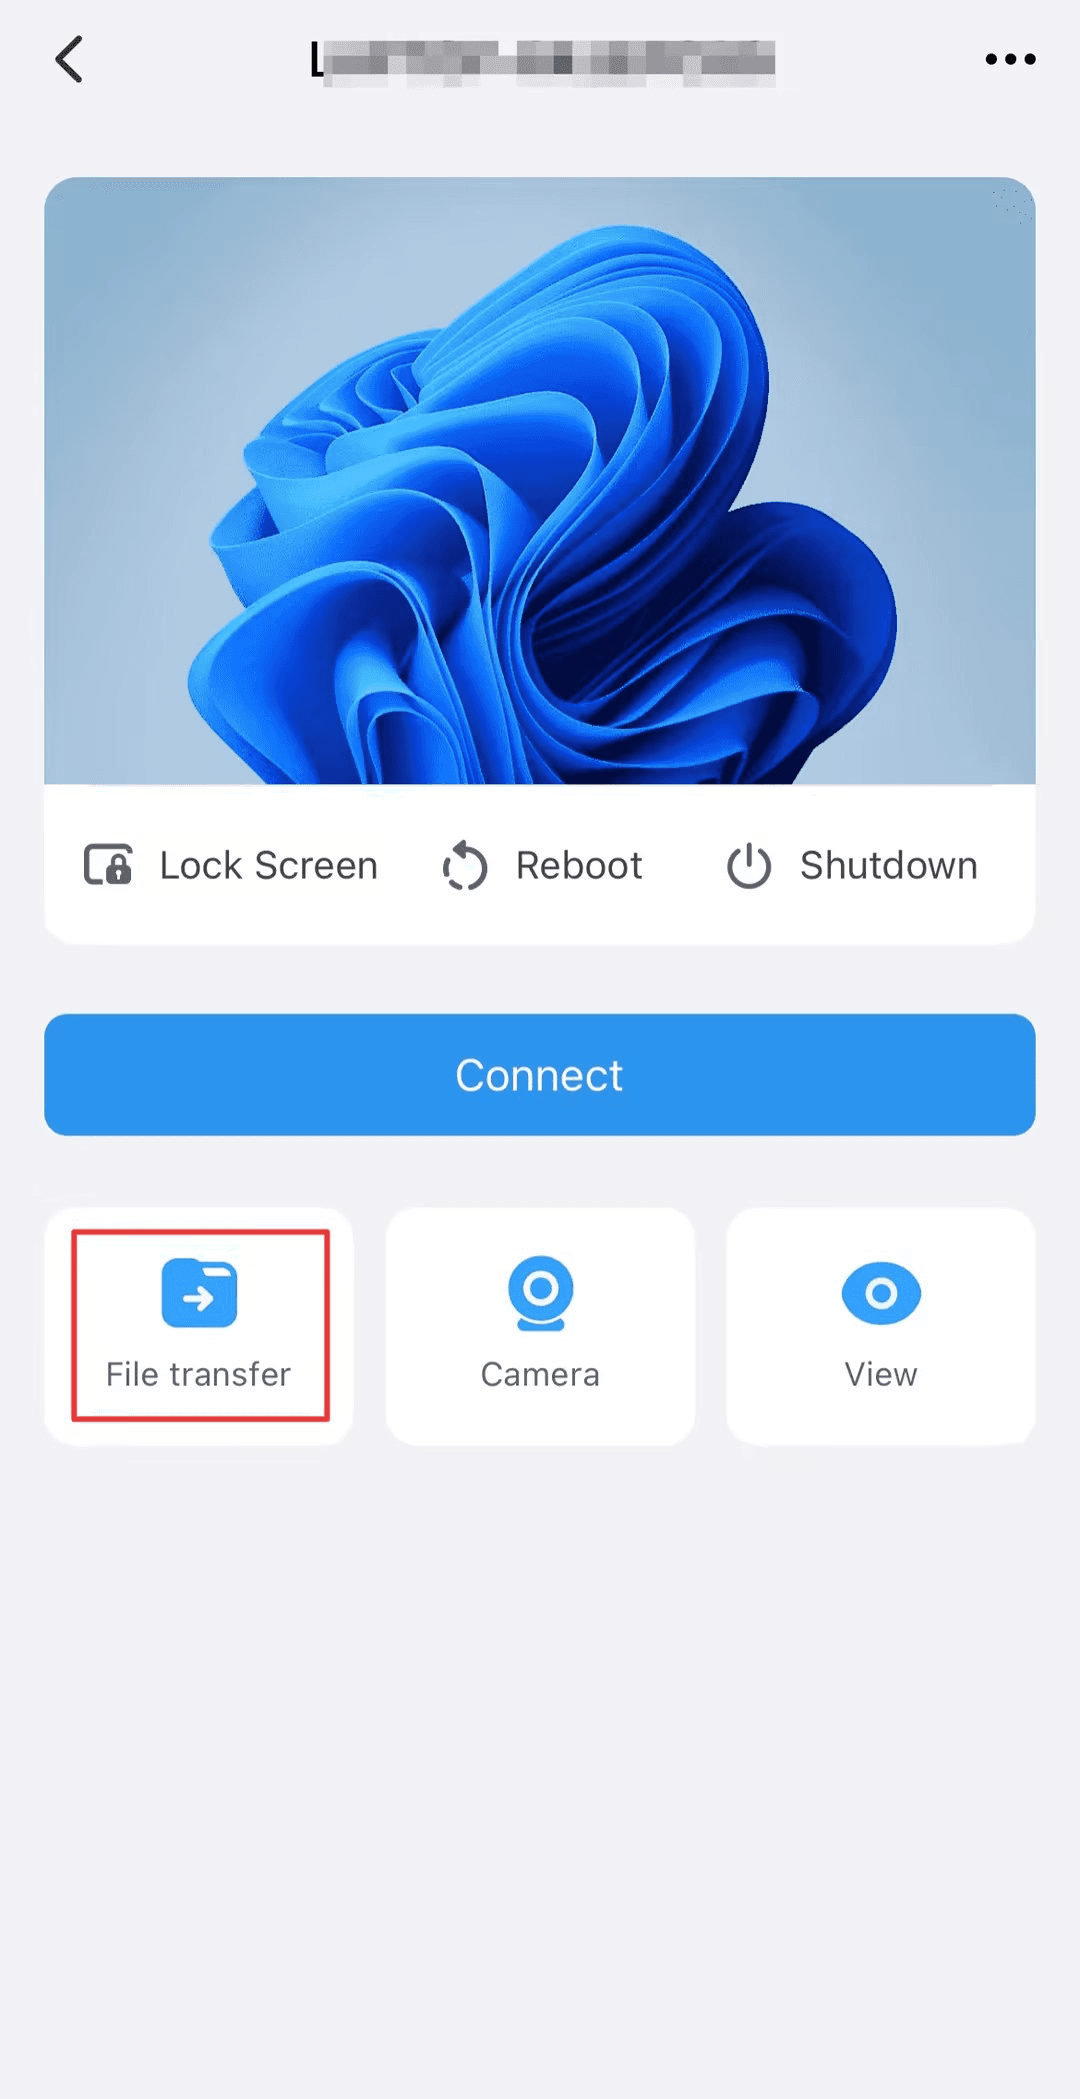
(3) After the remote control connection is successful, go to "Interact" >> "File transfer".

After finding "File Transfer", click to connect with password or manual verification. After the connection is successful, the file transfer page will appear.
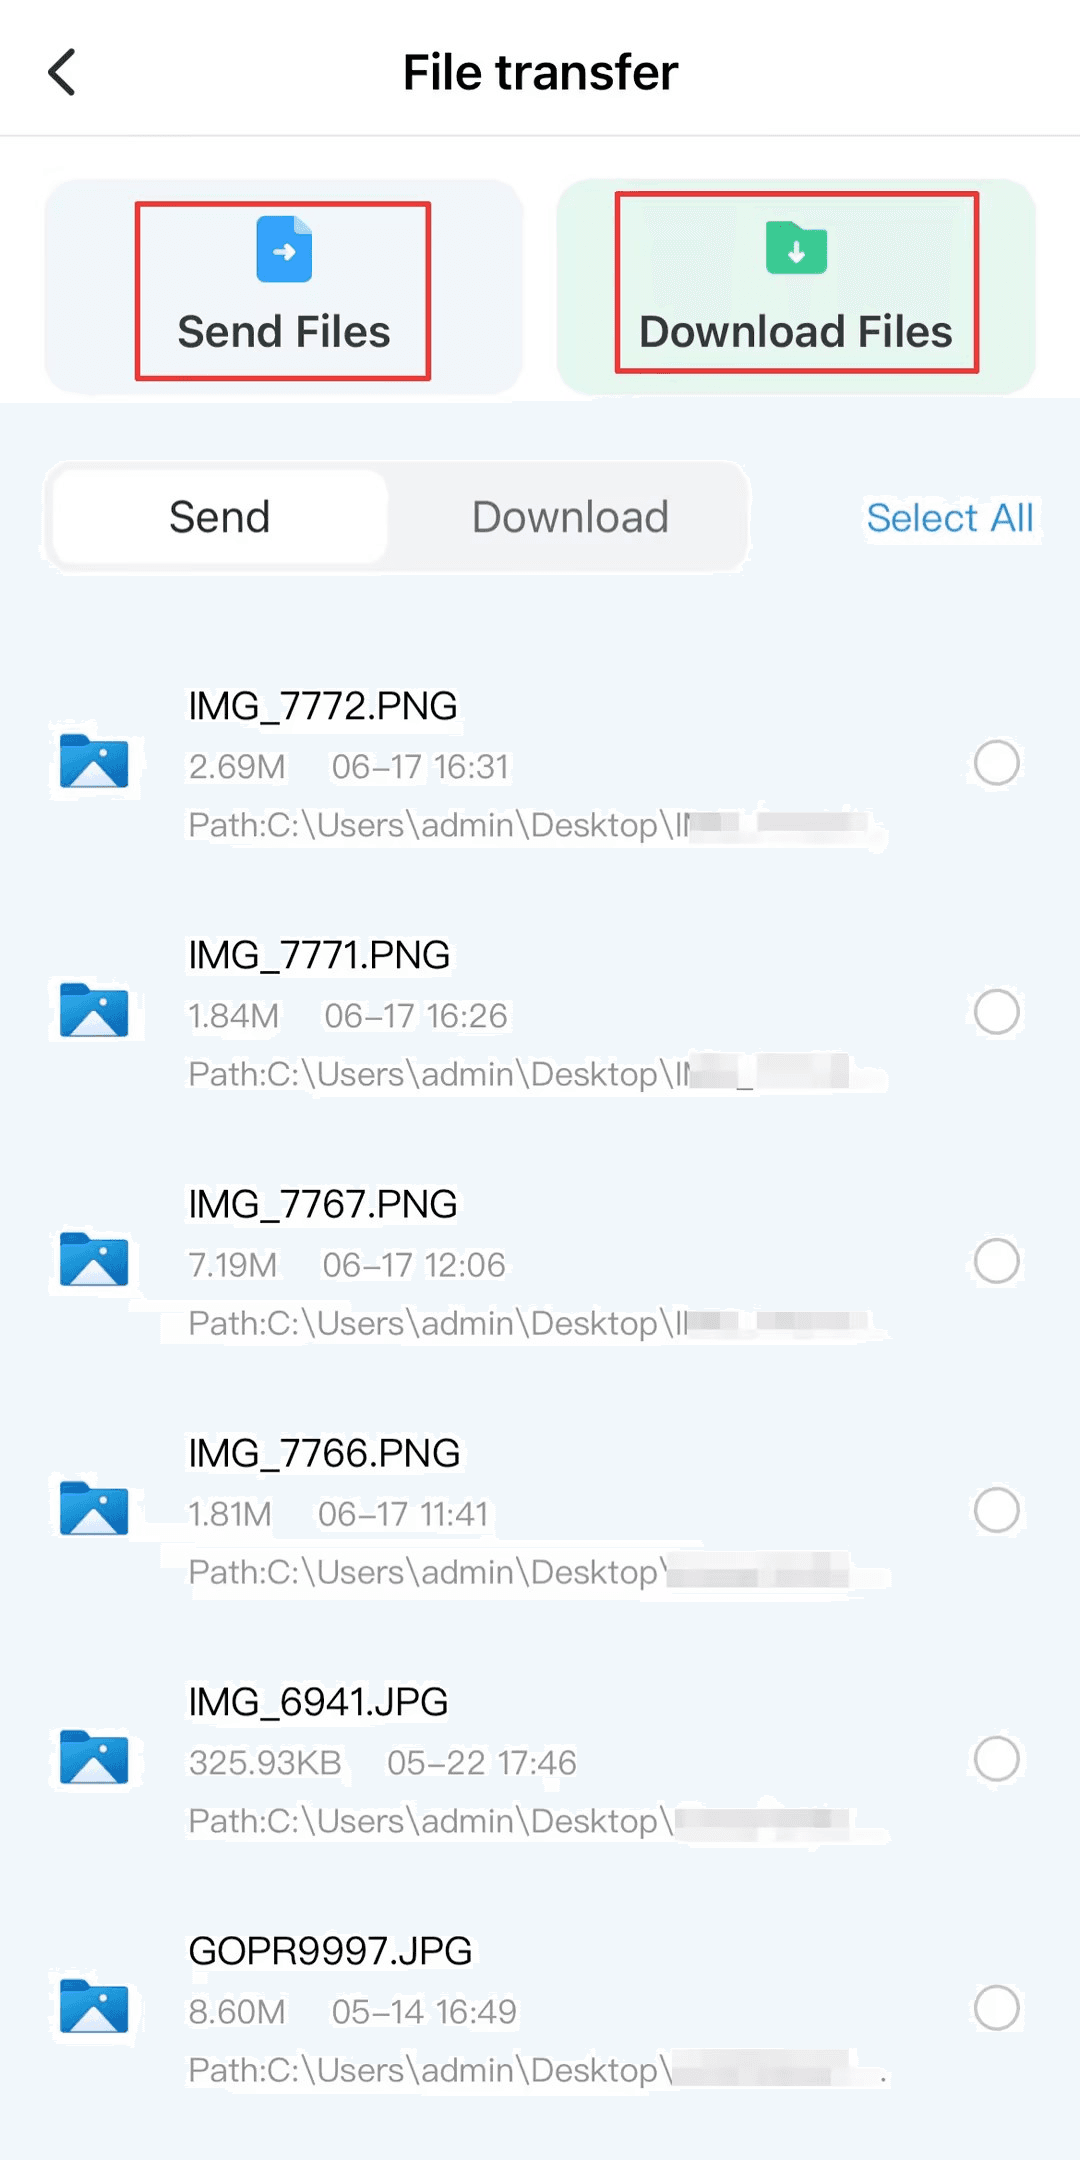
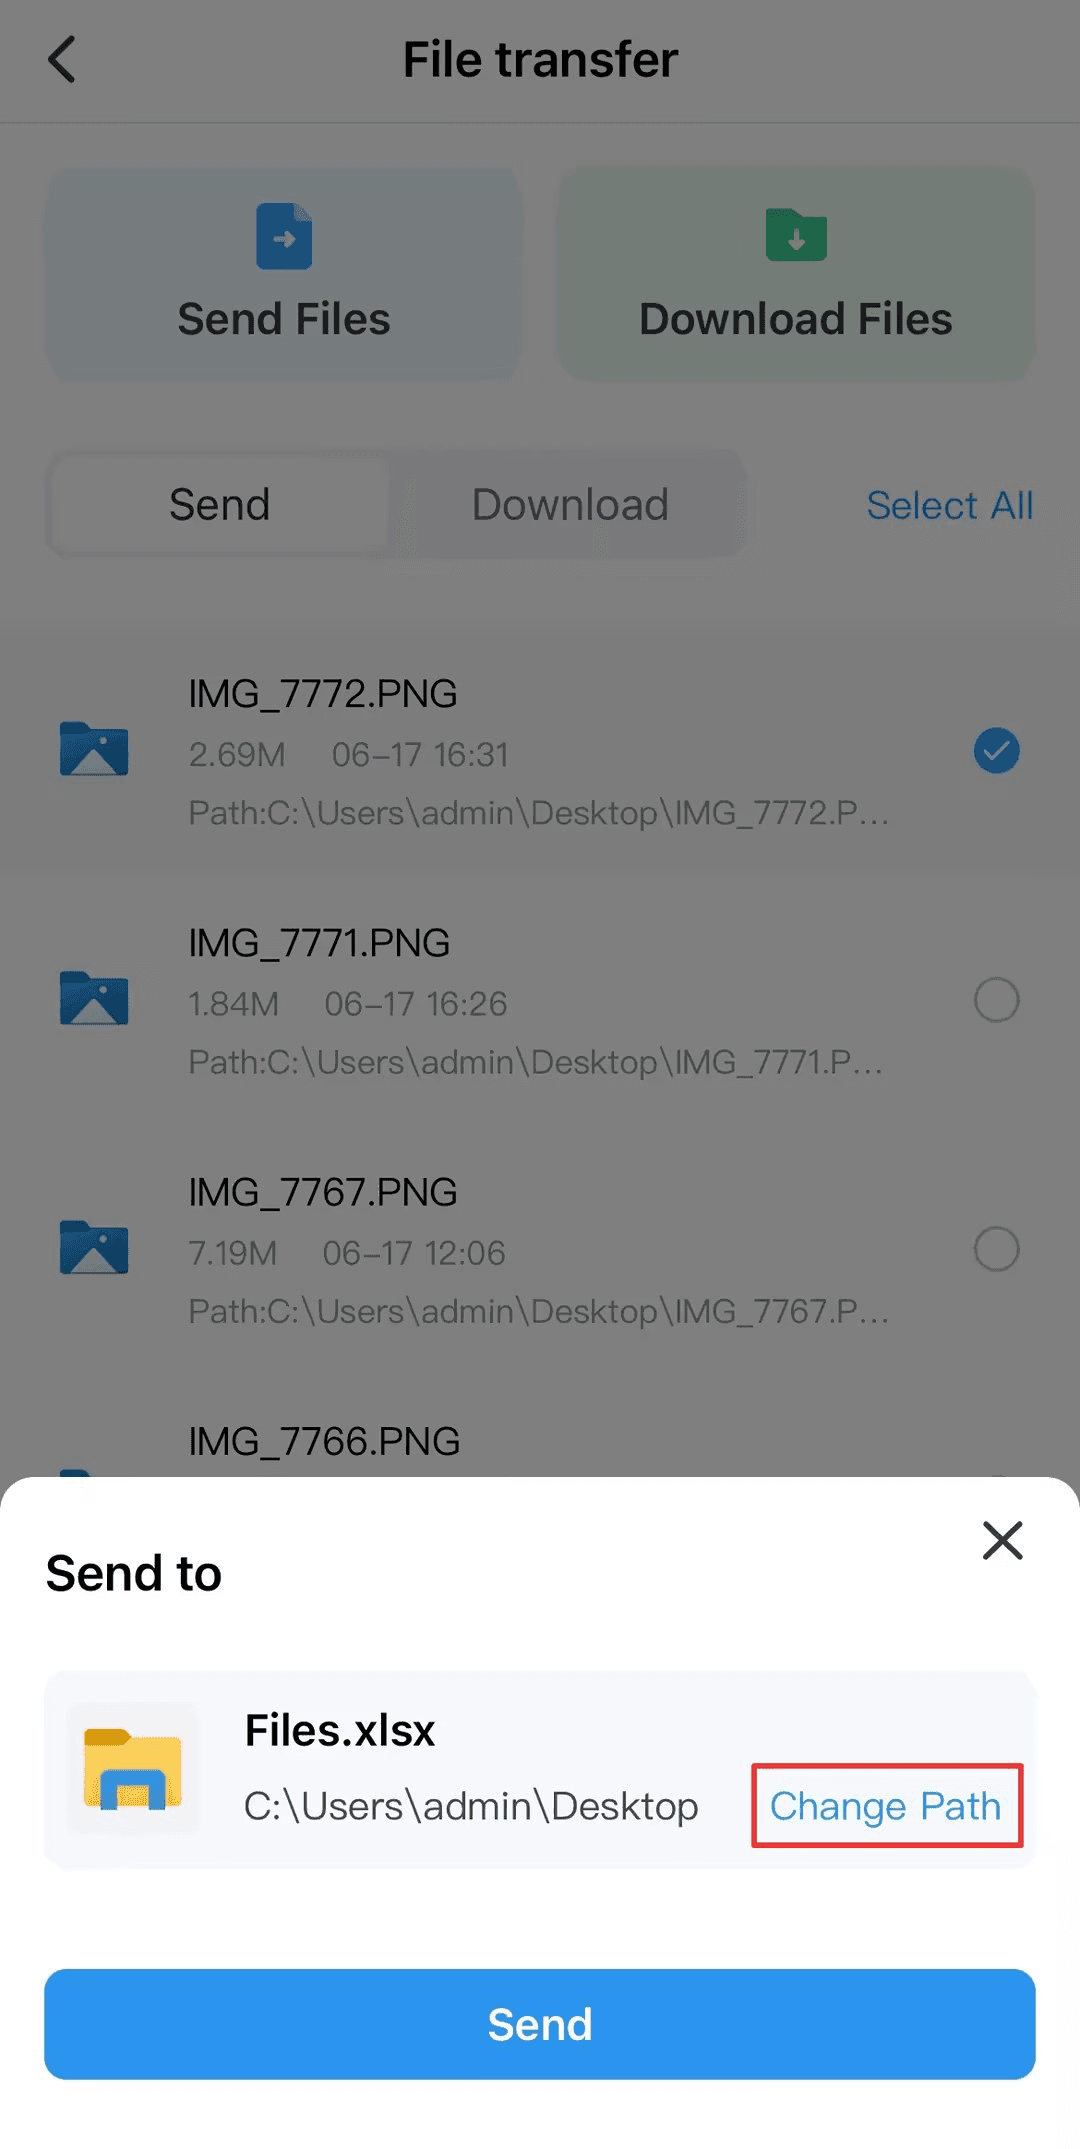
Click "Send Files", select the file on your mobile device, "Change Path" to select the destination location for transfer, and finally click "Send".
Select "Download Files" to download files from the remote device. Select the file you want to download and click "Download".
Conclusion
This article introduces 3 methods of transferring large files and analyzes their advantages and limitations. It is recommended that you use the third method - use DeskIn to transfer files. It's free and it supports cross-platform transfers with no limits on file size and quantity, high transfer speeds, and you don't have to sacrifice file quality. This is the ideal choice for transmitting large files, you should definitely give it a try.

PRODUCTIVITY
3 Ways To Wirelessly Mirror iPhone Screen To TV
Wanna project movies or games on your iPhone to the TV at a party? Do you want to share the files on your mobile phone onto the big screen when doing a presentation? This article will introduce three methods of wirelessly projecting iPhone screen to TV. Check it out!
Method 1: Mirror iPhone to TV via Airplay
AirPlay is a built-in function of Apple devices, which allows you to project the screen of your iPhone to TV easily. Make sure your iPhone and TV are connected to the same Wi-Fi network and follow the steps below:
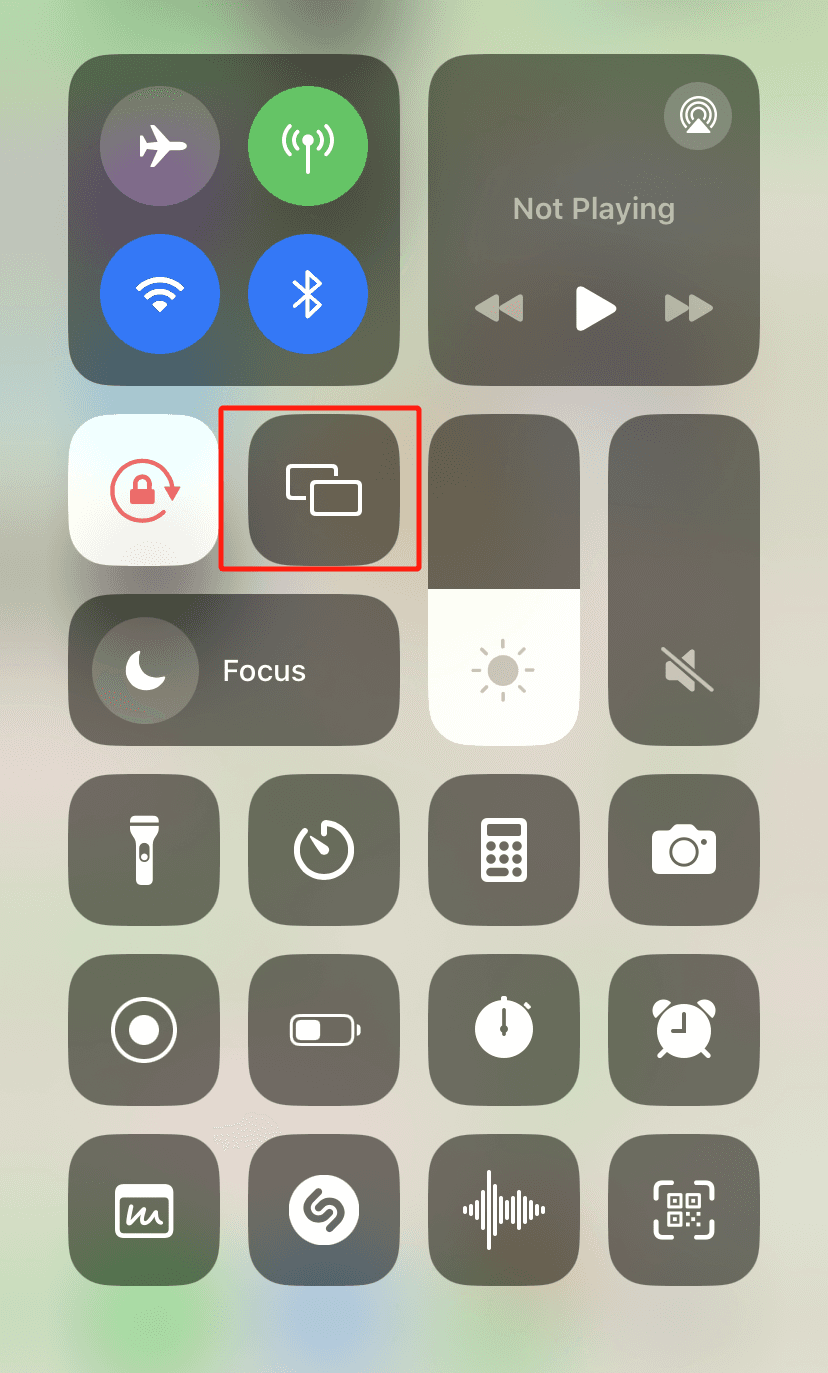
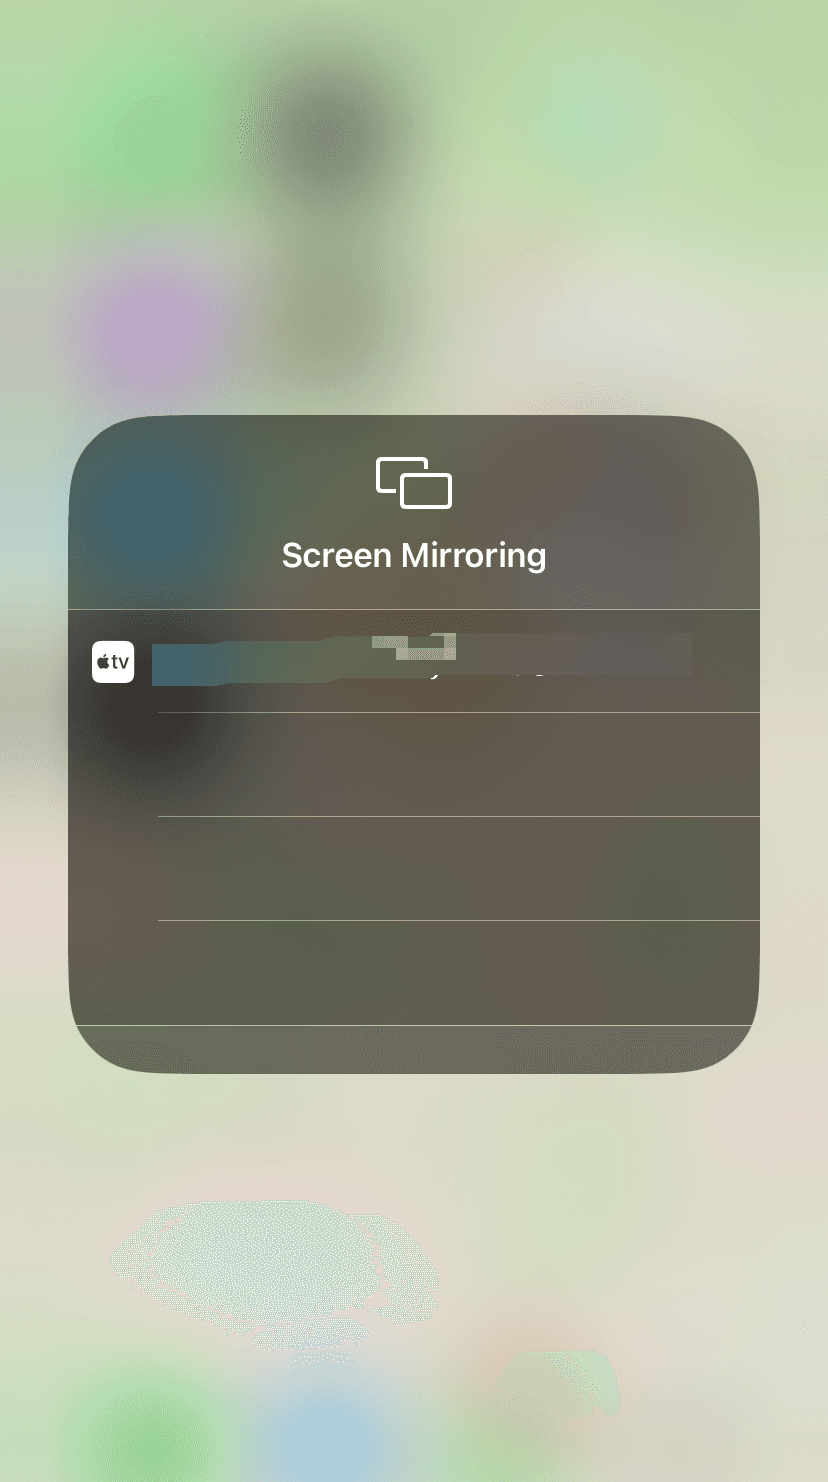
Go to Control Center: Swipe down from the top of the iPhone screen to open the Control Center.
Press Airplay icon: In the Control Center, find and press the Airplay icon.
Connect to TV: In the device list pops up, select your smart TV to connect.
Once the connection is successful, the screen of the iPhone will be projected onto the TV screen immediately.
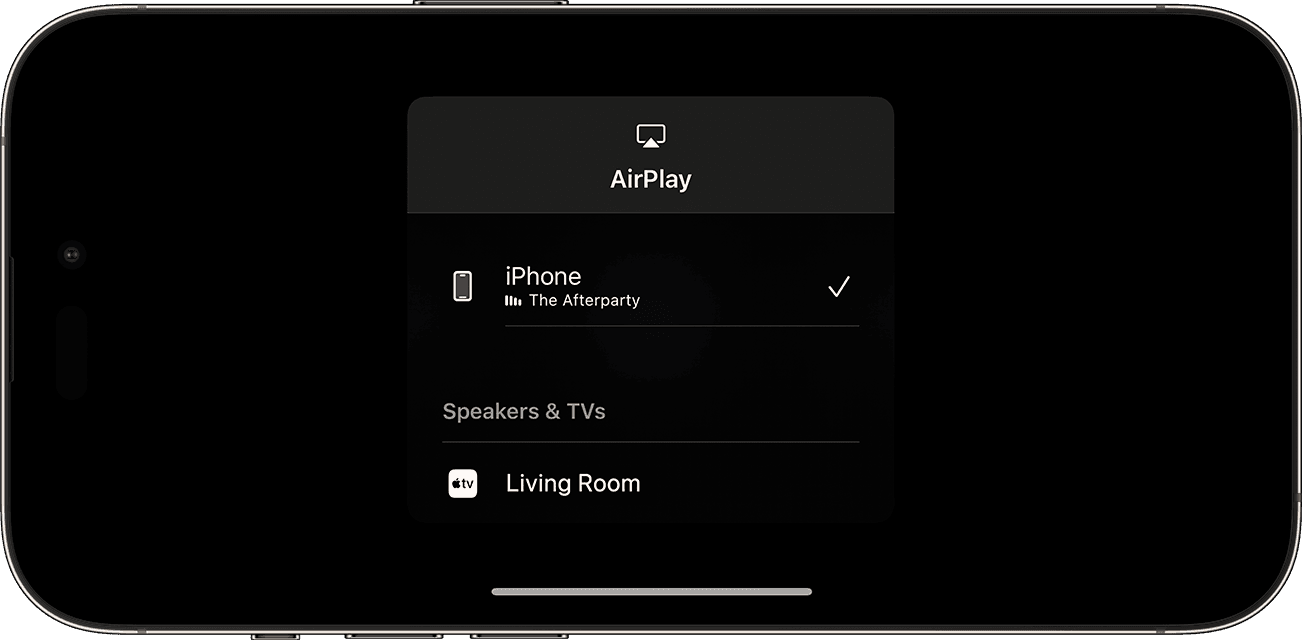
If you only want to project a video, you need to first open the video you want to project on your iPhone and find the same"AirPlay" button (some programs require you to click the "Share" button first) and select the TV to be projected. In this case, the video will only be projected to the TV, which will not affect the normal use of the phone, and there is no need to worry about the phone notifications being seen.
Method 2: Use third-party screen casting software
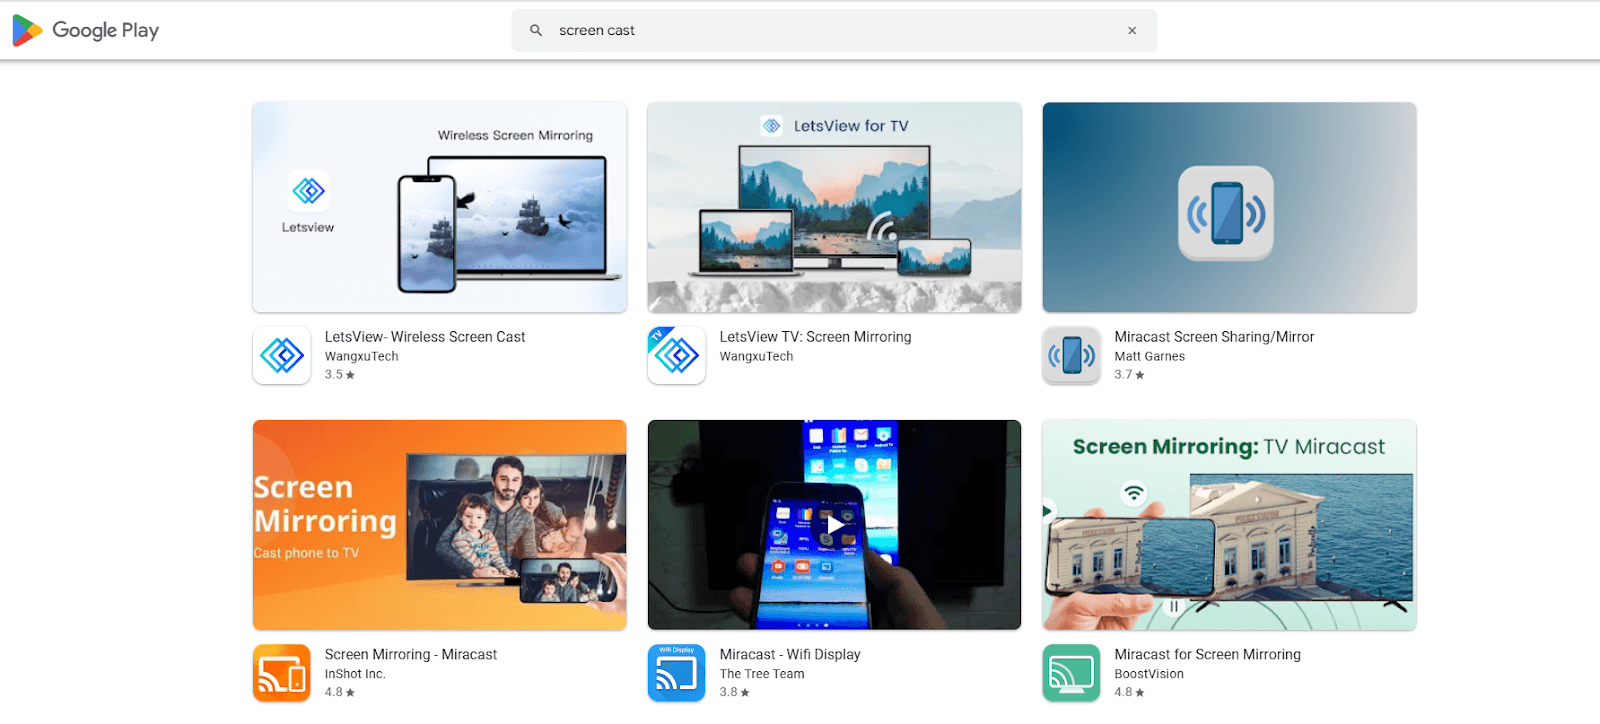
If your Smart TVs do not support AirPlay, you can use third-party screen casting softwares like LetsView, Miracast ect. Some projection software even supports controlling the video playback with the iPhone. However, the free version may have low resolution, and you can pay for advanced features.
Method 3: Use the projection function of the streaming app
When you are watching a movie or tv-series on YouTube, Disney+ etc., you can directly use the built-in mirroring function of the software to project the iPhone screen to TV.
Step by step guide:
Open the streaming app: Open the show you want to watch.
Find the mirroring button: Find the TV-like "Mirroring" icon on the video playback interface and click in.
Choose your TV device: Select your smart TV on the pop-up device list that you want to connect to. After the connection is successful, the video will be automatically cast to the TV for playback.
High definition mirroring tool——DeskIn
DeskIn is a free remote software designed for individual users, supporting wireless screen mirroring between any mobile phone, computer, and tablet device. It supports up to 2K screen mirroring definition and is very easy to use.
High features of DeskIn:
System Compatibility: DeskIn allows seamless connection and screen mirroring between iOS, Android, Windows and Mac systems.
High definition: Supports up to 2K projection, the image quality is high and lossless.
Flexible: Your iPhone and TV don't need to be in the same network to mirror the screen.
Feature-rich: Supports adjusting frame rate, resolution and scale. In addition to the screen mirroring function, it also supports file transfer, audio call, and remote connection. One app fits all needs!
How to use DeskIn to project iPhone screen?
First install DeskIn on your iPhone and computer respectively, register a free account and log in. If you are logging in on a new device for the first time, you need email verification to keep your account safe.
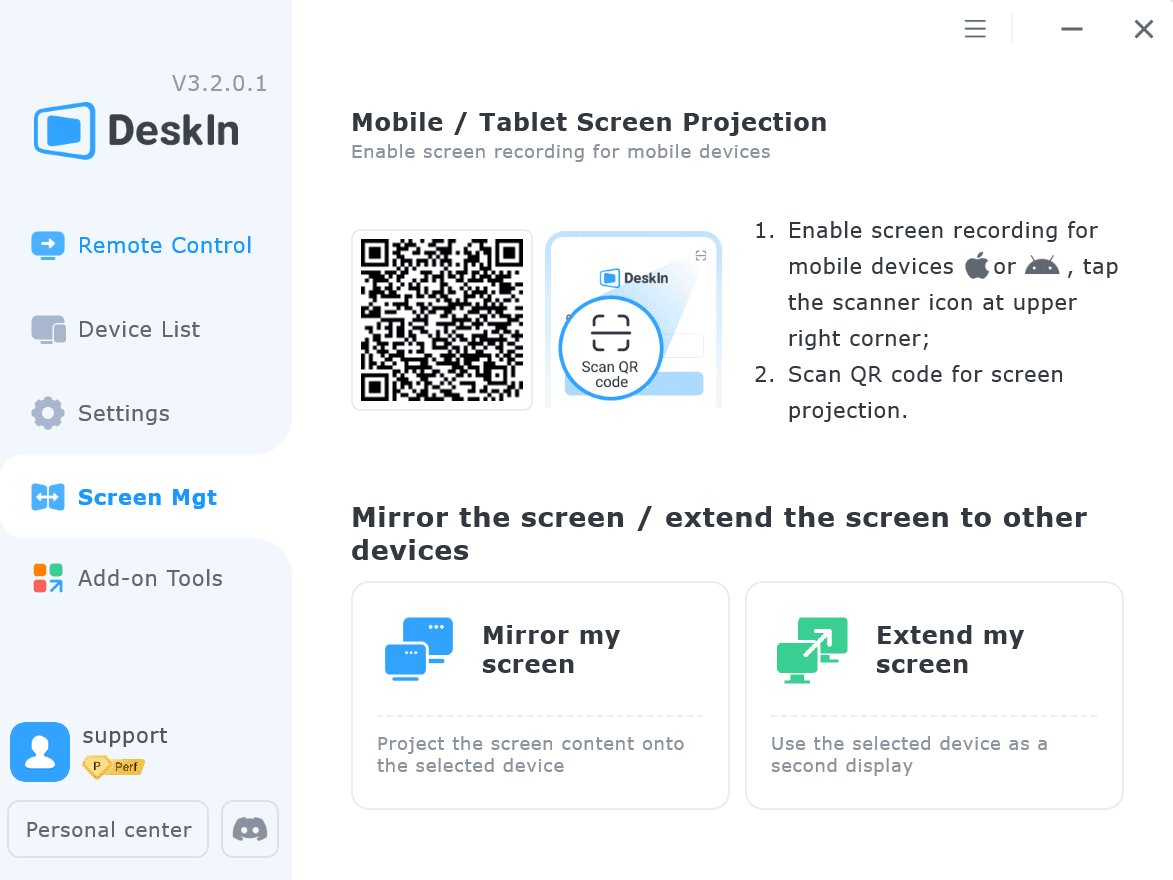
Scan the QR code to cast the screen
Log in to the mobile DeskIn, click on the upper right corner of the main interface, and scan the QR code on desktop DeskIn>> Screen Mgt
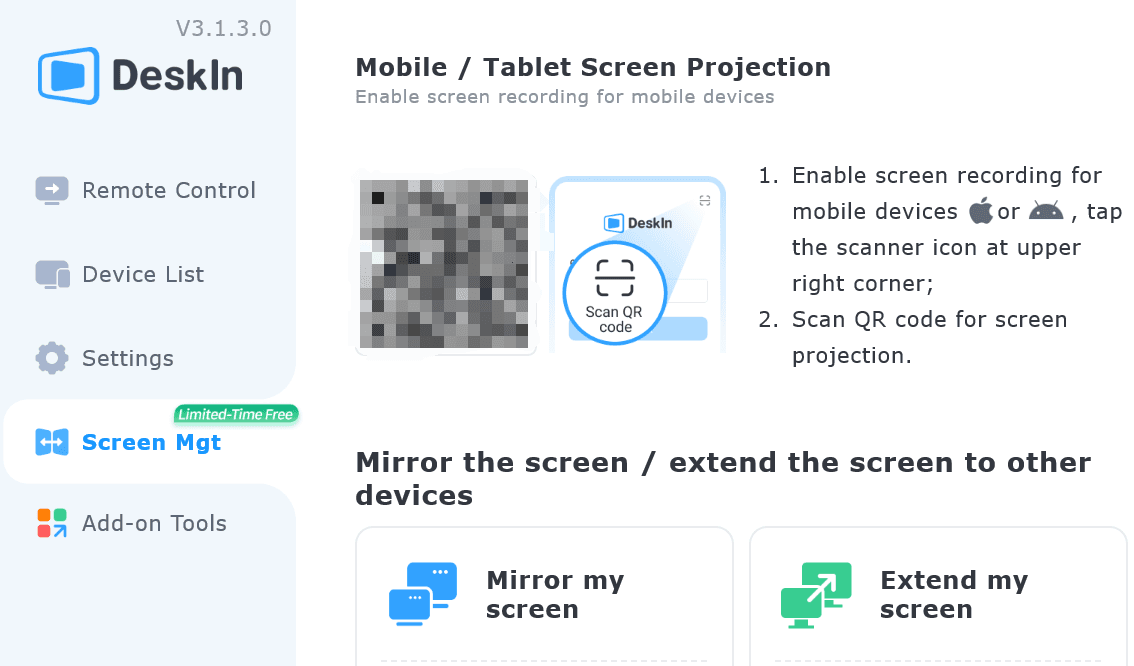
Click to start the live broadcast on your mobile phone, and you will be able to cast the screen in a few seconds.
Conclusions:
This article introduces 3 ways to project iPhone screen to TV: use Airplay, use third-party screen casting software, and use the projection function of the streaming app. If you are looking for a screen mirroring tool that allows you to cast screen between iPhone, android phone, computer and tablet, you can also try high definition screen casting software DeskIn.

PRODUCTIVITY
4 Best Parental Control App 2025. What Should Pay Attention To When Using.
More and more kids have their own smartpgones. While bringing more communication convenience, it also exposes them to more dangers. Out of concern for their children's safety and excessive phone usage time, some parents use parental control app software to monitor their kid’s phone. What should parents pay attention to when using their app? This article gives you 4 tips and introduces 4 best parental control apps. Check it out.
Why Should Parents Monitor Their Children's Phones?
1. Manage phone usage time
Children may be addicted to games, short videos, social media, and use mobile phones uncontrollably. At this time, by monitoring their children's mobile phone usage time and managing app usage time, parents can guide their children to live a healthier, more time-managed life.
2. Detect harmful messages and programs
Children may not be able to distinguish toxic and harmful information on the Internet at their young age.Regularly checking your children’s mobile text messages, web browsing history and social media can prevent them from getting bad influence from sexual, violent, gambling, fraud and drug-related content. At the same time, you can give them proper guidence of using internet.
3. Avoid accidental payment
Currently the payment verification process on phones is becoming more and more simple, which brings convenience but also hidden dangers. Children may purchase in-game items, donate to streamers, or accidentally subscribe to an app. If not discovered in time, it may cause big losses.
4. Keep eyes on children and prevent dangers
Parents cannot be with their children at all times and cannot 100% be aware of what happens at school or with friends. By monitoring the text messages or chat records of children's mobile phones, they may be able to know at the first time when there are conflicts with classmates, school bullying (being bullied or bullying), violence, etc. Some monitoring programs can also track the location of kid’s phones, so when kids are in danger, parents can arrive as soon as possible.
5. Fix tech problems
When kids encounter technical problems with their phone, such as settings, backup problems, upload files etc,. parents can use remote programs to control their children's mobile phones and help fix it.
4 things to pay attention to before monitoring your children’s phones
1. Respect children
Although we understand that parents monitor their children's mobile phones out of concern. But please remember that the child also has their own ideas, secrets and privacy. Please remember this before using a monitoring program:always respect your child and their opinions. Don't go too far or you may cause the relationship to deteriorate.
2. Communicate with your children
Talk about your thoughts and reasons with your child before monitoring their phone. At the same time, listen to theirs, communicate to reach a consensus. Make sure you have your child's consent before downloading and using a phone monitoring program. If they strongly disagree with the idea, communitate and figure out other ways.
3. Make an agreement and stick to it
Make an agreement with your child when you can monitor their phone, what apps you can monitor and can’t and stick to it. Remember, trust and communication are more important than anything else.
4. Choose safe monitoring software
When you decide to use a monitoring program, remember to choose one with a high security level. Since these programs gain access to most of your phone's permissions, using unsafe programs may cause the risk of information leakage. In serious cases, it may also pose a threat to the safety of your children.
4 best parental control software 2024
DeskIn
DeskIn is a remote desktop software suitable for web, Android, ios, Windows and MacBook. This means that you can use not only your phone, but also a computer to remotely control your child's mobile phone. You can delete risky messages, check phone usage time, block apps by remotely accessing your kid’s phone. Compared to other programs, DeskIn will not record the browsing history, track location of the remote mobile phone. You can only view and operate the remote phone with its permission. This leaves space for kid’s privacy and makes it easier for children to accept.
Pros:
Secure: DeskIn only allows devices under the same account to remotely control the phone ,which can prevent children's phones from being monitored by strangers.
Cross-system compatible: DeskIn has Android, ios, Windows and MacBook versions. You can use a computer to remotely monitor your child's phone, or you can use your phone to remotely monitor your child's computer.
Voice call: DeskIn allows you to make voice calls while accessing your child's phone. When you discover some harmful apps or messages, even if the children are not around, you can ask your kids for more details and provide guidance. You can also conduct synchronous teaching when helping them fix tech problems.
Use the remote camera: You can also use DeskIn to access the front and rear camera of your kid’s phone. When your child is in danger, you can know where they are are what’s going on.
Flexible connection methods: DeskIn allows two connection methods, manual verification and unattended password connection, which makes it more acceptable to children. Under normal circumstances, you can ask your child to do manual verification when monitoring their phone, just to inform them. In an emergency, you can still use a password for unattended connection.
Cons:
Can't track the location of the kid's phone.
Family Link
Family Link is a parental control software developed by Google that allows users to manage Android phones. It essentially manages children’s phones by managing their Google accounts. It can block or allow individual apps, hide apps, find devices, set a bedtime and set app limits. But it also has loopholes that when using a hidden browser, kids can bypass browsing restrictions. Some netizens also reported that its time limit function is easy to be bypassed by children.
Pros:
Set time limit: You can set downtime for kids’ devices and time limit for apps.
Block software or websites: You can manage app permissions and website browsing permissions of your kid’s phone. Limit the display of adult content or even allow them to view only certain websites.
You can approve or block apps kids download from Playstore and .
Track your child’s location: You can use a map to track your child’s real-time location, or you can set to receive a reminder when your child reaches a certain location.
Cons:
Can manage Android phones only
Don't support remote control the mobile phone
Website browsing restrictions and control time can be bypassed
KidsGuard
KidsGuard is more of a “spyware”, it can monitor all operations of the mobile phone, obtain all files on the mobile phone and record chat messages. Basically, all usage information of the binded mobile phone will be scanned and recorded. However, it does not have many operational functions, such as setting usage time limits, restricting web pages to browse, etc.
Pros:
Free simulation demo screen is provided. You can simulate it first and then decide whether to pay.
Can monitor iPhone via iCloud, receive and manage emails, view contacts, photos, reminders, etc.
Track social media messages with keywords: You can query messages using keywords.
Payment monitoring: can record children’s subscription consumption in the app store
You can view all usage status and reports of the remote mobile phone through the web panel: usage time, mobile phone files, browsing history, chat history, etc.
Cons:
You need to pay to unlock advanced features
The mobile phone cannot be directly controlled and set.
Obtaining too many permissions on the mobile phone and recording too much content can easily lead to privacy leaks.
Airdroid
Airdroid is a comprehensive control application that allows you to control devices with AirDroid Kids through AirDroid Parental Control App. Supports monitoring remote mobile devices using mobile phones or web pages. After payment, it supports management of up to 10 devices.
Pros:
You can use the camera and microphone of your kid’s Android phone to view and listen to the environment and sounds around your child.
Synchronously receive notifications from apps on your child’s Android phone, such as Line and Facebook.
You can get the daily/weekly report of your child’s mobile phone usage through the report panel.
You can manage and limit the usage time or permissions of mobile phones, software, and web pages.
Keyword detection: Conduct keyword detection on social software to identify harmful content or potential bullying issues.
Track the location of the mobile phone.
Cons:
There is no free version, you need to pay to unlock all features
Obtaining too many permissions on mobile phones and recording too much content can easily lead to privacy leaks.
How to use DeskIn to access your child’s phone
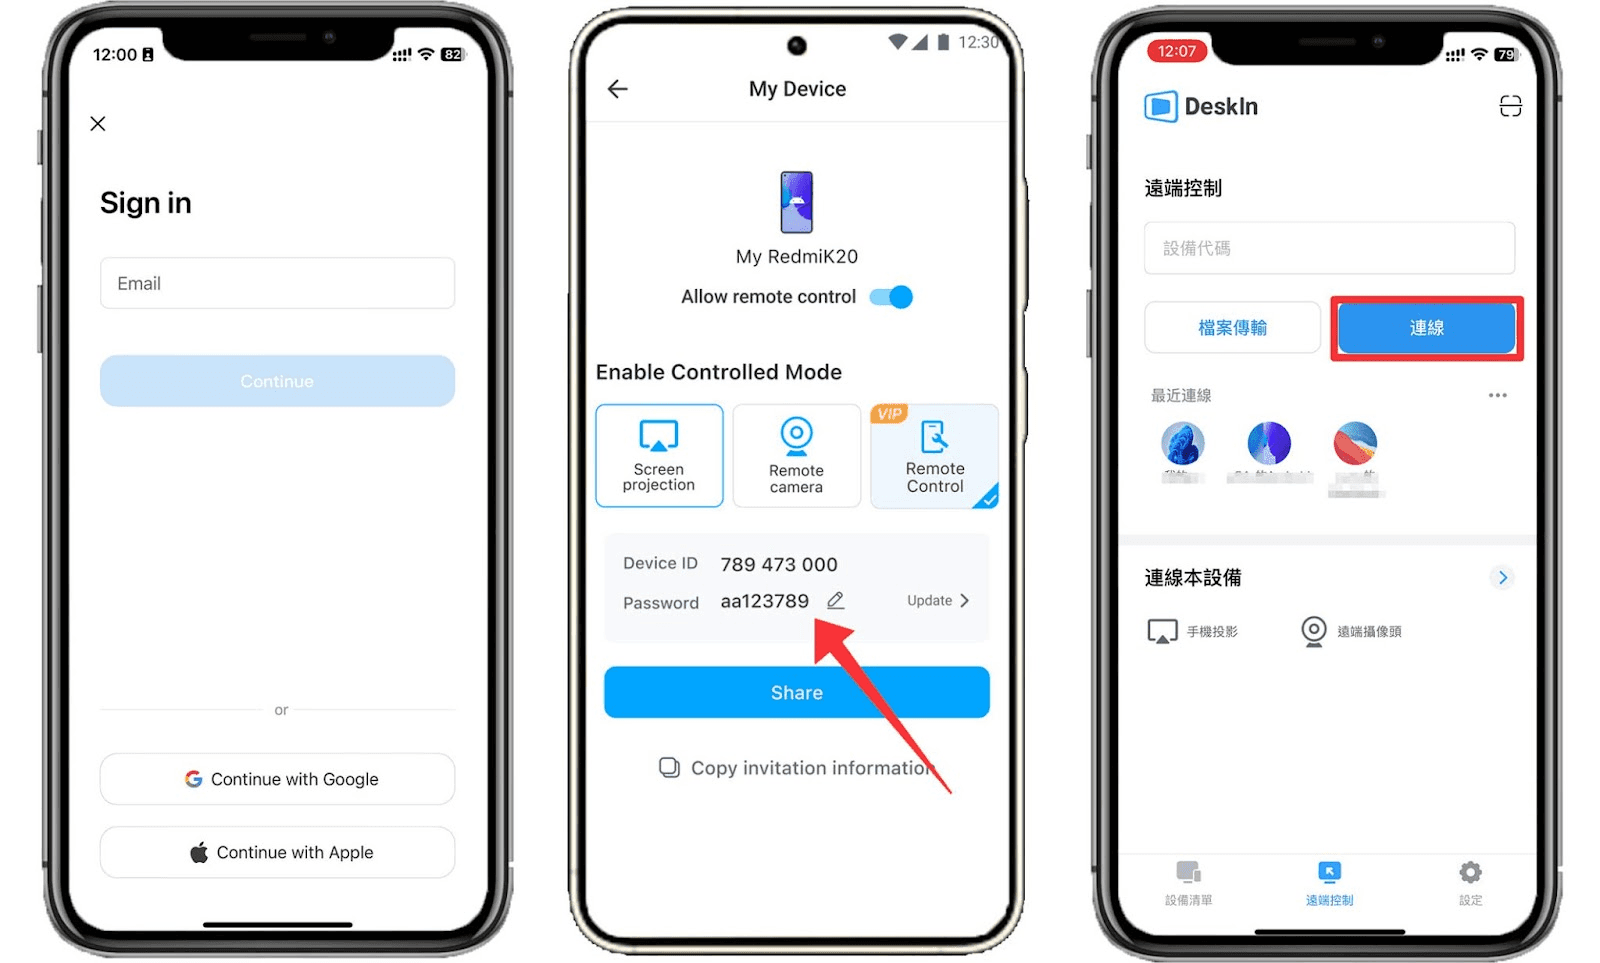
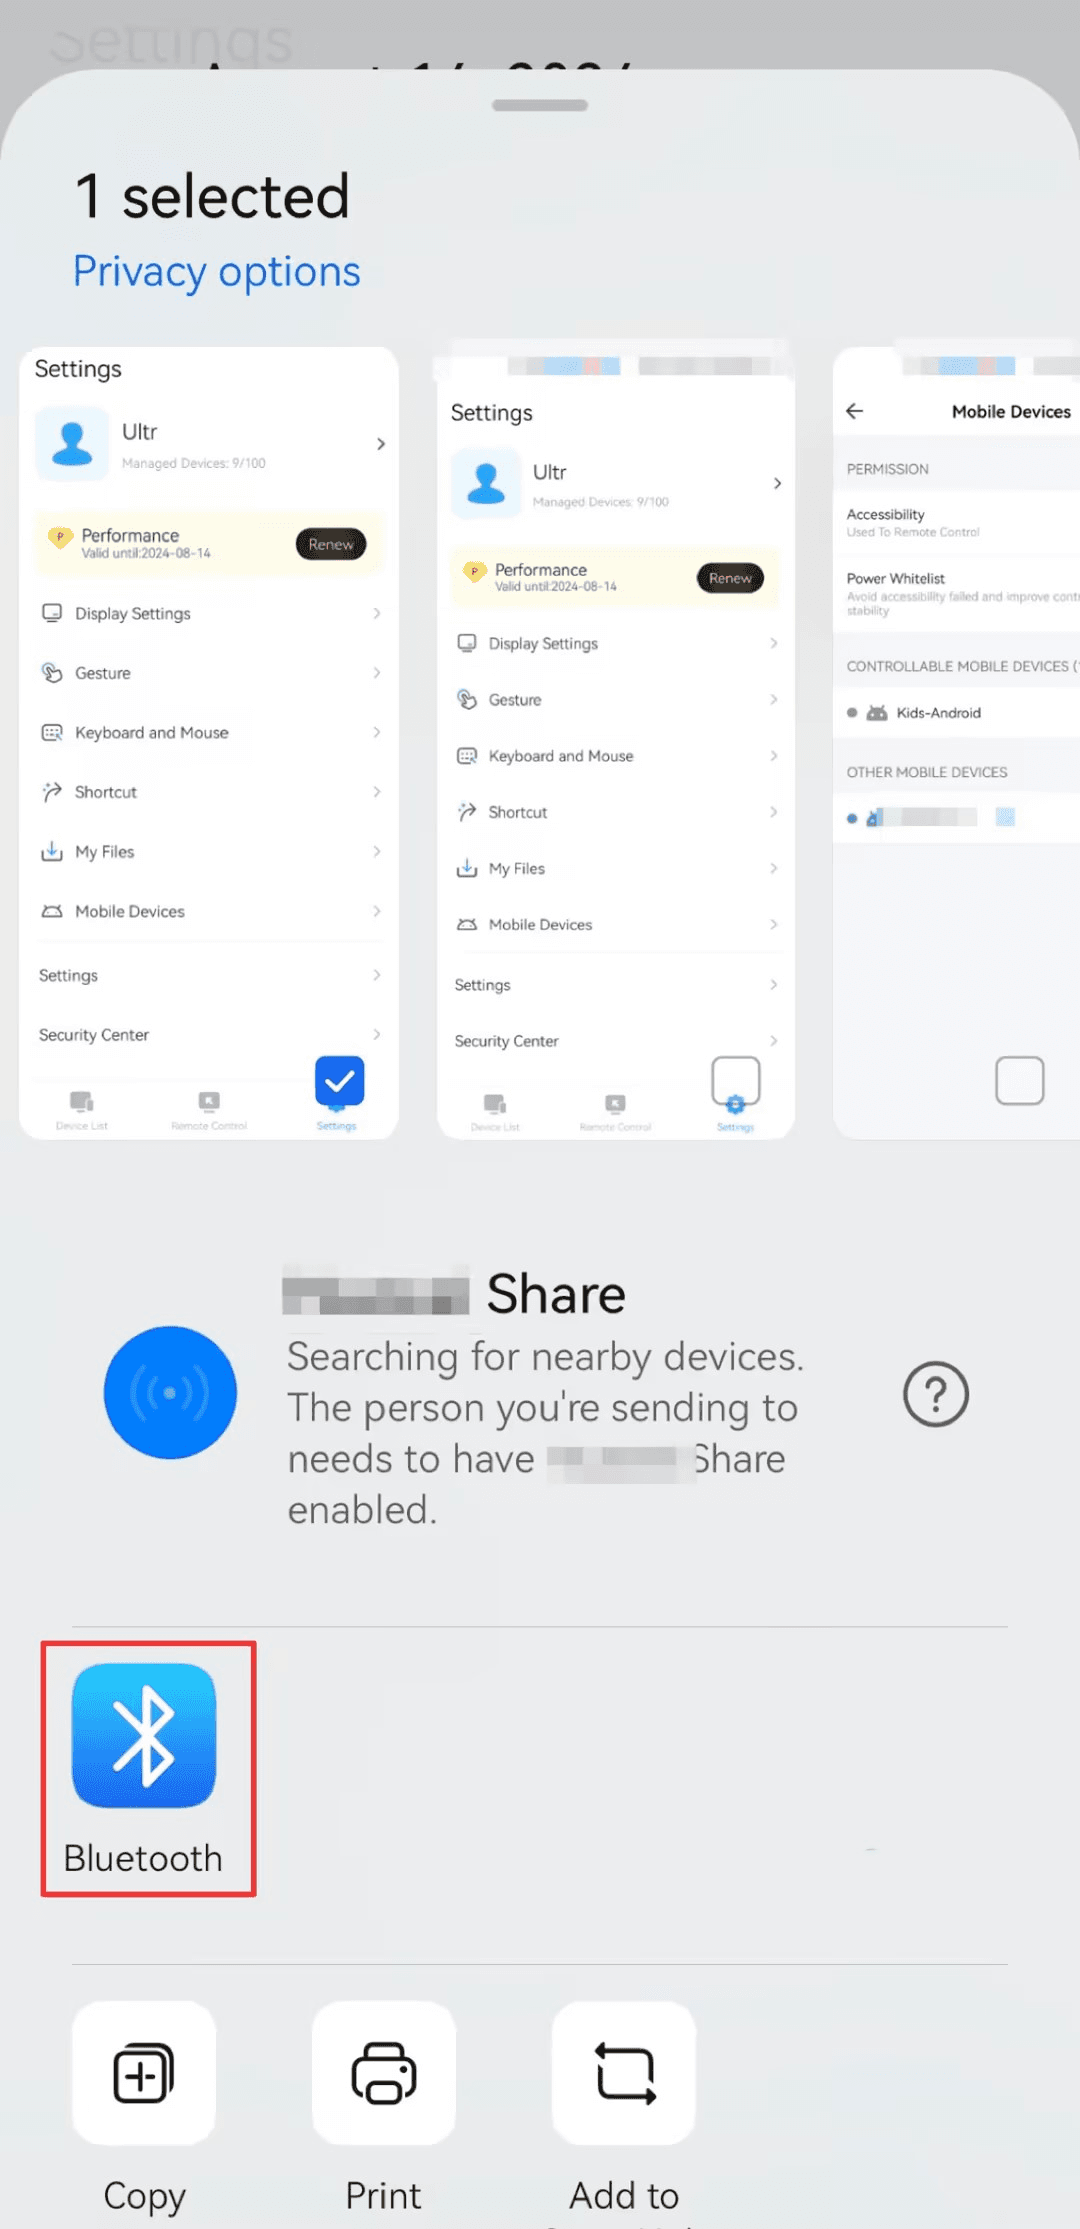
Step 1: Install DeskIn on your device and your child’s phone, register and log in to a same DeskIn account.
Step 2: Ask your child to open DeskIn, toggle on “Allow remote control" button to allow accessing, and set a connection password.
Step 3: Then you can find your child's phone in the device list or use the device ID to access their phone. Your child can do manual verification, or you can use password to do unattended access.
Conclusion
This article introduces 4 parental control software to help parents monitor their children's mobile phone. Each software has its pros and cons, and you can choose according to your needs. Among the four softwares, DeskIn can full-control kid’s mobile phone and requires fewer permissions, making it easier for children to accept. Although parents have a good intention to monitor their children's mobile phones, parents should not go too far and give children space and respect their privacy. What’s important in a good parent and kid relationship is mutual trust.
COMPARISONS
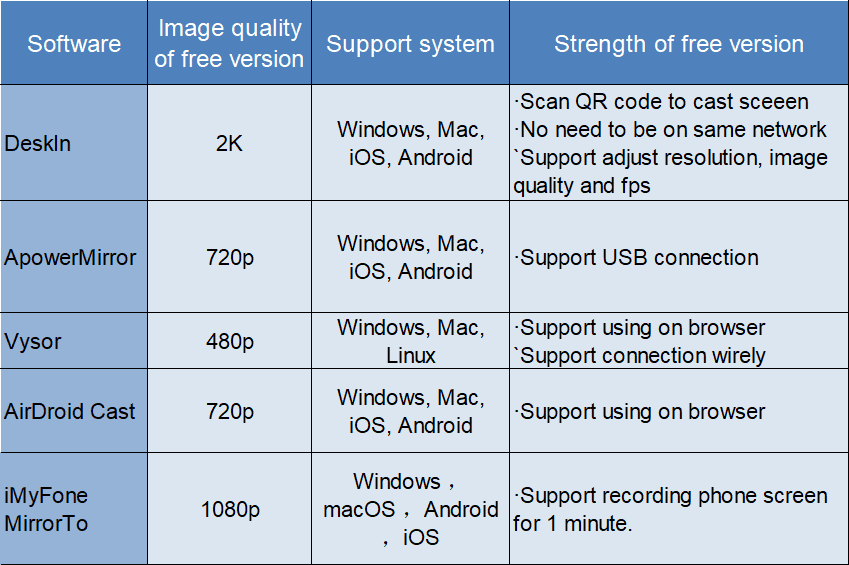
5 Best Free LetsView Alternatives
If you're looking for a free screen mirroring app like LetsView, here are five well-reviewed alternatives, each with unique features and strengths, check it out!
Your number one choice – Deskln
DeskIn is a tool focused on efficient remote connection and screen management, known for its stability and high performance.
Strength:
The free version supports up to 2K image quality, clear and lossless
Adjustable frame rate, resolution and ratio to flexibly adapt to different screen
Supports multiple projection methods (wireless screen mirroring, scanning QR code to cast screen), no need to be on the same network.
System compatible, support using on Windows, Mac, iOS, Android
Provide additional functions such as file transfer, extend screen, remote control, etc.
Shortcoming:
Google TV is not supported yet
ApowerMirror
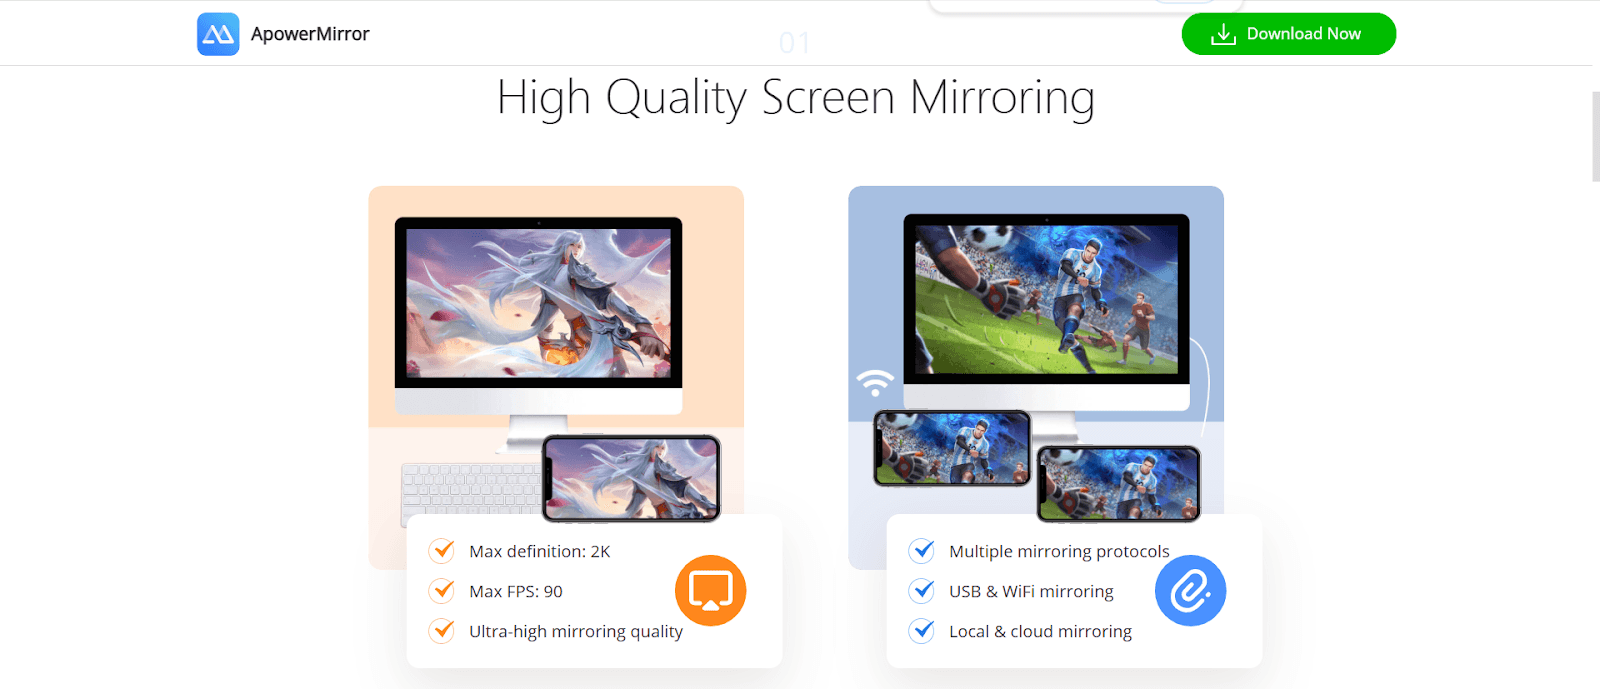
ApowerMirror is a comprehensive screen mirroring software that focuses on two-way control and multi-scenario use.
Strength:
The free version supports 720p image quality (with watermark), which can meet basic needs
Allows users to cast the screen between phone and computers.
Provides additional functions (such as screen recording, screenshots), suitable for making tutorials or sharing content
Shortcoming:
Unable to adjust parameters such as image quality or frame rate.
The free version has a watermark
Cross-platform free projection has time limit
Free version only support mirror to 1 screen
Free version doesn't support cast the sound
Vysor
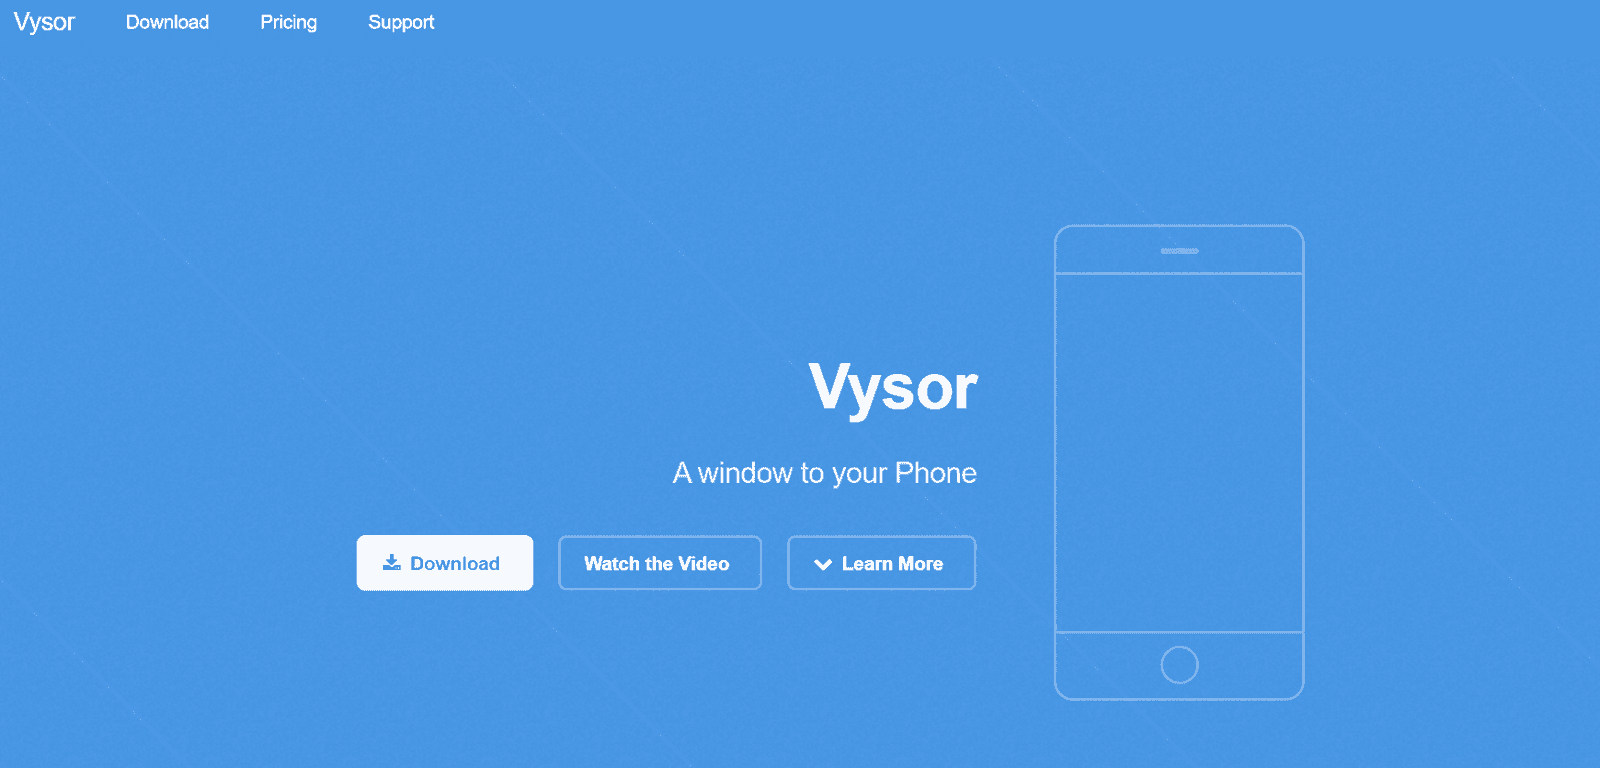
Vysor is a screen mirroring tool designed specifically for developers, emphasizing simplicity and ready-to-use.
Strength:
Free version supports basic mirroring functions.
There is no need to install a special application, it can be used through the browser.
Shortcoming:
Free version has low image quality
Not supported on iOS devices
AirDroid Cast
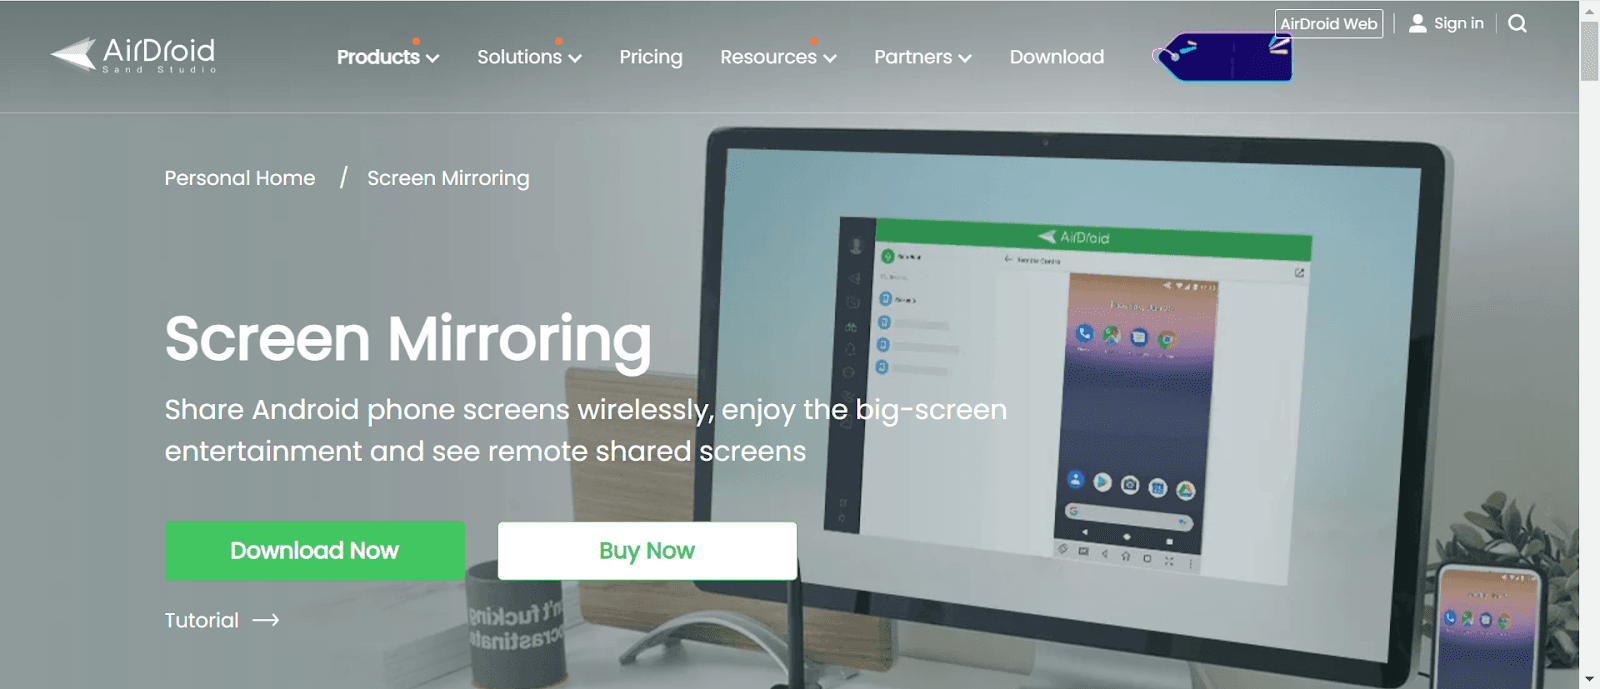
AirDroid Cast is a tool suitable for teams, focusing on multi-device connection and remote control.
Strength:
Mirror screens can be used through the browser.
Quick connection via LAN and Internet.
Allow sharing multiple Android device screens to one PC
Shortcoming:
Free version has low image quality
Cross-platform control is paid features
iMyFone MirrorTo
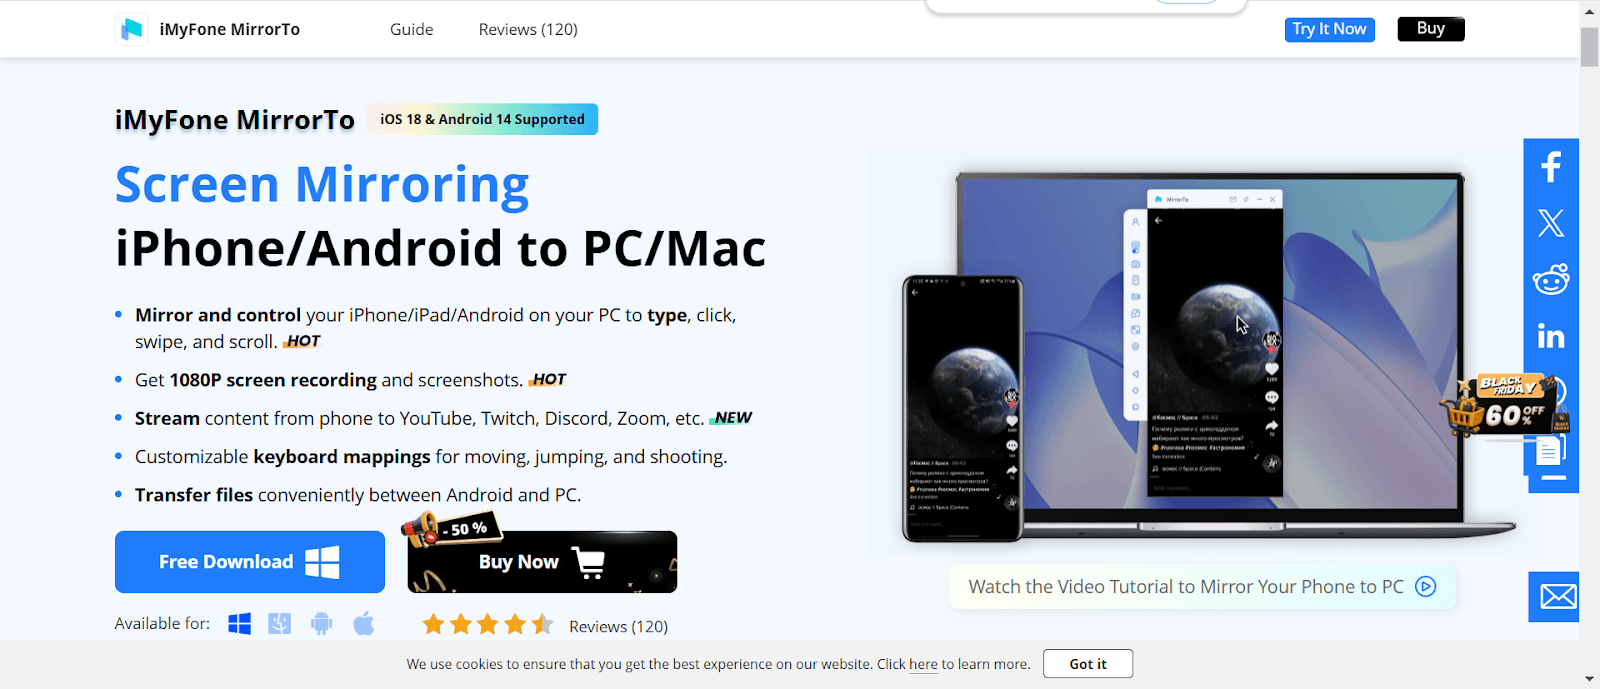
iMyFone MirrorTo is an easy-to-use and powerful screen mirroring tool, specially designed for multi-platform projection needs and intuitive to operate.
Strength:
Supports multiple mobile devices to connect and project.
Supports scanning mobile codes, USB data cables, Wi-Fi and other methods to project the screen to the computer and synchronize the sound in seconds.
Support switching appearance skin
Shortcoming:
No free version
Only supports projection from mobile phone to computer. If you want to project a computer screen, you need to install other software.
Comparision of 5 screen mirroring tools:
How to mirror screen using Deskln
First install DeskIn on the devices you want to cast screen to and from, register a free account and log in.
Note: If you are logging in on a new device for the first time, you need to go to your registration email to complete verification.
Method 1: Screen Mirroring computer screen
Find the device you want to cast the screen to on the “Device List" on the DeskIn client. Easily just click “Screen Mgt” then you can mirror the screen.
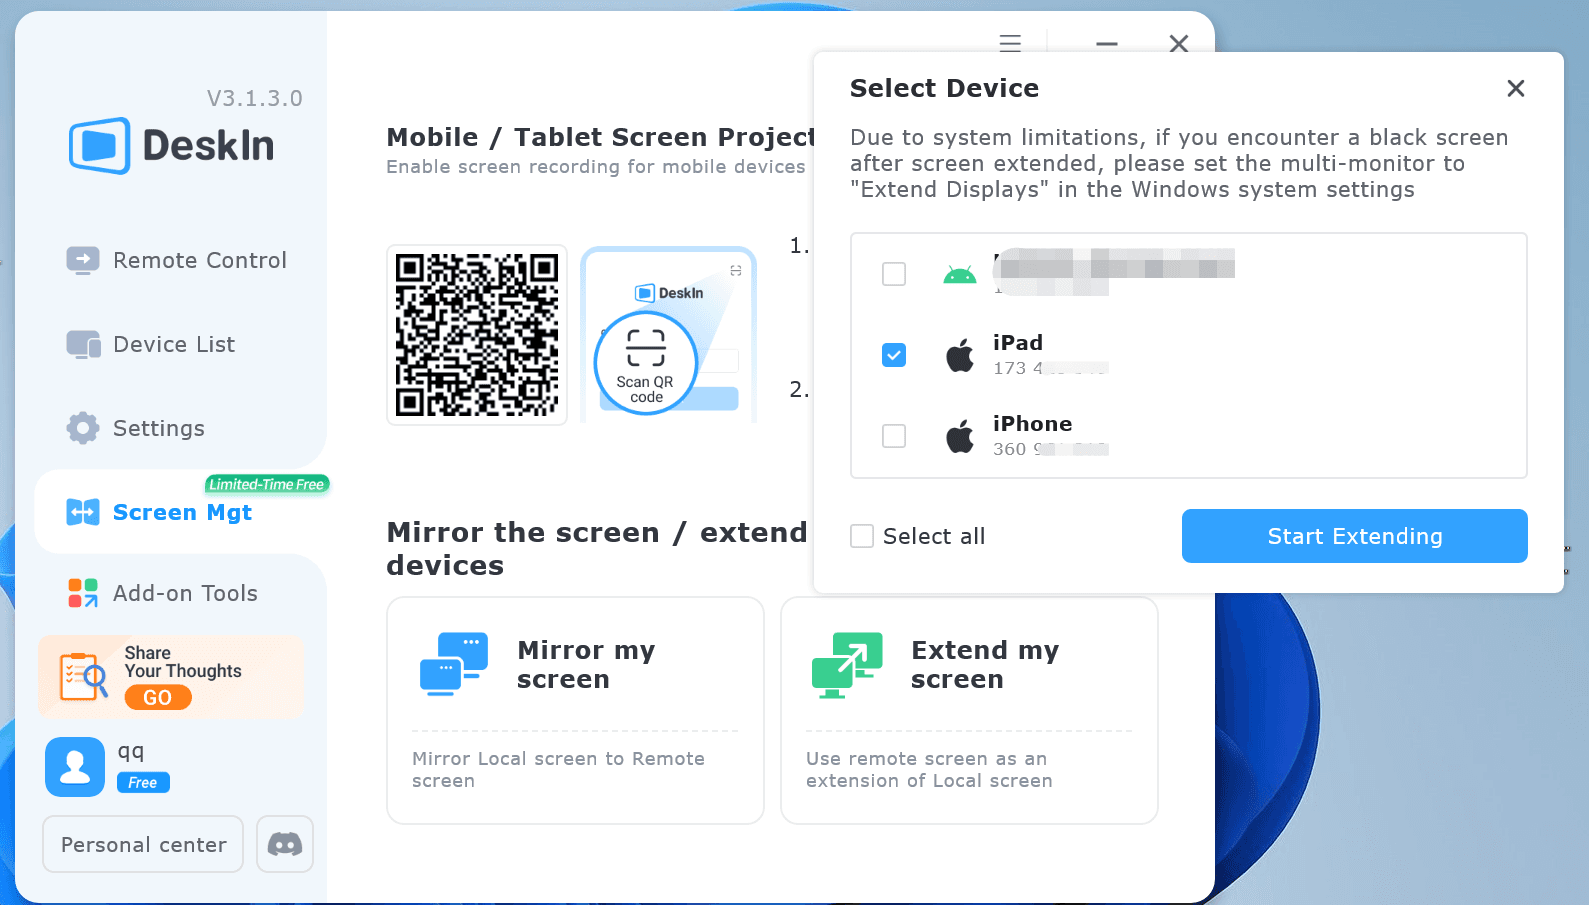
Method 2: Scan QR code to cast the phone screen
Log in to DeskIn on mobile, click the Scan icon on the upper right corner of the main interface, and scan the QR code on “Screen Mgt” on the device you want to cast screen to.
Conclusion
The above five free software all provide a stable and efficient screen mirroring experience and are good alternatives to Letsview. If you are looking for the one that is free, stable and has high image quality, DeskIn is the impeccable first choice! Download and try it now!
PRODUCTIVITY
5 Best Remote Desktop Software For Windows
Remote desktop software revolutionizes the way we interact with technology, enabling seamless access and control of distant devices. This article explores the core functionalities of such tools and highlights five top solutions for Windows users, including the high-performance DeskIn.
What is remote desktop software?
Remote desktop software is a tool that allows people to remotely access and control remote computers with local devices. Through remote software, users can remotely operate applications, send files and change settings of other computers as if they were working locally.
Main functions of remote desktop software
Remote Access: Allows users to remotely access and control other computer devices.
File Transfer: Supports wireless file transfer between remote devices and local devices.
Remote Collaboration: Allows users to share clipboard between remote and local devices.
Remote printing: Allows users to print files from remote computers to local or network printers directly.
Multiplayer collaboration: Allows multiple users to access the same remote computer at the same time.
5 Best Remote Desktop Software for Windows
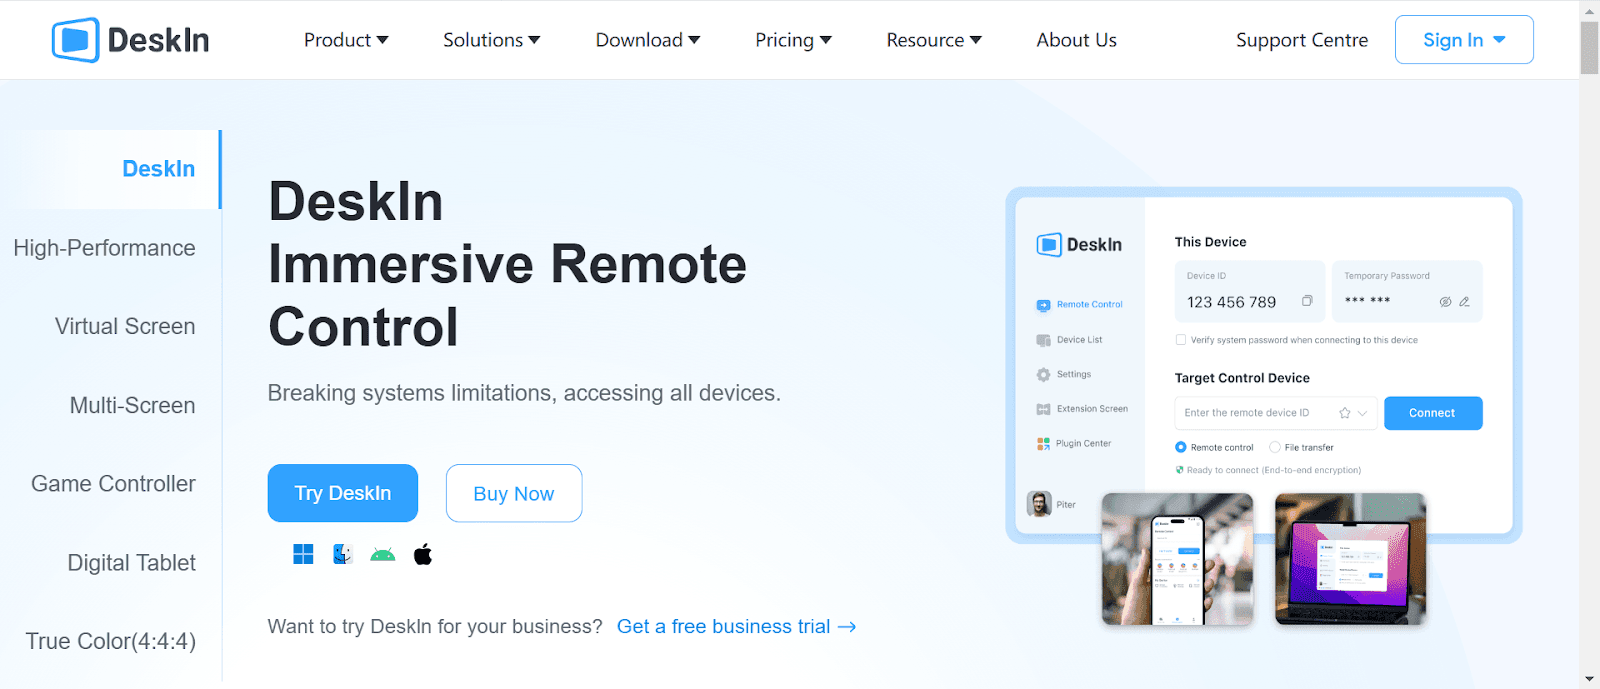
Deskln - High performance remote desktop software
DeskIn is a remote software designed for individual users. It runs smoothly on Windows systems and provides a seamless remote desktop experience. Not only does it have high definition and low latency, but also very stable connection. The writer myself tried to remote access a Macbook with Windows PC, and the connection was not lost even after one night! DeskIn supports cross-platform connection between Windows, Mac, iOS or Android. In addition to remote connection, it also has screen management and real-time communication features.
Pros:
High performance and low latency: DeskIn supports up to 4K image quality, and latency less than 40ms, allowing smooth remote connection experience.
System compatibility: DeskIn supports seamless connection and remote access between Windows, iOS, MacOS and Android. It also supports initiating remote connections from the Web, making it more flexible.
Rich features: Other than remote access, DeskIn provides multiple collaboration and screen management functions such as extend screen, cast screen, voice call, annotation, shared clipboard, etc. One app fits all needs.
High-speed file transfer: DeskIn supports cross-system file transfer with no restrictions on size, type, and quantity, and the speed is up to 12MB/S.
High security: 256-bit encryption, allowing to set black and white lists, security passwords, only allowing connections with the same account, locking the client, etc.
Cons:
Linux system and Google TV are not supported yet
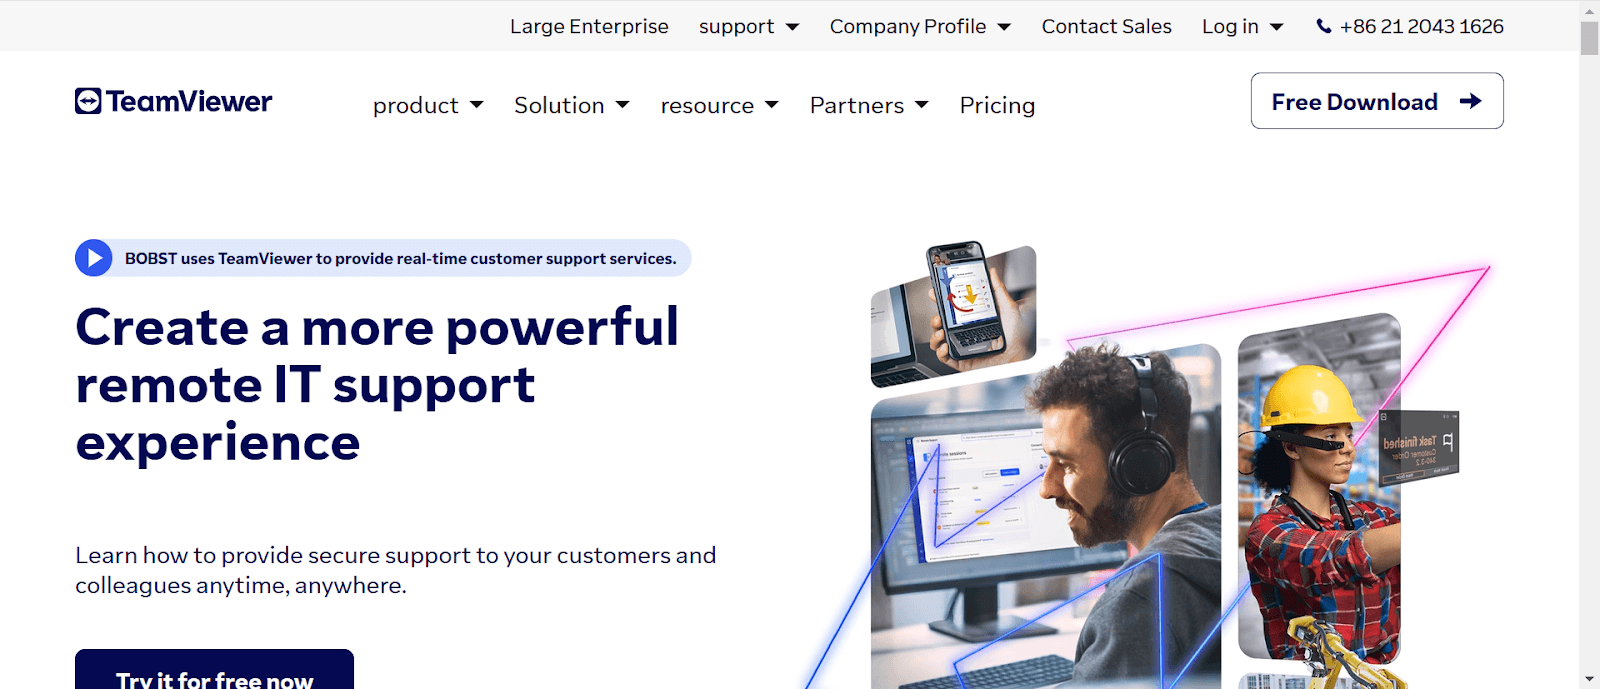
TeamViewer-Great choice for enterprises user
As one of the earliest remote desktop software, TeamViewer has a wide user base in large enterprises. Its performance on Windows systems is remarkable, not only showing strong functionality and flexibility, but also making great efforts in user experience and security. It is undoubtedly the best choice for large enterprises to carry out remote management and control.
Pros:
System Compatibility:In addition to Windows, MacOS, iOS, and Android, it also supports use on Linux and Chrome OS.It gives a seamless remote connection experience for IT engineers. Remote collaboration can be realized no matter what device team members use.
Fully functional:In addition to various practical functions such as remote desktop, file transfer, and voice calls, TeamViewer also has many management features, allowing enterprises to uniformly manage internal devices.
Technical support and services:TeamViewer has a strong technical support team that can provide users with timely and effective technical support and solutions. This provides a strong guarantee for enterprise users to solve various problems during use.
Cons:
Expensive: The price of the commercial version of TeamViewer is relatively high, some features require additional payment to unlock, which makes it inaccessible for users with limited budgets.
Slow file transmission: After comparing multiple remote software, Teamviewer has the slowest file transfer speed, and there is a limit on file size——4GB or less at a time.
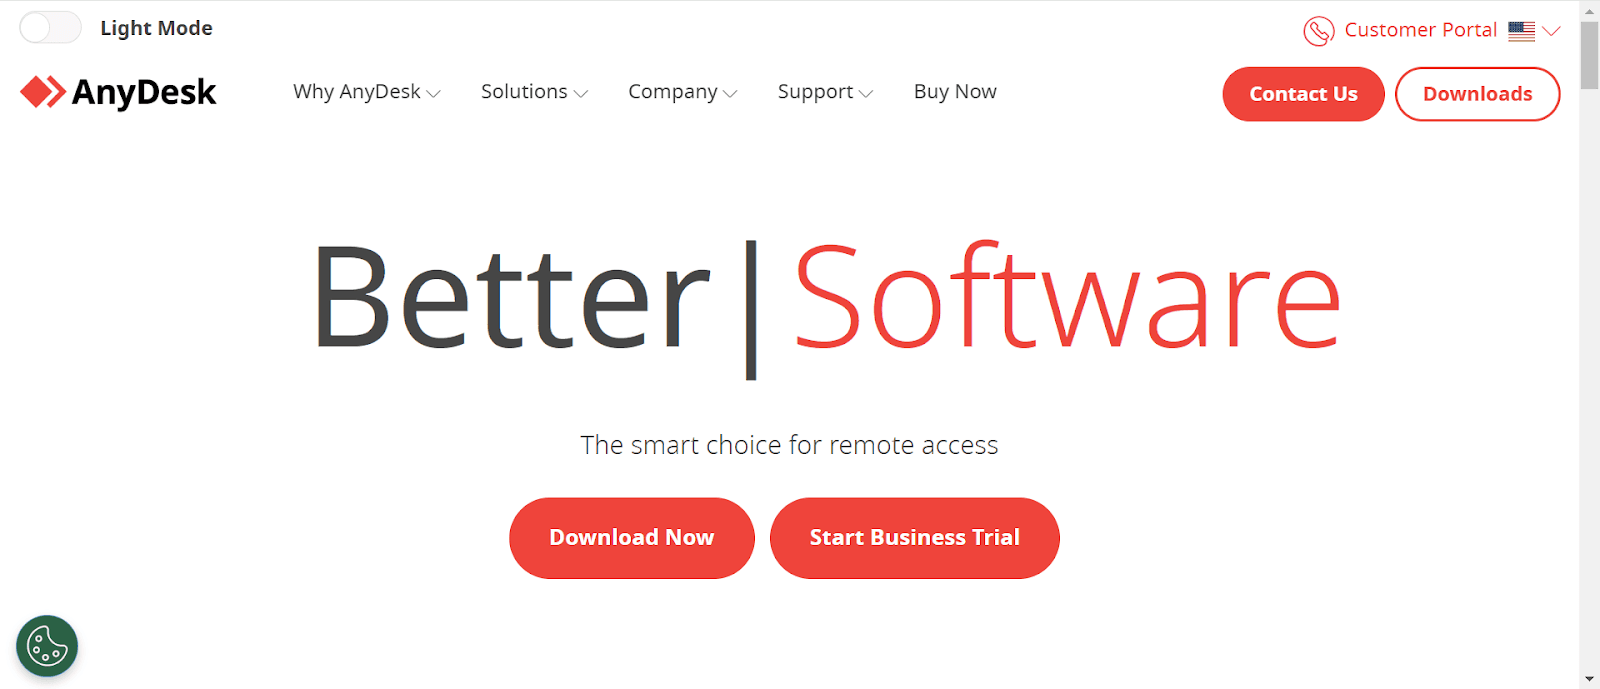
AnyDesk-Enable flexible remote access
With the core features of being lightweight, efficient, and safe, Anydesk aims to provide users with a smooth and convenient remote operation environment. Whether they are enterprise users, technical support teams, or individual users, they can get the remote access capabilities they need from AnyDesk.
Pros:
Lightweight and efficient:With an installation file of only 1.1 MB, AnyDesk is one of the most lightweight remote access solutions on the market. You can download it in just a few seconds.
Installation-free registration: You don't have to install and register an account before using Anydesk, which is quite convenient.
Low latency:AnyDesk is known for its fast remote access speeds, with latency lower to 19ms.
Fast file transfer speed:Anydesk's file transfer speed is relatively fast and supports cross-platform file transfer.
Cons:
Low definition:Anydesk's resolution is automatically adjusted.This results in the remote desktop display sometimes being poor, with average color and clarity, thus affecting the user experience.
System file access restrictions:If users need to change or access system files, they need to install AnyDesk software on their local machine. For security reasons, the browser does not have access to system files. This means that users may need additional settings or permissions to perform certain advanced operations.
Lacks advanced features:Although DeskIn is relatively easy to use, its functions are relatively simple and lacks some advanced features such asFunctions related to games, screen management, and voice collaboration.
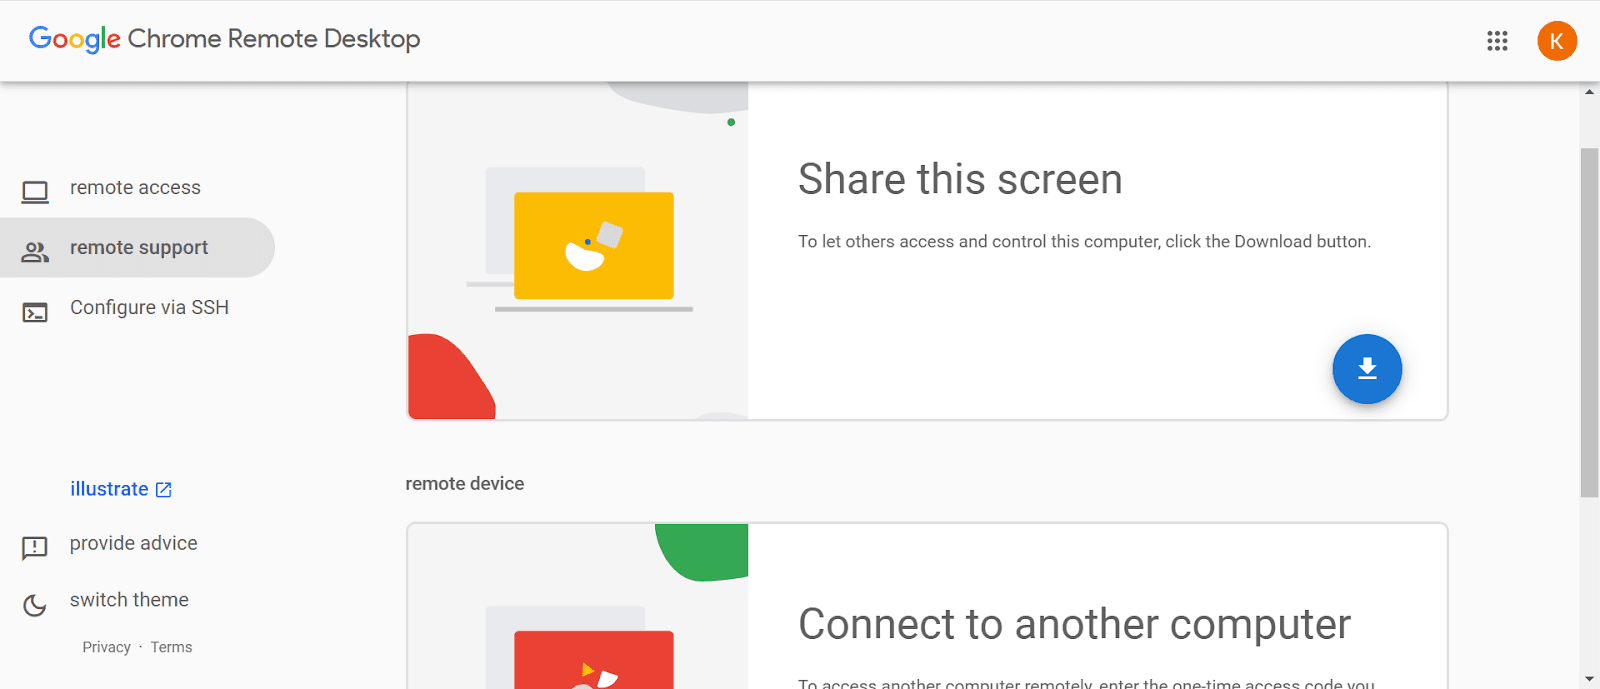
Chrome Remote Desktop-Easy cross-platform control
Chrome Remote Desktop is a remote desktop control tool based on the Chrome browser provided by Google. It allows users to remotely access and control content through the Chrome browser or other supported devices (such as iOS and Android) at any time and anywhere. Control computers running Windows, Linux, MacOS, Chrome OS, and more. This tool is not only suitable for individual users, but also suitable for corporate environments for remote office, technical support, server management and other operations.
Pros:
Free services:Completely free, it is a very economical choice for individual users or small businesses with infrequent use and limited budget.
Cross-platform compatibility:Chrome Remote Desktop supports multiple operating systems. Whether the user is using Windows, MacOS, Linux, iOS, or Android, seamless connection can be achieved.
Easy to operate:As an extension of the Chrome browser, it can initiate remote connections from web pages. The function is relatively simple and easy for novices to use.
Cons:
Bind to Chrome browser: Chrome Remote Desktop is binded to Chrome browser, it may be inconvenient to people who are using other browsers.
Limited functionality: Compared with some professional remote desktop tools, the functions of Chrome Remote Desktop are basic and lack advanced functions.
Auto adjustment only: Chrome adjusts defination automatically, sometime may cause blurry. Its performance on image quality, clarity, color may not be as good as some professional tools.
Security risks: Chrome remote desktop is linked to Google account, once the information of your account is leaked, your device may be hacked.
Microsoft Remote Desktop - built-in remote tool on Windows
Microsoft Remote Desktop is a built-in tool on Windows operating system, it allows users to remotely access one computer from another, providing a convenient way to operate and achieve efficient collaboration among multiple workstations. It has good application potential at the enterprise level.
Pros:
Highly integrated with Windows system:It is built into the Windows system, so users do not need to install additional software and it is very convenient to use.
Powerful functionality:Supports a variety of functions, such as print redirection, clipboard sharing, etc., which improves the user experience and is especially suitable for business users.
Higher security: Provides enterprise-level encryption, ensuring the security of data transmission, which is very important for users that have confidential information on their device.
Cons:
Complexity:For users with non-technical background, initial setup may be cumbersome, especially when configuring firewall and port forwarding.
Windows platform only: You cannot do cross system connection with other devices of the Mac system.
Not all features available for free:Although basic remote desktop functions are free, in some advanced usage scenarios, you may need to purchase additional related Windows Server licenses.
Conclusion
This article introduces five remote desktop software suitable for Windows, including DeskIn, TeamViewer, AnyDesk, Chrome Remote Desktop and Microsoft Remote Desktop. Among them, DeskIn stands out for its ultra-high performance, seamless connection experience, rich functions, and high-speed file transfer. If you are looking for a remote desktop software suitable for Windows, DeskIn is undoubtedly the one you should try.
PRODUCTIVITY
5 Practical Ways To Transfer Files Between Android And Windows PC
If you are using Apple devices, you can do simple and fast file transfer between your iPhone and Macbook with Airdrop. But this only works with iOS and macOS systems. Besides using a USB flash drive, how can we transfer files from an Android phone or tablet to a Windows PC, or vice versa? This article will give you 5 simple and quick solutions.
Method 1: Send files via DeskIn remote desktop
DeskIn is a reliable remote desktop software that allows simple and fast file transfers between Android and Windows without the need to be on the same network. The speed and quality of transfer are not inferior to USB wired transfer. Now I will show you how to use DeskIn for quick file transfer.
Step 1: Download DeskIn
First install DeskIn on Android and Windows, register a free account and log in. When logging in to your account for the first time on a new device, you need to complete email verification to ensure account security.

Step 2: Connect and send files
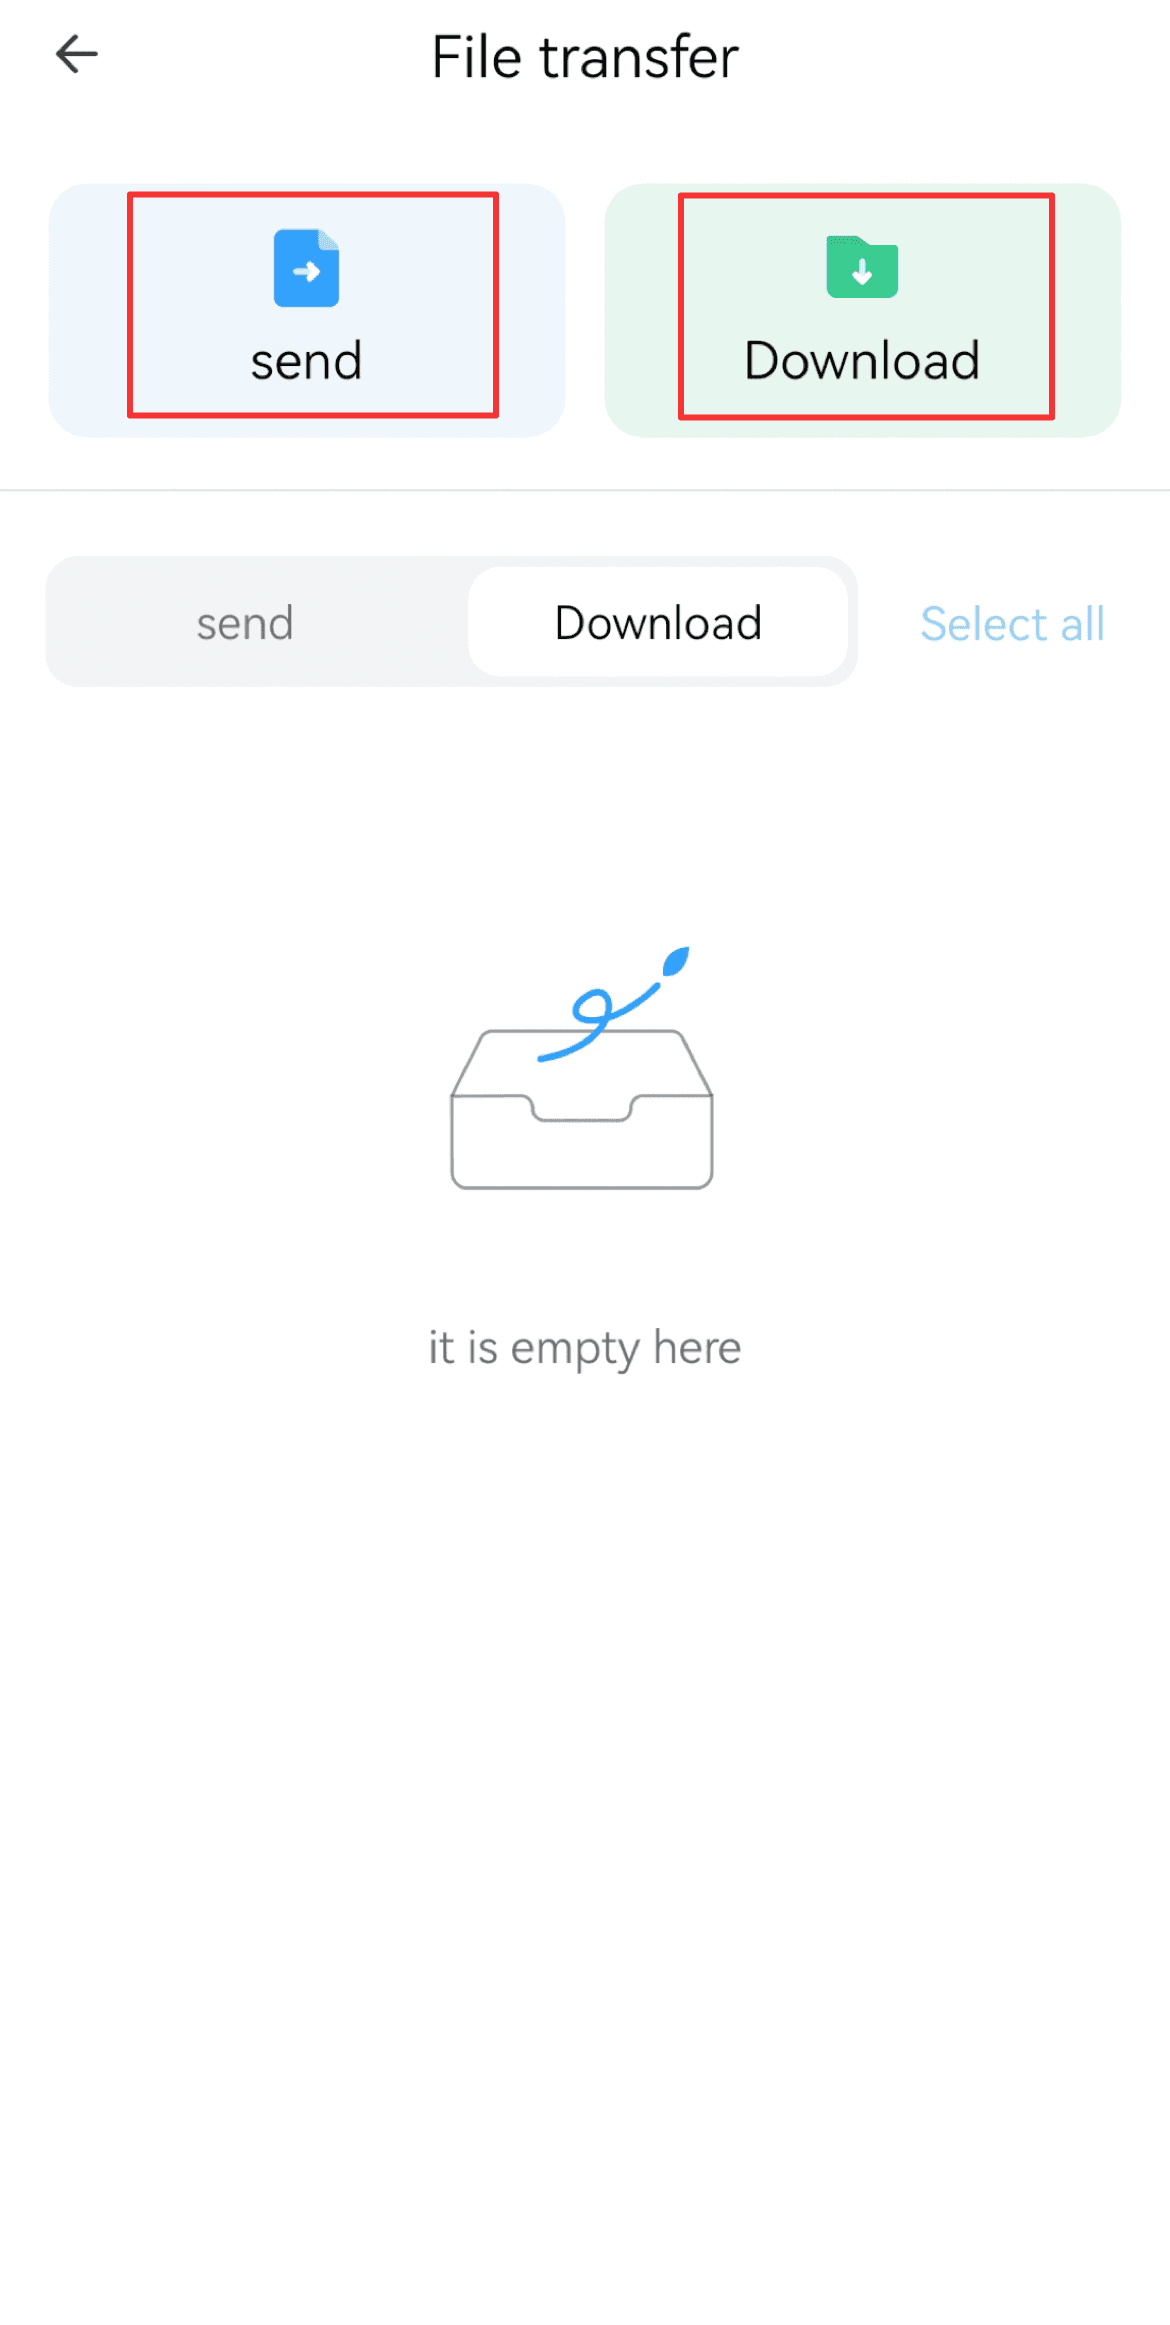
After logging in: Click "Remote Control" >>enter the device ID of the target device>>"File Transfer" .
If you want to send files from Android to Windows, click "Send">>Select the photos or files you want to transfer >>” Change Path” to choose the transfer location.
If you want to transfer files from Windows to Android, click "Download" and select the files you want to transfer.

Method 2: Send files via Bluetooth
Transferring files via Bluetooth is also a common method. Here is how you can do:
1. Activate Bluetooth on both your Windows and Android device: Go to Settings >> Bluetooth and toggle on the Bluetooth option.
2. Pair the two devices
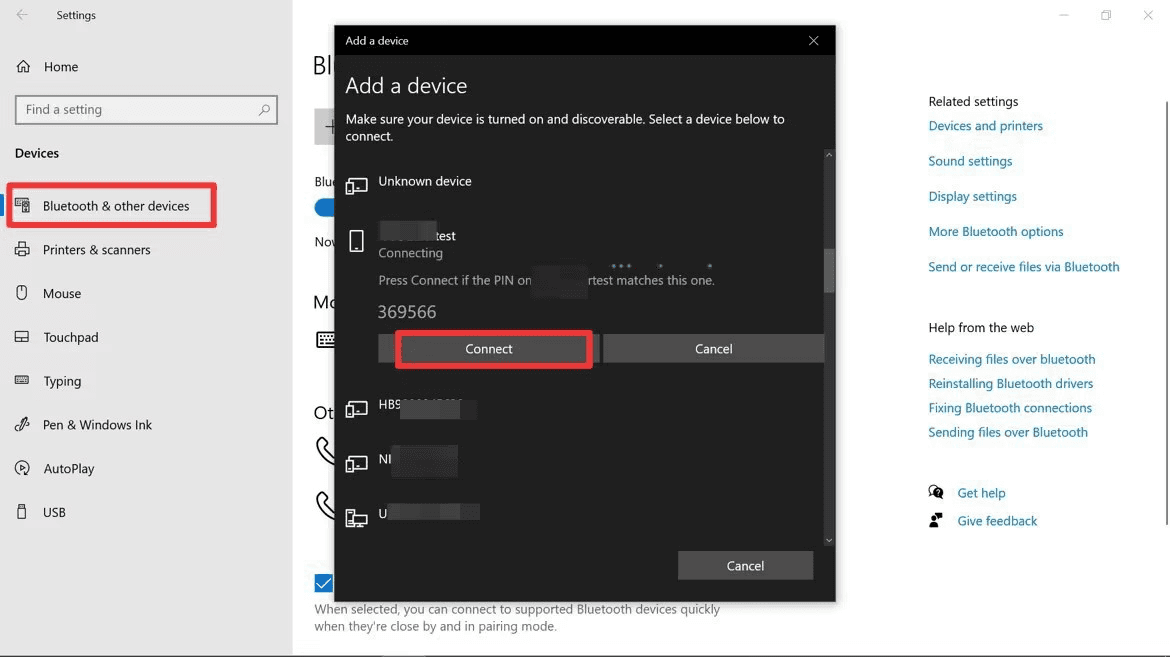
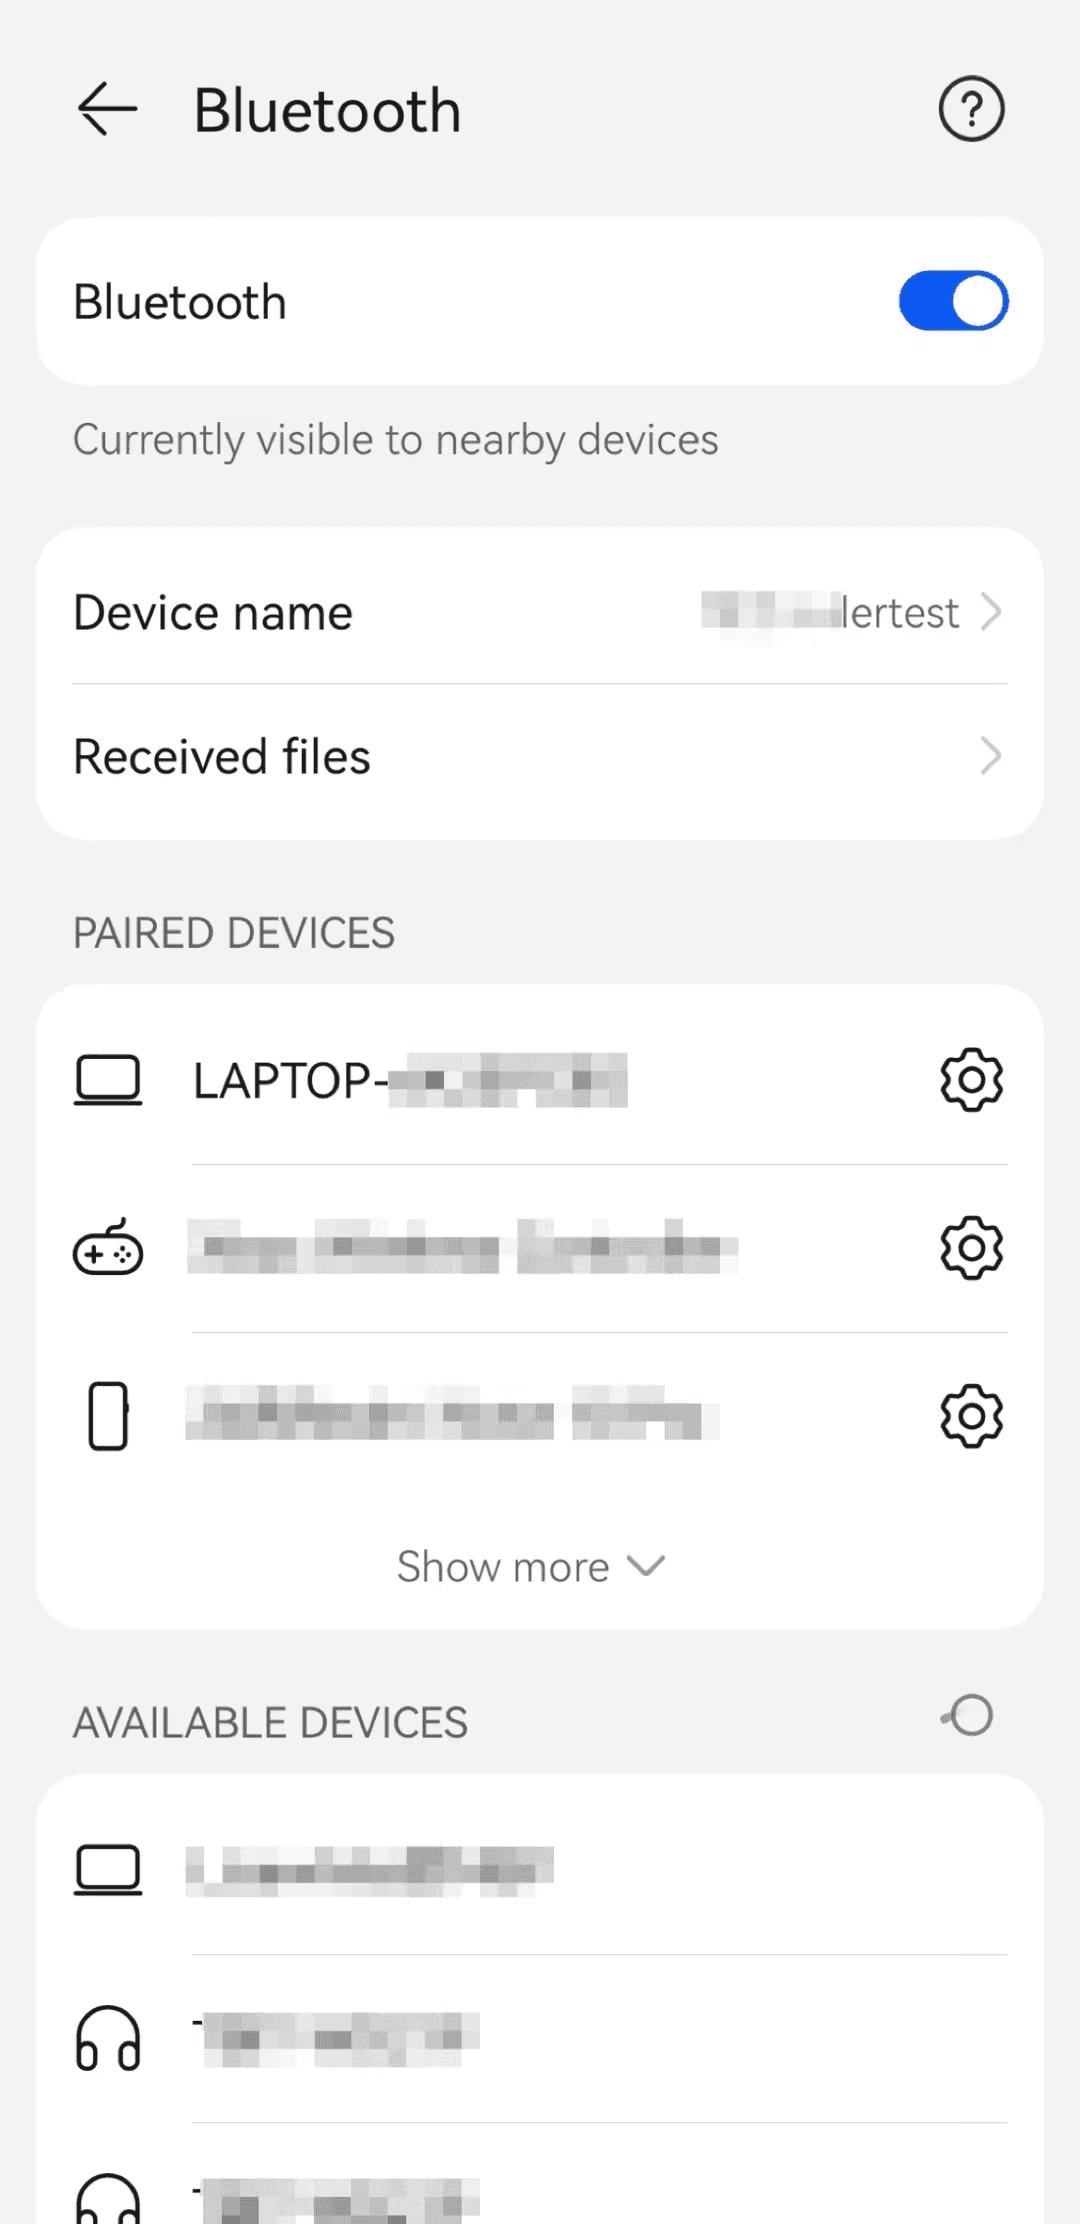
(1) Connect from windows: "Settings" >> "Bluetooth & other devices" >> "Add a device" >> Select the Android device>> "Connect".
(2) Connect from Android: "Settings" >> "Bluetooth" >> "Available devices" >> Select the Windows device to connect.
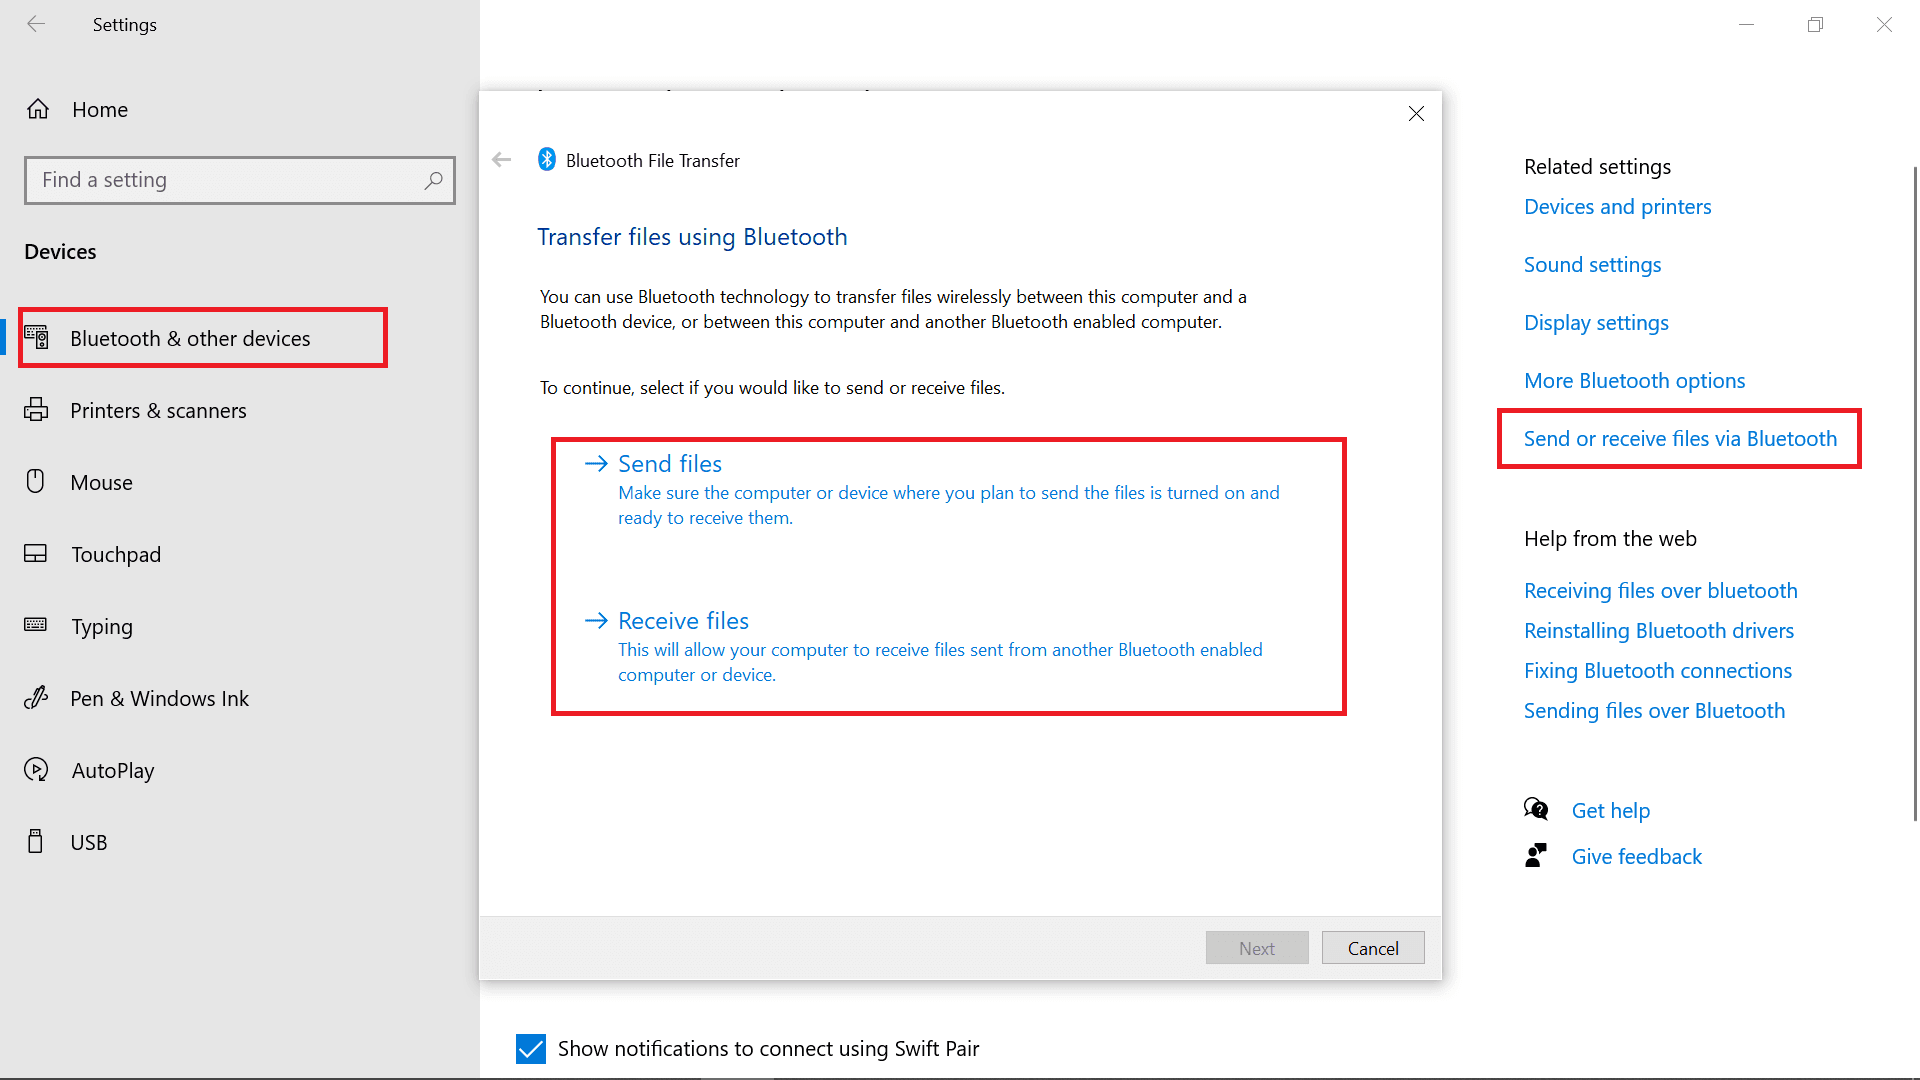
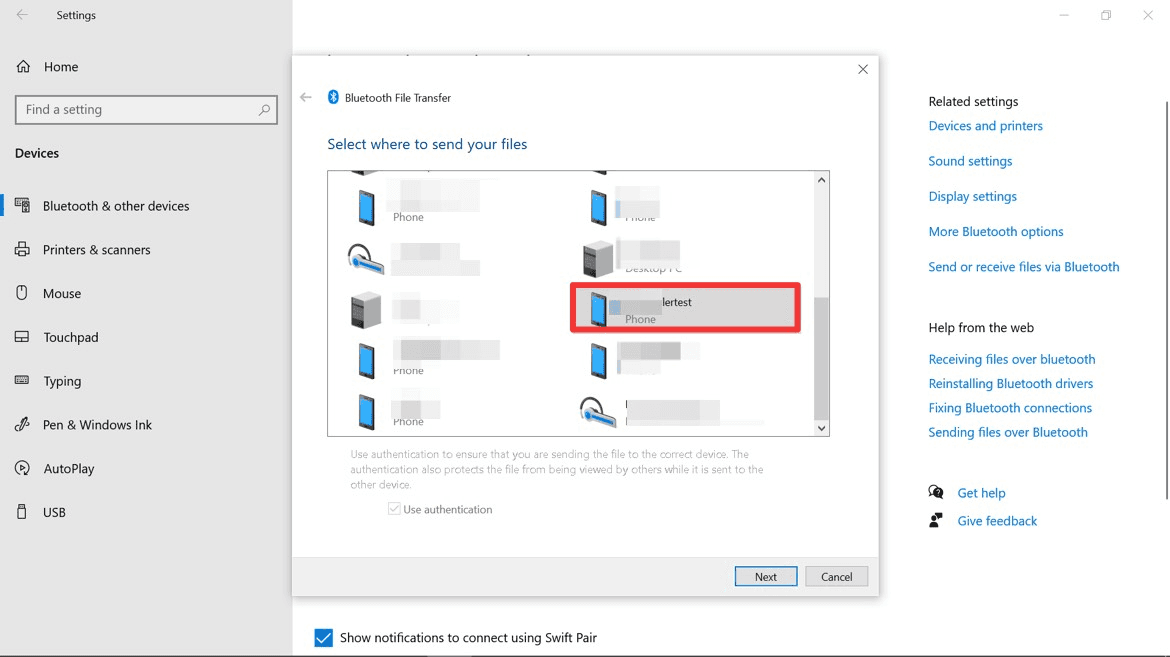
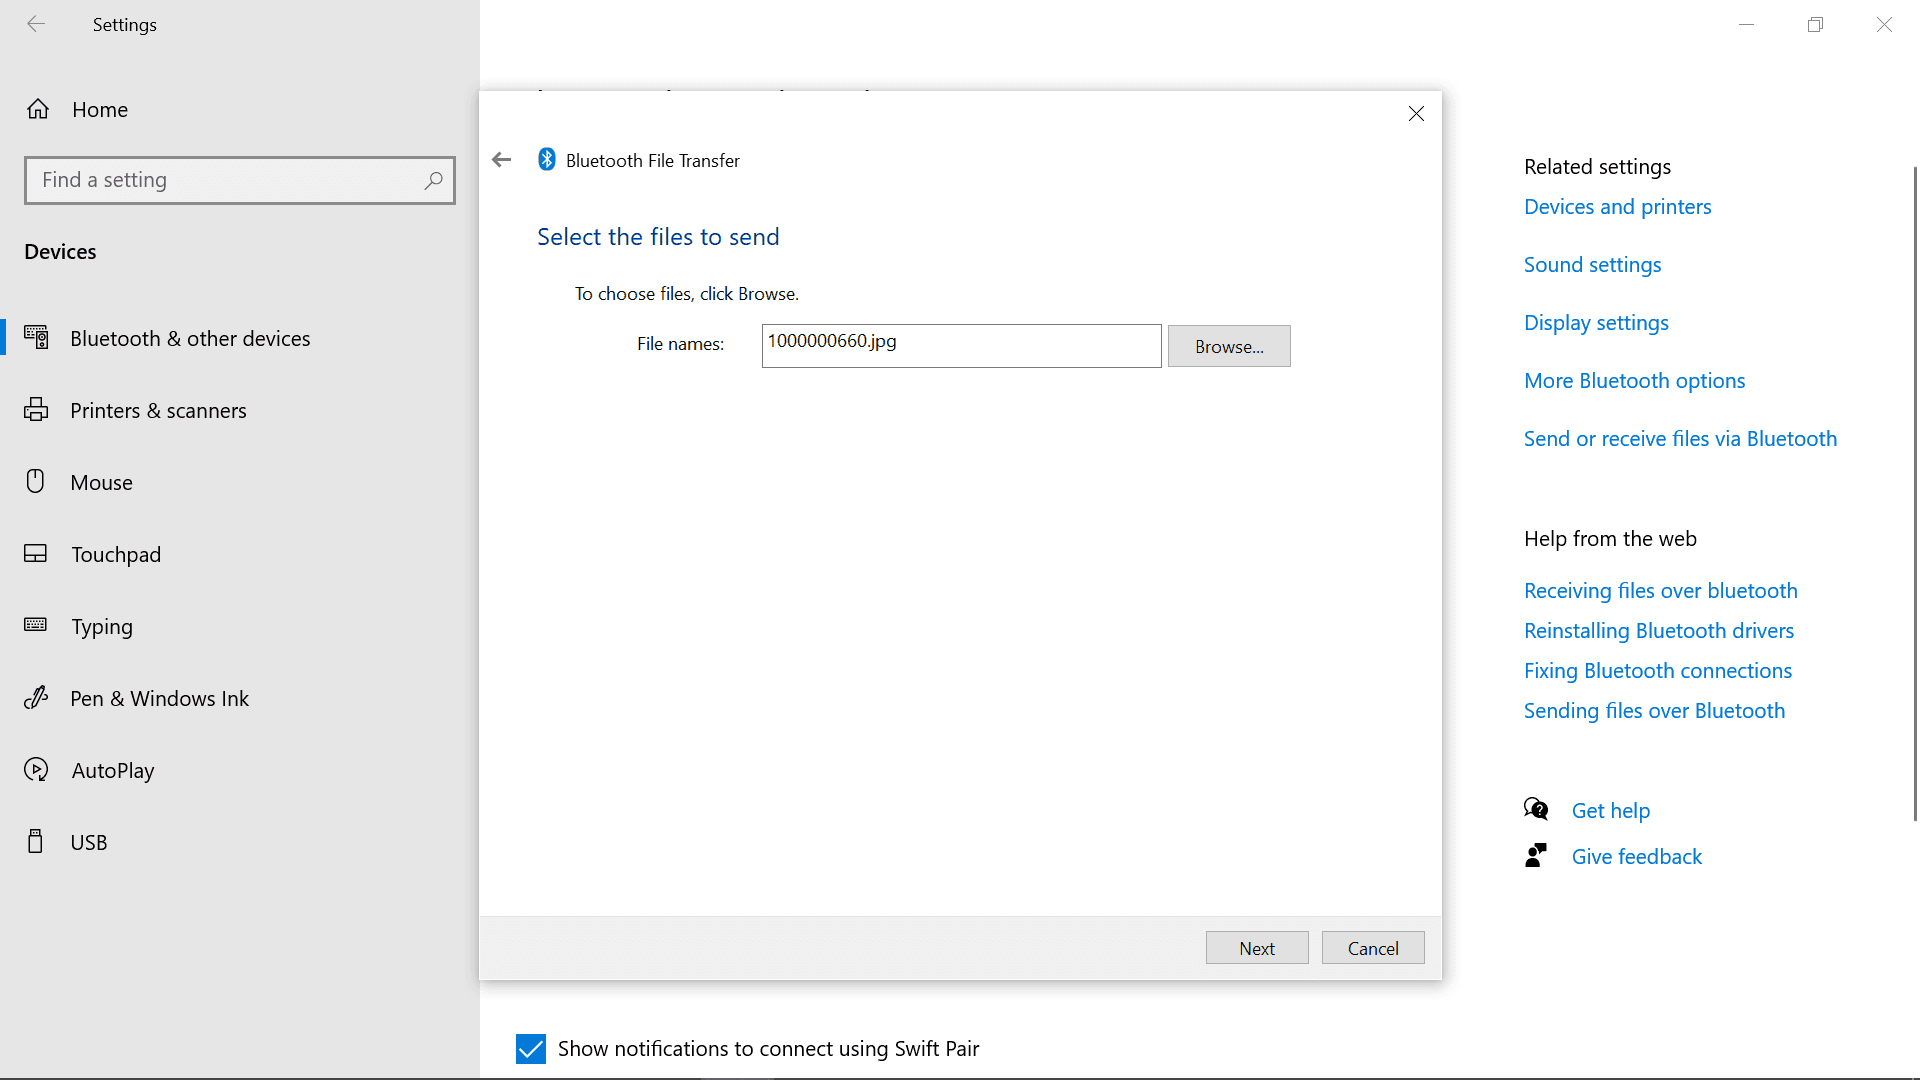
3. Transfer files from Windows to Android: Find "Send or receive files via Bluetooth" in Bluetooth settings >> "Send files" >> Select the Android device to send files >> "Next" >> "Select the files to send".
Note: During the process of transferring files, you should pay attention to the pop-up reminder of "Accept incoming file?" on your Android device, and click "Accept" in time, otherwise the transfer will fail.
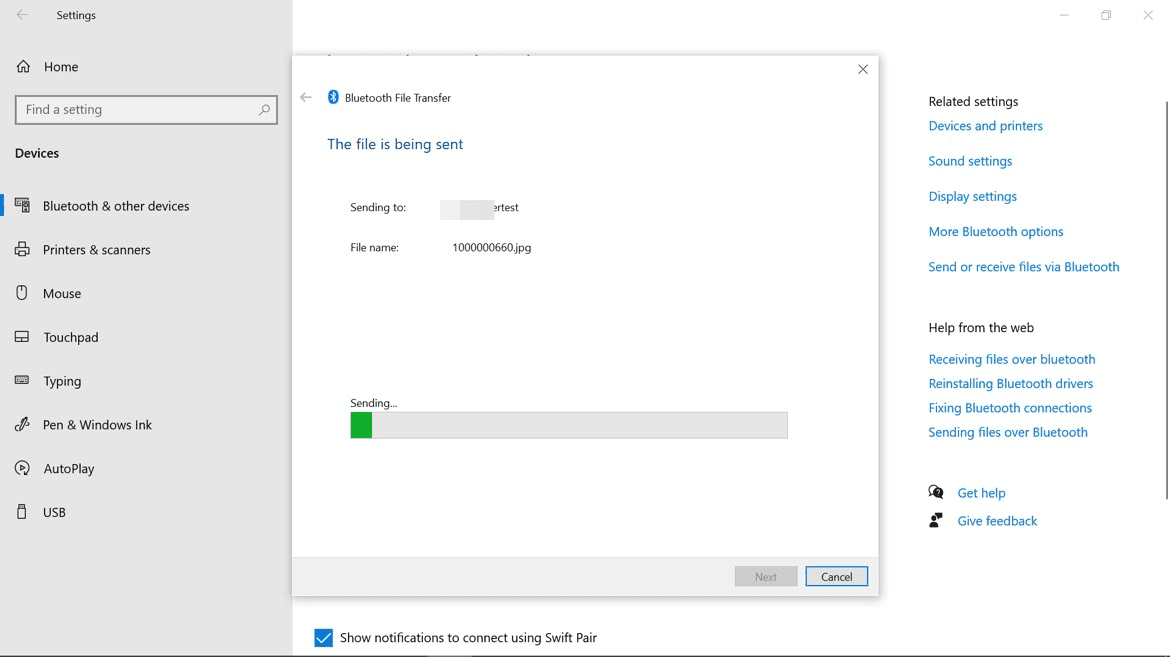
4.Transfer files from Android to Windows: select the file to be transferred on Android and click "Share" >> "Bluetooth" >> select the target Windows device and start transmission.
Limitations: This method requires the two devices to be nearby and under the same WIFI. It is not suitable for long-distance file transfer.
Method 3: Send files via email
We can also transfer data between Android and Windows through email. It’s the most common and easiest way.
1. Log in to the same email account on your Android and Windows devices.
2. Send Files as attachment to your mailbox
3. Download the file in the email on another device
Limitations: Email service providers usually have restrictions on the size of attachment files. This method is not suitable for sending large files.
Method 4: Send files via communication app
Most communication software (such as Line, WhatsApp, etc.) have Windows and Android versions and allow simultaneous log in. It’s convenient using it to send files to yourself or friends. Taking Line as an example, log in to the same account on your mobile phone and computer. upload the files that need to be transferred to "Keep Notes" and then download them on the other end.
Limitations: To ensure transmission speed, communication software usually compresses the files. So, it is not suitable for transmitting videos or photos since the image quality may be compromised. Some software also has restrictions on file type and size.
Method 5: Send files via Google Drive
Using Google Drive to transfer files is also a very convenient method. Just upload the files on Android or Windows to Google Drive. Log in to the same Google account on another device, then you can download the files. Files can also be stored in the cloud for a long time. If you need to share data to multiple devices, you can choose this method. Google Drive also supports managing the access permissions of file data, which can better prevent data leakage.
Limitations: This method is relatively time-consuming than direct transfer, and the free storage space of Google Drive is only 15GB. If you need more space to transfer a large file, you need to purchase additional space.
Conclusion
The above are 5 simple and free ways to transfer files wirelessly between Android devices and Windows devices. They each have their own advantages and limitations. You can choose according to your actual needs. It is most recommended to use the first method, DeskIn remote software, for file transfer, because it not only does not need to be carried out under the same network——supports long-distance transfer; but also has no limitation on size, type and quantity of transferred files.The most important thing is that it maintains high transfer speed up to 12MB/S without sacrificing file quality. It can be said to be the best solution for cross-system file transfer between Android and Windows.
COMPARISONS
5 Remote Desktop Software Test: Remote Work, Gaming, and Video Streaming
Due to work requirements, I frequently use remote desktop software. I spent time testing five free options: TeamViewer, DeskIn, AnyDesk, Awesun, and Parsec. Below, I share their performance in remote work, gaming, and video streaming to help those seeking reliable remote tools. Most tests were conducted via phone-to-PC and MacBook-to-PC connections.
Free Remote Desktop Software Spec Comparison
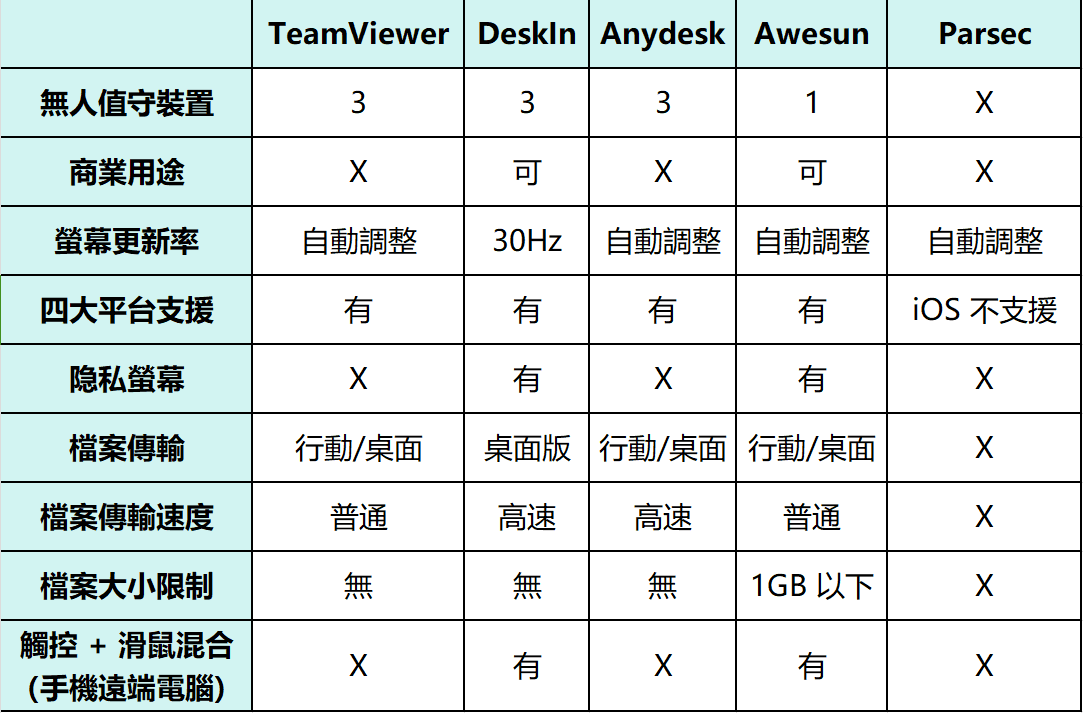
Note: The "four major platforms" refer to Windows, Mac, iOS, and Android.
Remote Work: DeskIn Outperforms Awesun
Among the five, only DeskIn and Awesun allow commercial use in their free versions. TeamViewer, AnyDesk, and Parsec require paid upgrades. Thus, I focused on DeskIn and Awesun for work scenarios.
Basic Operation: DeskIn Feels More Intuitive
Both DeskIn and Awesun have clean desktop interfaces, with quick access to features like text chat and dual-screen switching. However, DeskIn offers faster and more stable connections, while Awesun feels laggier.
Awesun’s scroll wheel sensitivity is too low, making navigation clunky compared to DeskIn’s smooth scrolling.
DeskIn Desktop/Phone Versions
DeskIn’s mobile app is the most user-friendly I’ve tried. Its touch + mouse hybrid mode and gestures (e.g., window switching, web browsing) work seamlessly. The screen response is lightning-fast, even on phones.

Bonus features: messaging/voice calls with remote devices and a Task View shortcut for quick window switching.
Awesun’s mobile app also has a hybrid mode and a single-layer menu (phone-friendly). However, it lacks Task View shortcuts and communication tools (e.g., voice calls), forcing users to rely on third-party apps for collaboration.
File Transfer: DeskIn Has No Speed/Size Limits
DeskIn’s mobile file transfer is paywalled (desktop is free). Speeds are impressive: 5GB over Wi-Fi takes ~3 minutes. Awesun allows free transfers on all platforms but limits files to 1GB, restricting usability.
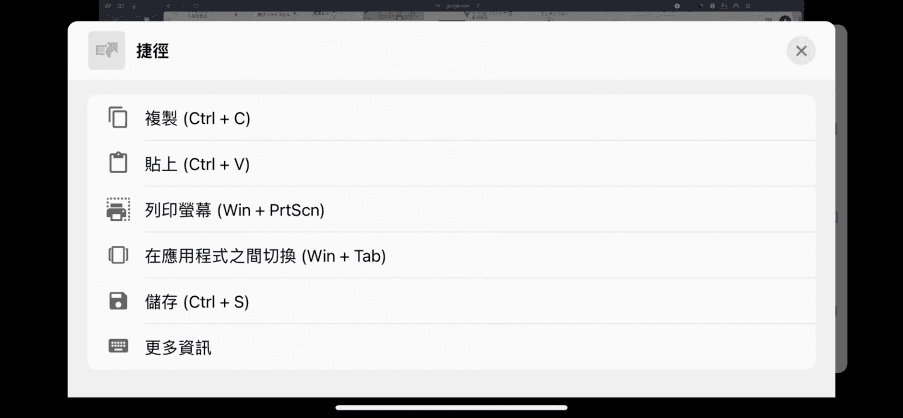
Remote Input: DeskIn’s Shortcuts Shine
For the typing section, the desktop versions are quite similar, so I won’t compare them. Instead, I’ll share the experience of using a phone to remotely control a computer.
Both DeskIn and Awesun mobile versions have keyboards that occupy about half the screen, making typing relatively comfortable.
However ,DeskIn has a significant advantage: it allows users to pin frequently used shortcuts (like copy and paste) above the keyboard or on the remote screen. This makes it easy to copy desired content while typing and paste it where needed. Users can also customize shortcut keys:
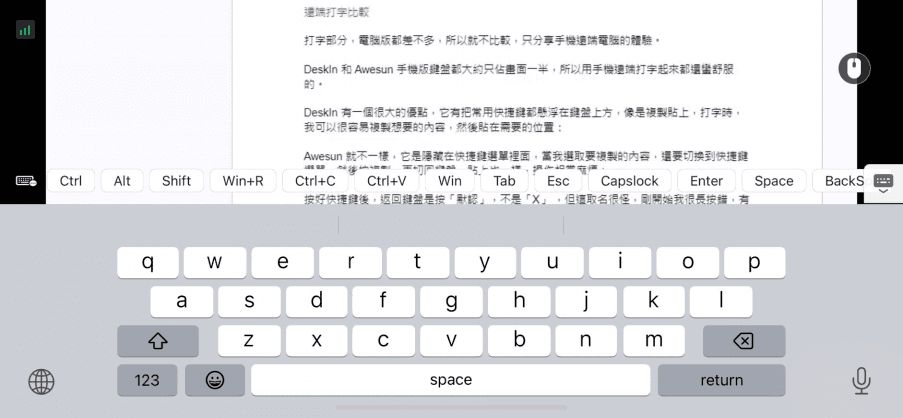
Awesun, on the other hand, hides shortcuts in a menu. When I want to copy selected content, I need to switch to the shortcut menu, press copy, then switch back to the keyboard. The same applies for pasting, making the process quite cumbersome.Additionally, after using a shortcut, returning to the keyboard requires pressing "Default" instead of "X." The naming is confusing, and I often pressed the wrong button initially, which was really frustrating.
Other Three Apps Briefly Reviewed:
TeamViewer: Feature-Rich but Slow Transfers, Clunky Mobile UI
Slow connections (free version), especially on mobile.
Full-featured desktop with a “leave message” function post-session.
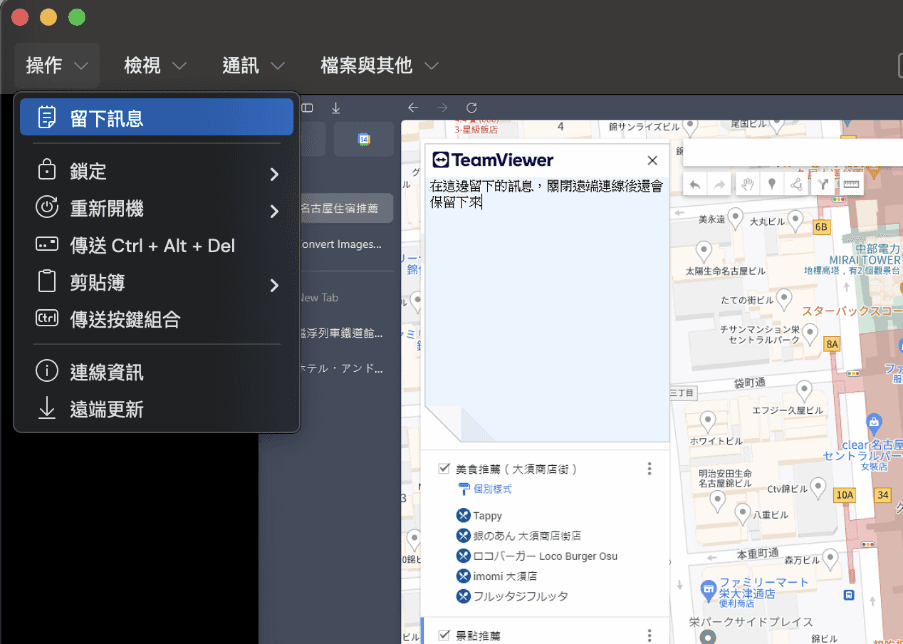
Painfully slow transfers: 5GB took 30+ minutes.
Mobile mouse controls lack touch integration; copy/paste shortcuts are buried.
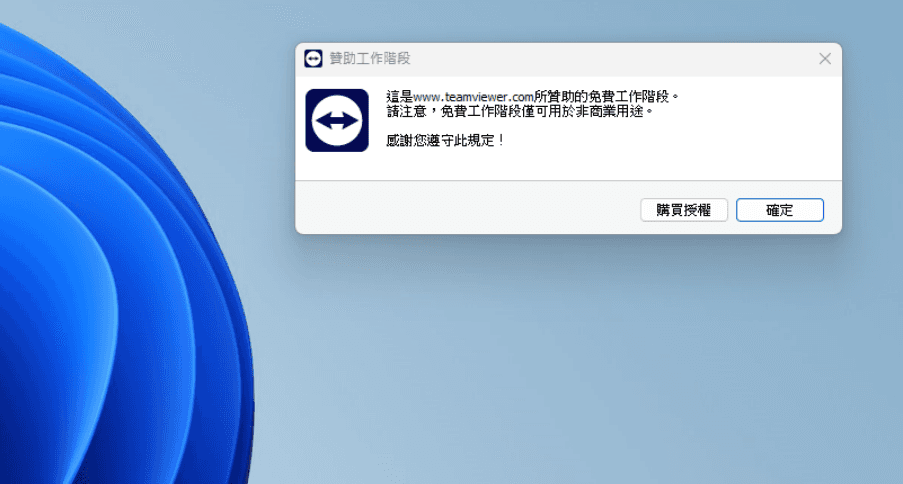
Annoying commercial-use pop-ups on both devices after sessions.
AnyDesk: Fast Transfers, Chinese Input Issues
No installation needed for desktop, but UI feels outdated.
Blazing transfer speeds rival DeskIn, but laggy visuals (1-2 sec delays).
Mobile menu hidden on the right edge (minimalist design).
Input bugs: iOS struggles with third-party Chinese IMEs; Android lacks delete functionality.
Parsec: Great for Gaming, Useless for Work
No Chinese support, but setup is simple.
Desktop version lacks basic features (no file transfer).
Mobile app (Android-only) is barebones: no zoom, no Chinese input.
Ideal for gaming (smooth, adjustable bandwidth), but avoid for productivity.
Remote Gaming Scenario Comparison
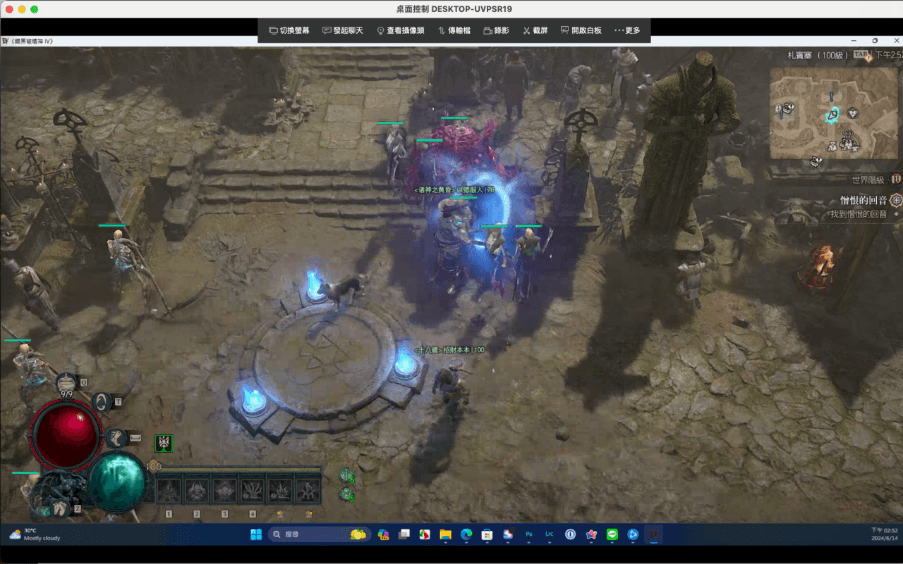
For the gaming section, I tested "using a MacBook to remotely play Diablo IV on a PC" to evaluate each software’s connection quality and latency. This scenario reflects my occasional use case: taking a MacBook Pro out for work and wanting to game during breaks if my home PC is on.
TeamViewer
First, I tested TeamViewer. While playable, it felt noticeably sluggish, with delayed movements and occasional screen freezes, resulting in a subpar experience. Setting the quality to "Speed Priority" did not improve performance.
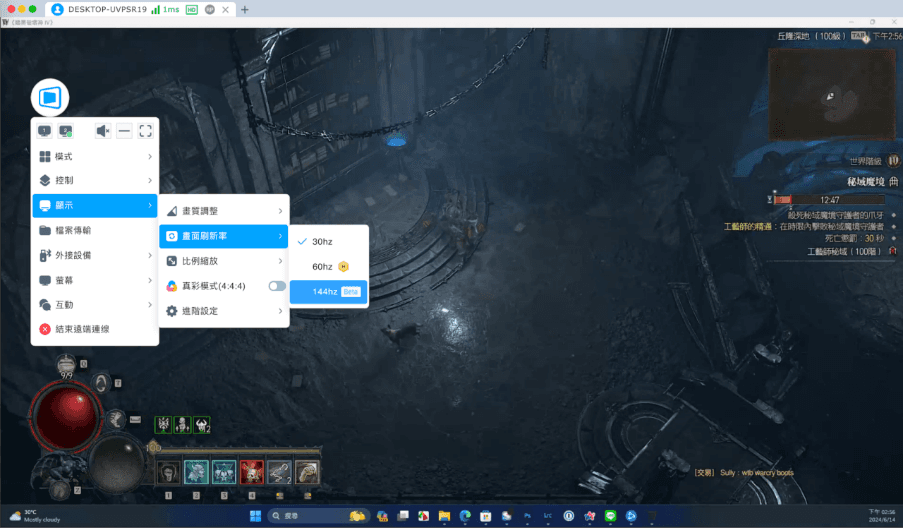
DeskIn
Next, DeskIn impressed me. The visuals were sharp, and gameplay remained smooth for 30 minutes. It also displays real-time FPS and latency stats. DeskIn offers 4K 60fps and 144fps options (paid version only), which would enhance gaming further.
AnyDesk
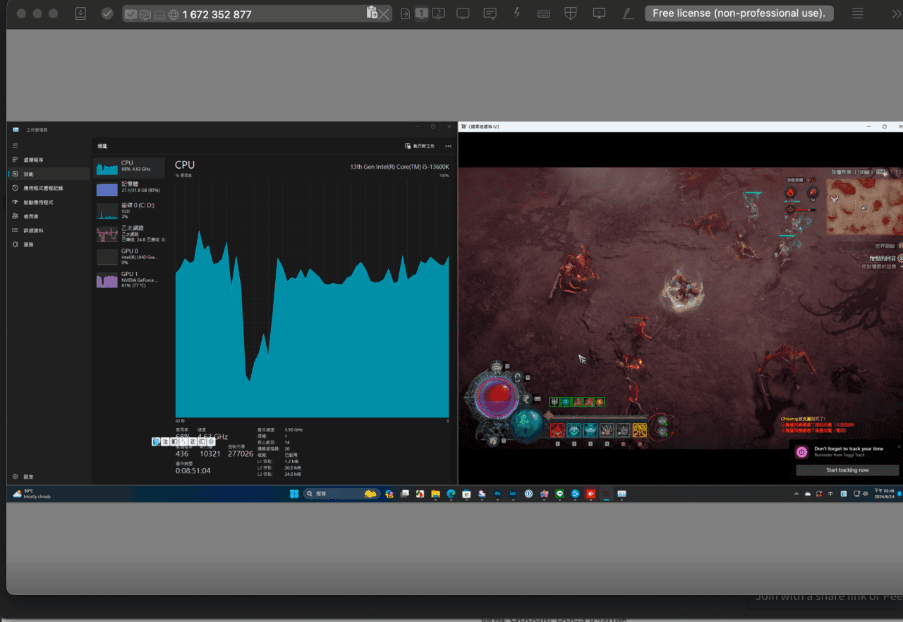
AnyDesk delivered the best image quality among the five and smooth gameplay. However, I noticed a critical issue: the remote PC’s CPU usage spiked to 70-80%, causing loud fan noise and raising concerns about long-term hardware strain.
Awesun
Awesun performed smoothly except for brief stutters during scene transitions (e.g., returning to town). Its Mac version had stability issues—crashing after one session and requiring reinstallation. It also lacked audio.
Parsec
Parsec excelled in gaming, offering flawless Diablo IV performance with adjustable bandwidth settings to minimize latency. It also supports multiplayer rooms. If gaming is your sole focus, Parsec is a no-brainer.

Remote Video Streaming Comparison
Streaming videos via phone-to-PC tests each software’s latency. I tested YouTube, Netflix, and local files. Three performed smoothly: TeamViewer, DeskIn, and Parsec, but with caveats.
TeamViewer: Smooth playback but extremely low volume (no mute option), forcing sound output if the PC plays audio.
Parsec: Great speed and audio, but mobile lacks zoom (full-screen only).
DeskIn: Flawless sync and no issues.
AnyDesk: Mobile audio is broken (iOS/Android)—no sound despite settings.
Awesun: Choppy audio and desynced visuals, indicating poor connection quality.
How to Choose Remote Desktop Software
Prioritize features (file transfer, device communication, keyboard ease) and low-latency connections. Additional tools like DeskIn’s screen extension and voice calls add value. Cross-platform support (iOS/Android/Windows/Mac) ensures future flexibility.
Conclusion
I expected the renowned TeamViewer to dominate, but testing revealed flaws. DeskIn emerged as the top choice for its balanced performance, stability, and features. If you’re seeking reliable remote software, give DeskIn a try!
PRODUCTIVITY
5 Tools to Extend Mac/Windows Screen-Easy Dual Screen Set Up
Screen extension tech is becoming more and more popular in our daily lives. Here we introduce 5 tools can extend Mac/Windows screen easily.
1. DeskIn Rating ⭐⭐⭐⭐⭐
DeskIn is a one-stop remote desktop software designed for individual users. Besides remote access functions, it provides free screen management features - cross-system extended screen and mirror screen. It supports resolution up to 2K60FPS, and allows you to adjust resolution and frame rate manually. If you are looking for a free extended screen tool, DeskIn is the most recommended one.
Supported Systems: Support extending Windows 10 1903+, MacOS 10.15+ screen wirelessly to Android 6+、iOS10、Mac 10.15+、Windows 10 1903+ devices
Resolution: Up to 2K 60FPS
Limitations: Linux system is not supported yet, and wired screen extension is not supported.
Strengths: No need to manually enter the device ID or use it under the same Wi-Fi. Supports Mac, Windows, iOS, and Android platforms. High-definition image quality and high stability.
Free Trial: Extend screen feature is free to use
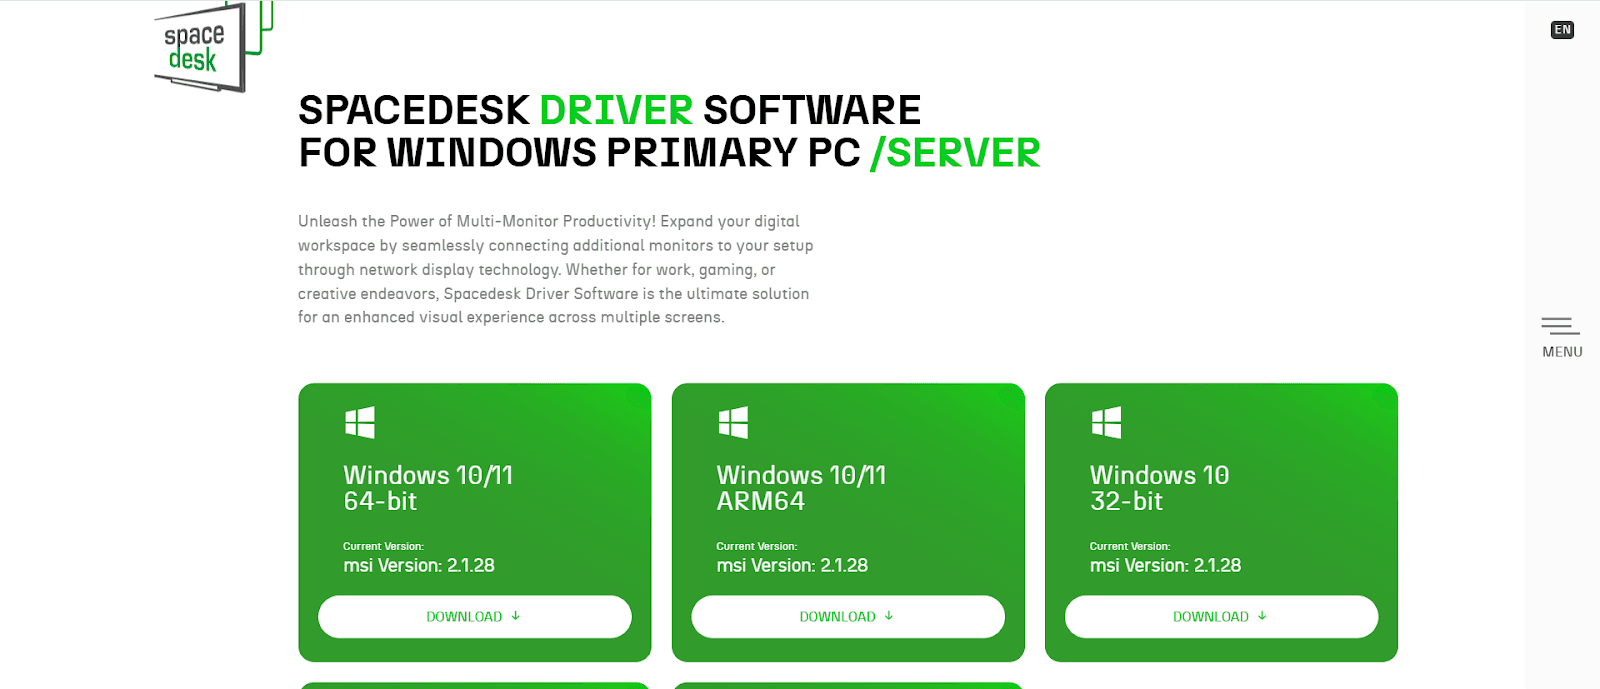
2. Spacedesk Rating ⭐⭐⭐⭐
Spacedesk is a completely free screen management tool (Note: commercial use requires a paid license) and has no ads. It allows extending screen to up to 3 screens at the same time, wired and wireless connections, and adjusting parameters such as image quality, resolution, frame rate, etc. The only drawback is that it does not support Mac systems yet.
Supported Systems: Support extending screen from Windows 8+ devices wirelessly, wiredly to Android 4.1+, iOS9.3+, Windows 7+ , HTML5
Resolution: Supports up to 8K 60FPS (The extended device needs to support 8K)
Limitation: Mac system is not supported, and wireless screen expansion is unstable and easy to disconnect. The main device and the device used as an extended screen need to download two different softwares, which is relatively troublesome. Devices need to be on the same Wifi to use the feature.
Free trial: Completely free to use.
3. Duet Display Rating ⭐⭐⭐
Duet is developed by a team of former Apple engineers, providing remote access and screen management functions. The software does not provide a free version. Its remote service and screen management service need to be purchased separately. Its screen management service includes extended screens and mirrored screens, and provides 4 paid versions. You can choose to subscribe annually or purchase a lifetime license. Since there is no free version, the following only introduces the performance of its cheapest paid version.
Supported Systems: Supports wired or wireless extension from MacOS10.13+, Windows 10+ to iOS 7.0+ , Android 7+, MacOS10.9+, Windows 10+ devices
Resolution: Supports up to 60FPS, supported resolution is not declared
Limitations: No free version
Free trial: 7 days trial
Paid plan: US $48~$72 per year
4. GlideX Rating ⭐⭐⭐
GlideX is a remote desktop software developed by ASUS, but in addition to ASUS's own products, it also supports use on other computers. The software provides rich functionalities, but many of them require purchase to unlock, and the free version has many restrictions. The free version only supports screen extension and projection from Windows to Android and iOS.
Supported Systems: Only supports extending screen from Windows 10 1090+ devices to Android 9+, iOS14+ version devices.
Resolution: Up to 720P 30FPS
Limitations: Has ads, does not support mac system-related functions, and does not support dynamically adjusted streaming quality.
Free trial: Register for ASUS, ROG laptops and desktops to enjoy a 1-year trial of "Glidex Professional Edition"
Paid plan: US $11.88~US $71.88 per year
5. LetsView Rating ⭐⭐
LetsView is a projection tool and you can pay to unlock the extended screen feature. It can be used without logging in, but the connection is a bit unstable. When using it on a Windows system, the editor often encounters the problem of being unable to successfully expand the screen and crashing.
Supported Systems: Supports wireless screen expansion from Windows 10+ to Android 5+ and iOS 9.0+ devices
Resolution: The cheapest plan supports up to 720P 30FPS
Limitations: It requires payment to unlock and cannot expand the Mac screen. When using it on Mac, you need to turn off the "Airplay" feature first and the 2 devices need to be on the same network to use the extended screen feature.
Free trial: No
Paid plan: US$ 29.99~US$ 39.99 per year
Conclusion
The above introduces 5 software that can extend the Mac and Windows screen to mobile devices: DeskIn, Spacedesk, GlideX, Duet display, and Letsview. Although they all provide screen extension functions, the supported systems, prices, and resolutions are different. If you are looking for an extension tool that is completely free, can be extended wirelessly, supports both Mac and Windows and has good performance, DeskIn is definitely your best choice. Download and give it a try!
PRODUCTIVITY
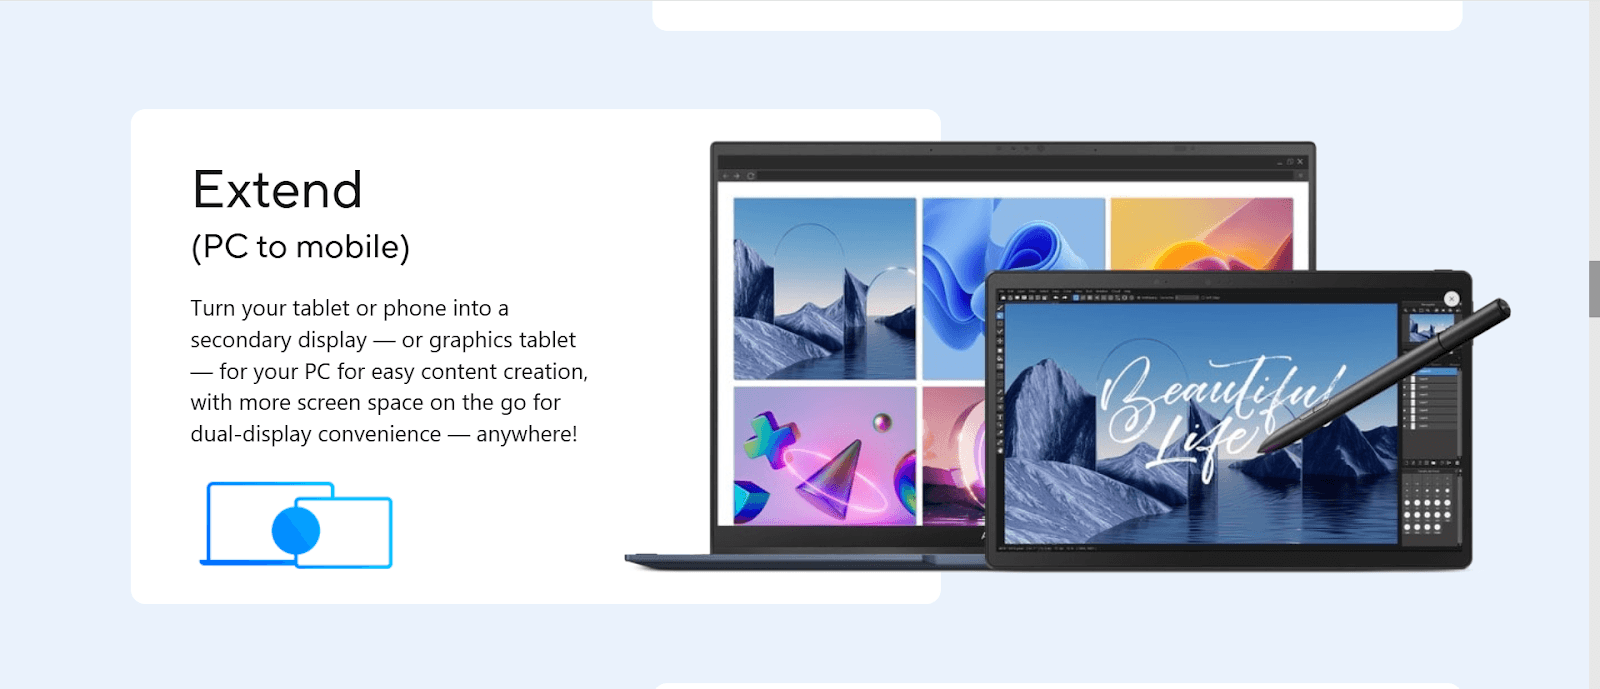
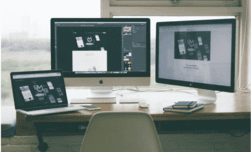
6 Dual-screen Productivity Tips! Guide to Turn iPad/Android Tablet Into A Second Monitor
Working with dual screens can greatly improve work efficiency, especially for designers and engineers who need multitask. But do you really need to buy an extra screen? The best screen may already be around you – that’s a tablet! This article will introduce you to 6 dual-screen productivity tips and how to turn your tablet into a second monitor for your computer.
6 dual-screen productivity tips:
1. Save time switching windows
When multitasking, you can open windows separately on two screens, saving time switching back and forth between windows and making your workspace cleaner and more organized.
2. Improve proofreading efficiency
When proofreading text or data, using the split-screen function may cause the text to be too small to be read clearly. You can open the file in two screens respectively to ensure that the font size is moderate, and the layout is consistent, making the proofreading work easier.
3. Improve editing efficiency
When editing, you can open the editing software on the main screen and find footage and materials on the other screen to improve editing efficiency.
4. Better view with portrait orientation
When you need to browse videos or files in vertical format, you can switch the dual screens to portrait orientation for more visual comfort.
5. Compile while consulting information
Whether you are a student writing an essay or an editor writing an article, you may need to search for information when writing. Dual screens allow you to do these simultaneously, you can also do copy-and-paste between 2 screens seamlessly.
6. Zoom in on detail
When you are doing design work or photoshop, you can zoom in on part of the image on the second screen to better view the details. You can also move a certain workspace in PS or PR to the second screen, enlarging it for more convenient use.
How to turn iPad/Android tablet into a second monitor?
Method 1: Use DeskIn remote software
Applicable system: Support cross-platform screen extension between Windows, iOS, Mac, Android computers and tablets
Step 1: Download and register a DeskIn account
Download DeskIn on your PC and iPad, register for a free account and log in separately
Note: If you are logging in on a new device for the first time, you need email verification to ensure the security of your account.

Step 2: Extend screen
On DeskIn on the computer >> Go to "Screen Mgt" >> Click "Expand my screen"
Select the device you want to expand the screen on and click "Start Extending".
After the connection is successful, your iPad will become a second screen for Windows/Mac, and windows can be flexibly moved between the two screens..
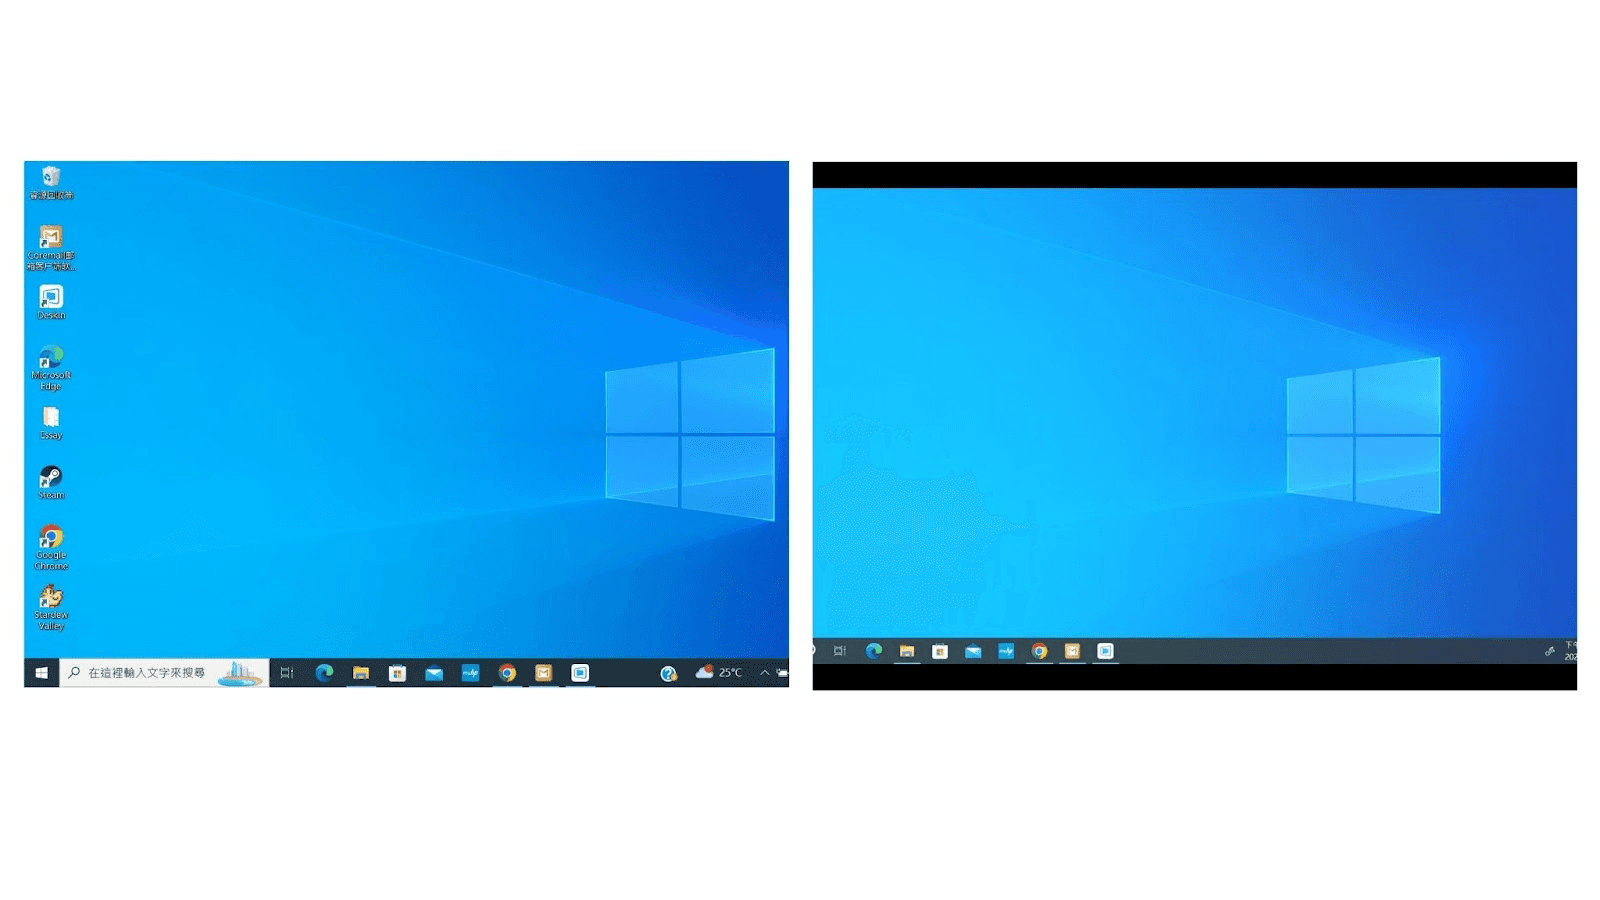
Computer screen (left) and iPad screen (right)
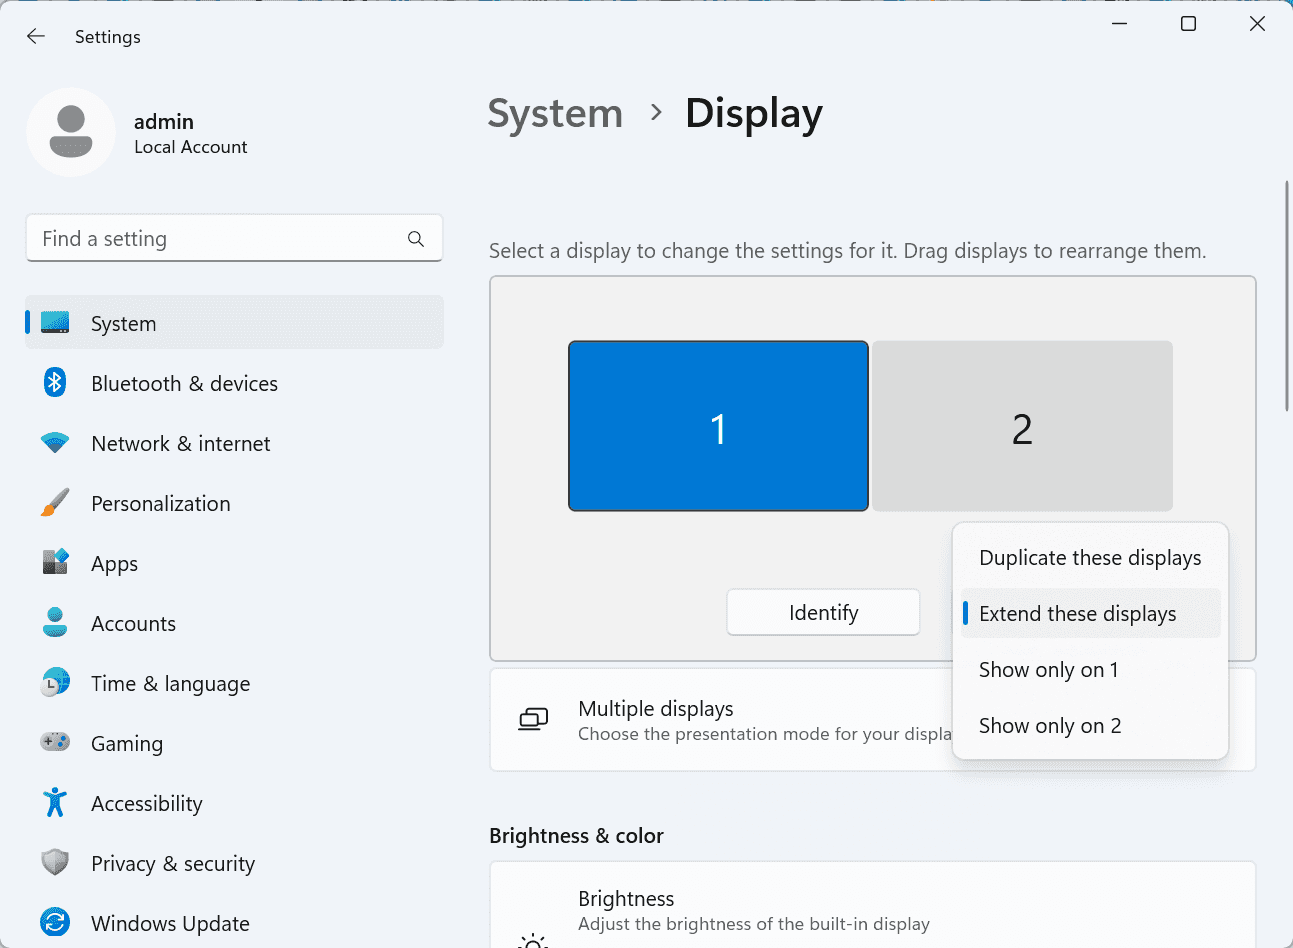
Step 3: System display settings
After extending the screen, if you find that your iPad only mirrors the content on your computer screen, please go to Windows System Settings>>Display Settings and set the screen option to "Extend these displays".
Method 2: Use Apple "Sidecar" Function
Applicable system: Extend Mac to Mac or iPad
Apple’s built-in feature Sidecar allows you to use the iPad as an external display for a MacBook and iMac.
Requirements:
1. The two devices should log into the same Apple ID or are on the same network.
2. Both devices should have Bluetooth, Wi-Fi turned on, and the distance cannot exceed 10 meters (about 10 meters).
Step 1 Display Setting
Open the Mac System Settings >> Click "Display" in the sidebar >> Click the "+" pop up menu on the right and choose your iPad.
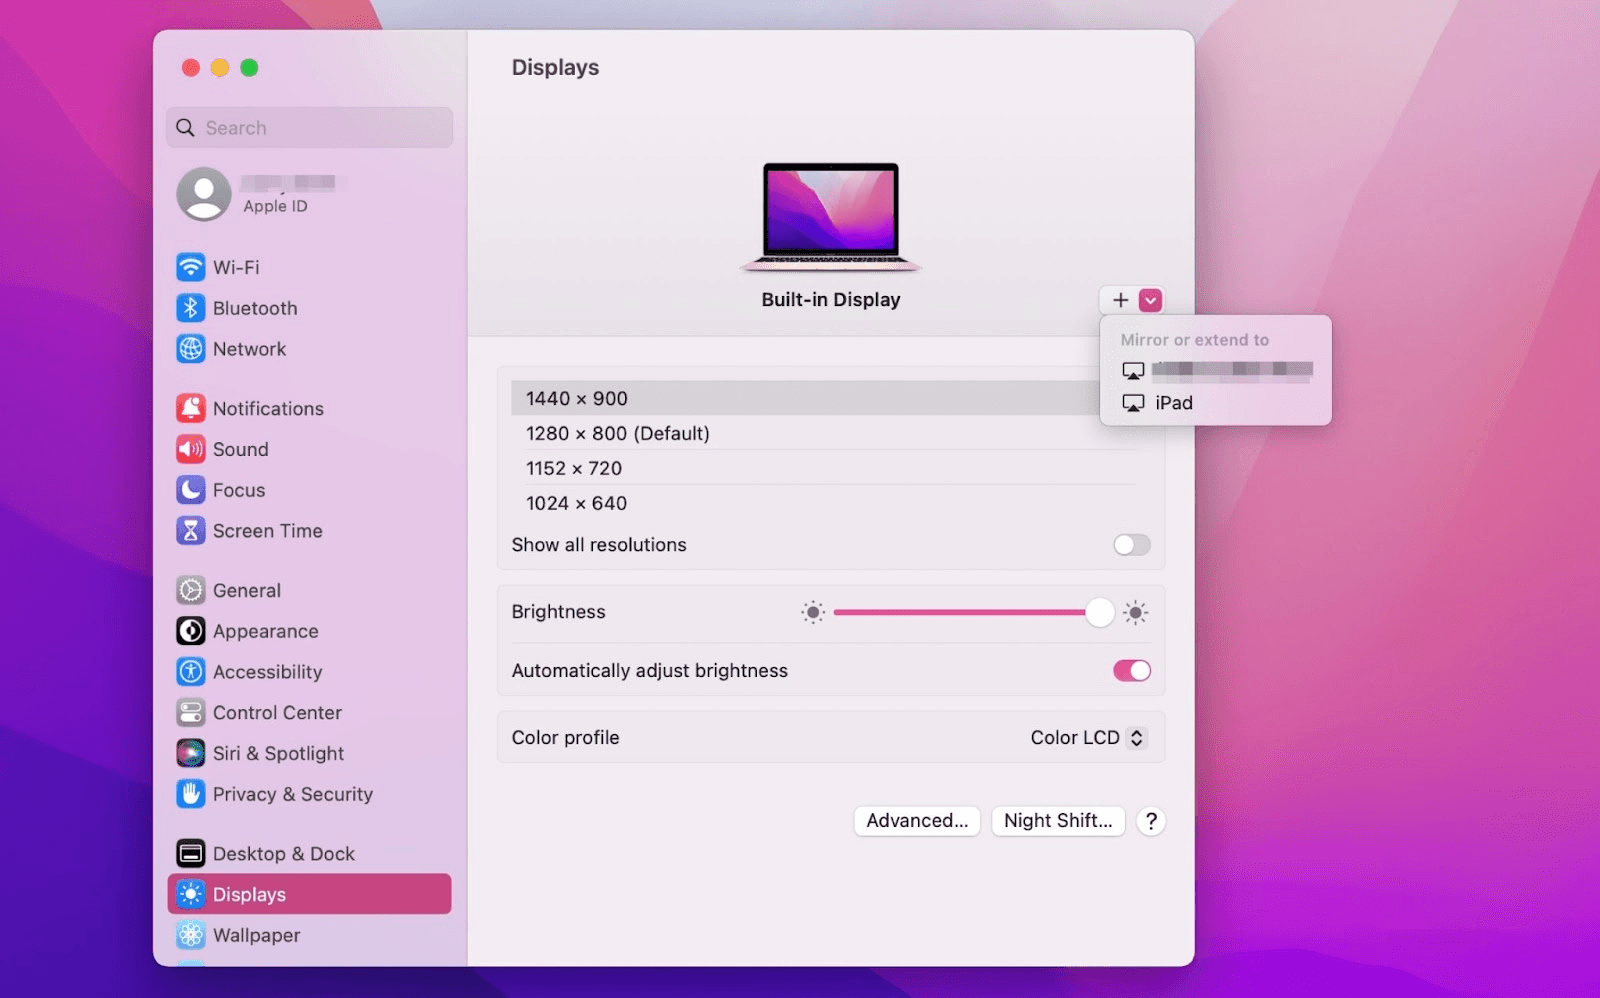
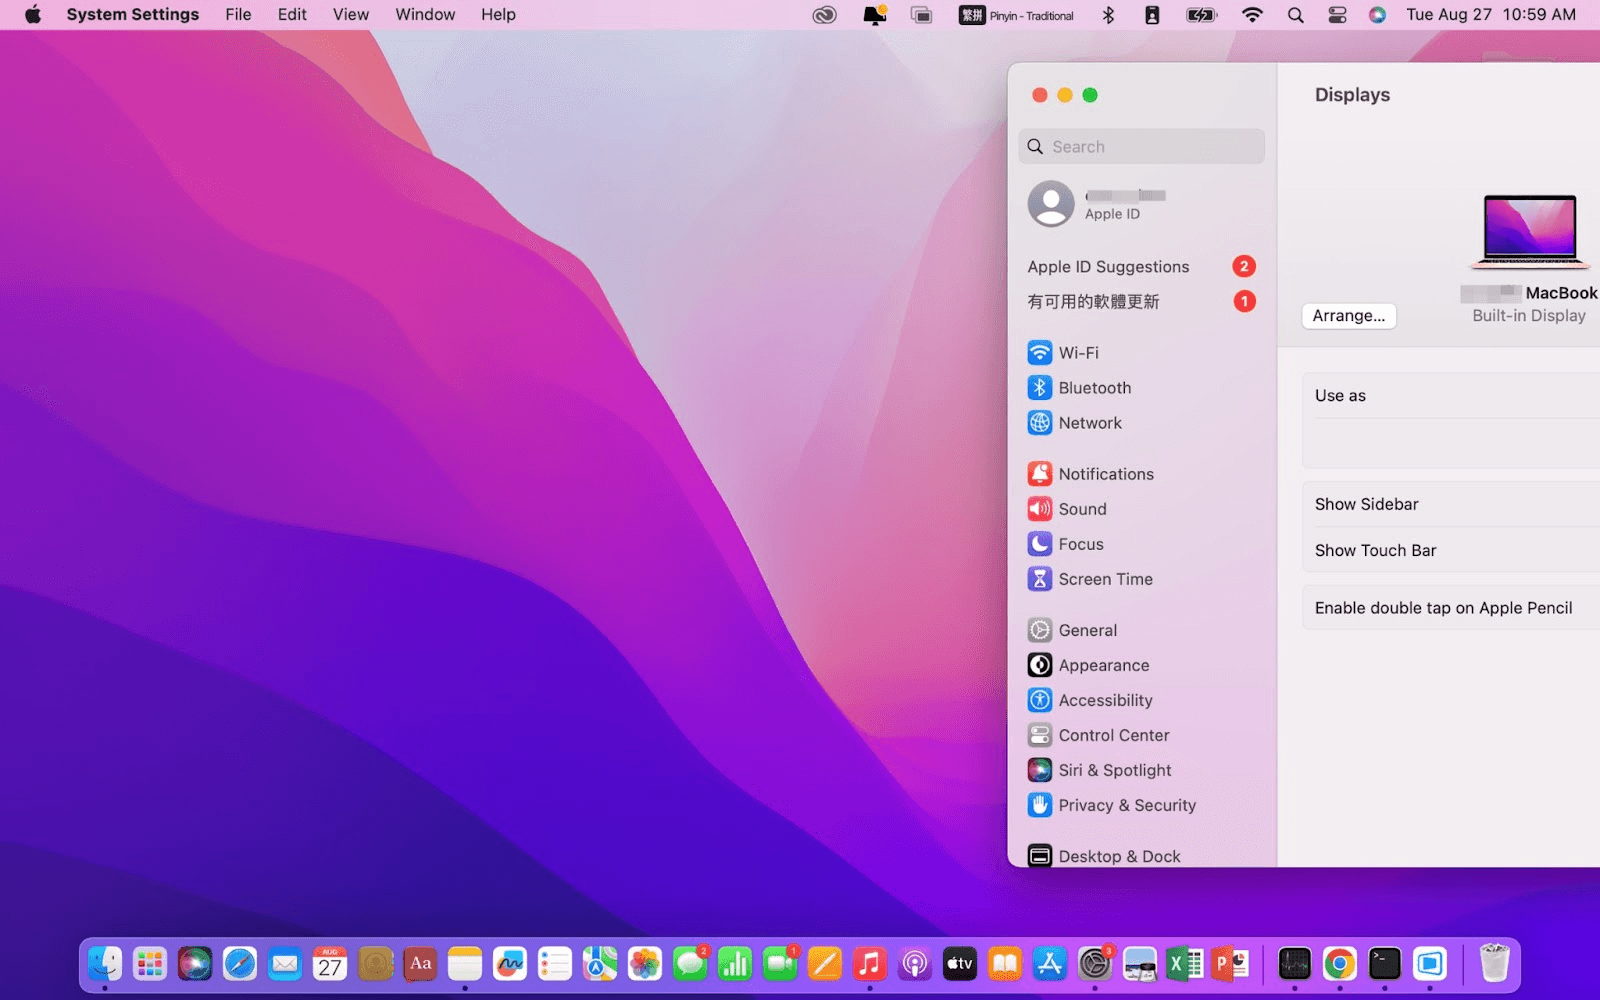
Select the iPad, change the Use as settings to "Extended Display". Check the Airplay settings on the top toolbar of the mac and set iPad as "Use As Separate Display".

Step 2: Extend screen
After completing the settings, your iPad will become the second display for your Mac. You can drag windows from your Mac to your iPad smoothly. You can also use the sidebar on the iPad or change the position of the sidebar on the system display settings.
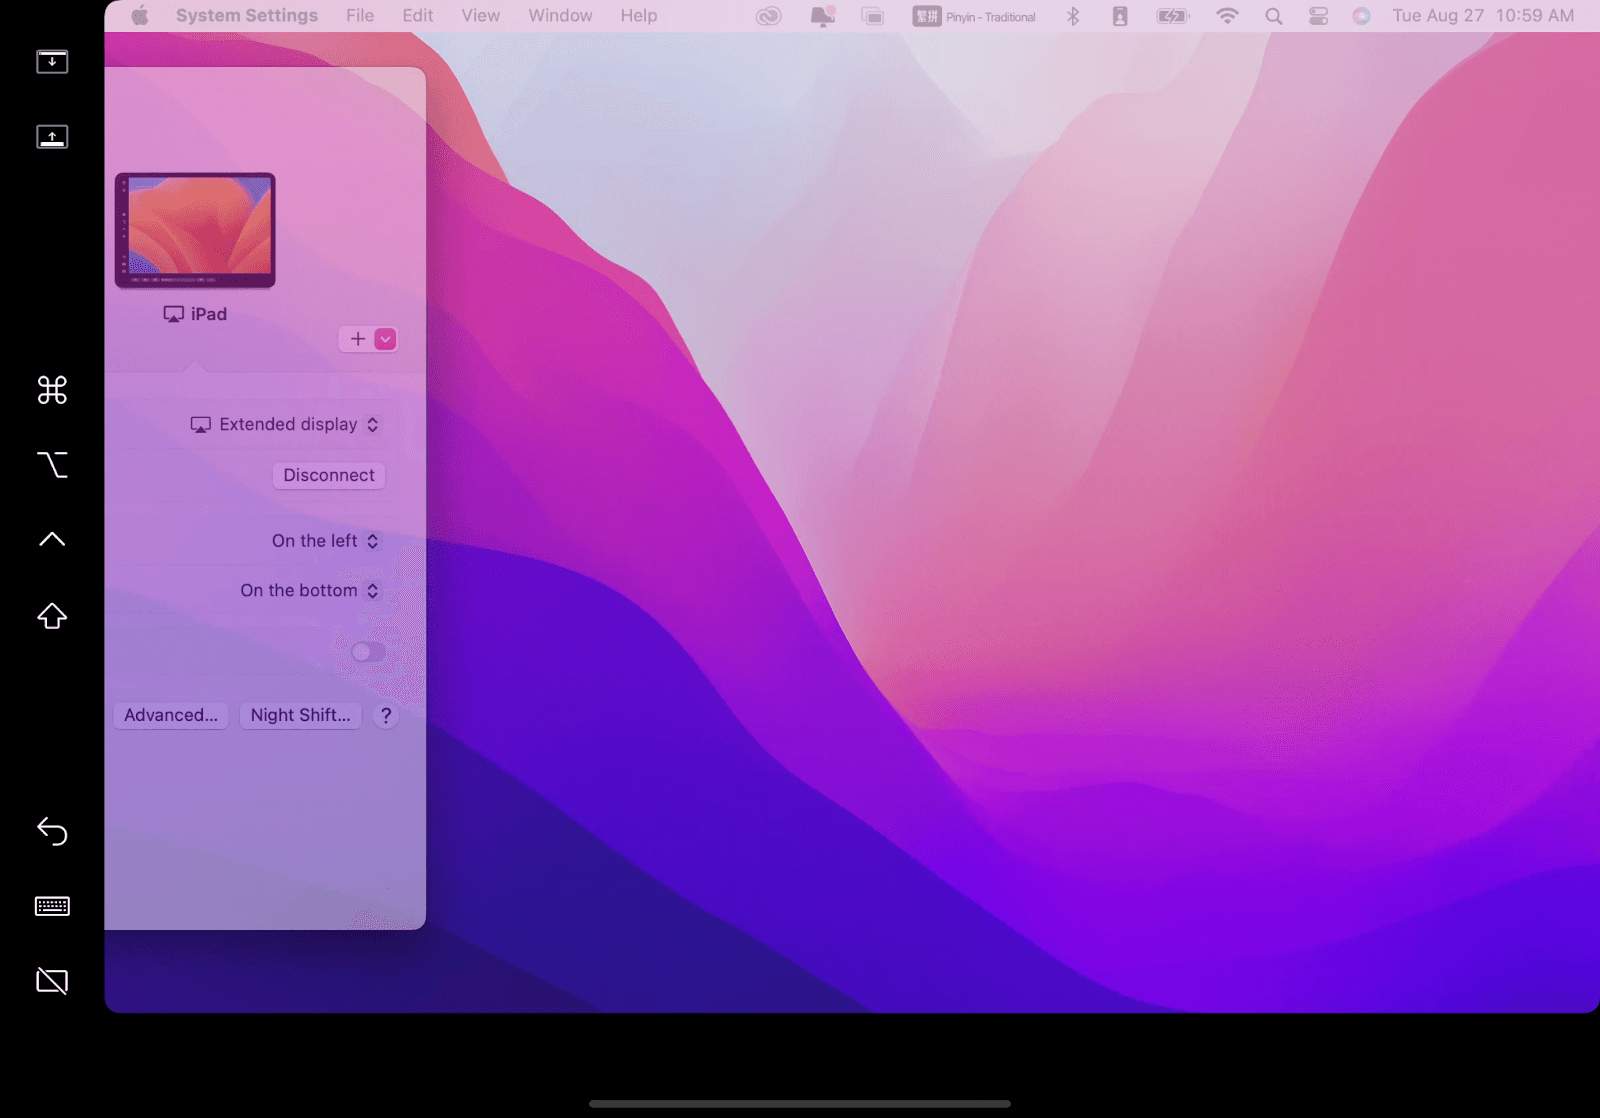
MacBook screen (Left) and iPad screen (Right)
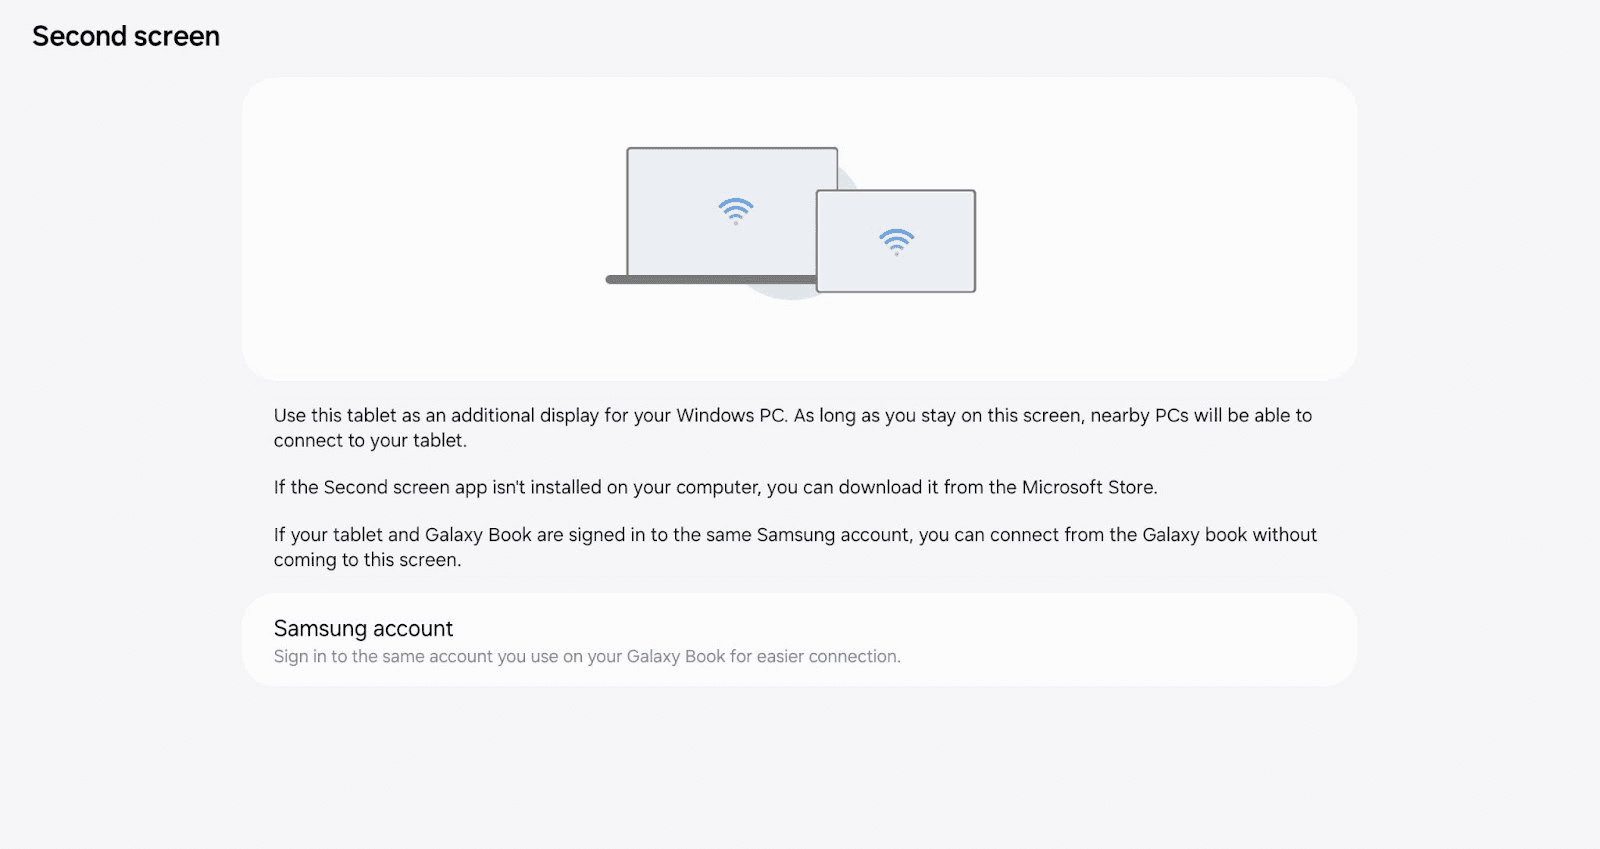
Method 3: Use Samsung “Second screen” function
Applicable system: Extend your Windows computer to your Samsung tablet
Step 1: Enter the "Second Screen" page
Go to the "Quick Settings Panel" by swiping down from the top of the tablet screen, tap the "Second Screen" icon to enter.
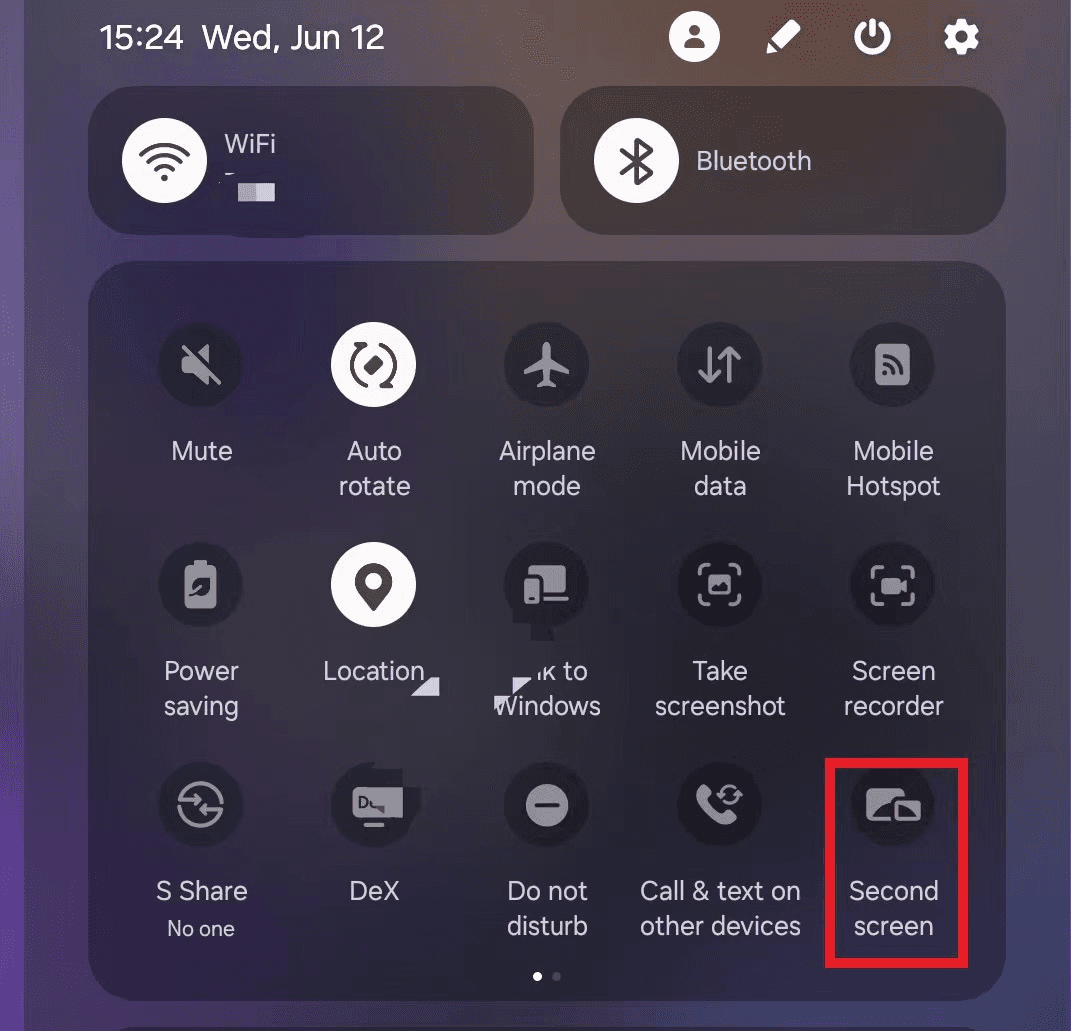
Follow the system prompts to select the desired connection mode "Drawing/Game" or "Video". After that, stay on the "Second Screen" page and do not leave.
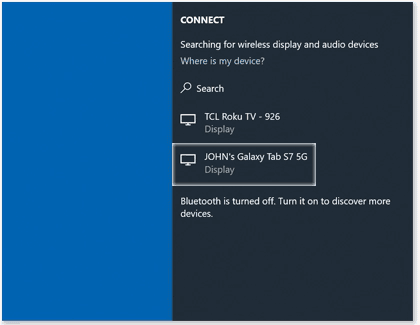
Step 2: Expand computer screen to tablet
Press "Windows+K" on your computer and select the tablet you want to extend in the pop-up device list. (Keep your tablet on the Second Screen page and your tablet will appear in the device list)
Conclusion
This article introduces 6 tips on how to use dual screens to improve work efficiency and also introduces 3 methods so that you can turn the tablet at hand into a "second screen" for Windows or Mac computers without buying another dual screen. This is especially useful for people who need to multitask or use multiple applications at the same time. Try it now!
Load More
Blog
Search Docs…
ALL TOPICS
COMPARISONS
GAME
PRODUCTIVITY
TROUBLESHOOTING
PRODUCTIVITY
2 Simple Ways To Share Window 10/11 Screen
Do you want to share your computer screen with your colleagues during a meeting or project videos/photos onto a larger screen? This article will introduce two simple methods to project your Windows 10/11 computer screen.
Method 1: Use professional projector app DeskIn to share screen
Advantages of using DeskIn remote desktop for projection:
Cross-platform support: DeskIn supports screen sharing between iOS, Windows, Android, and macOS systems.
No need for the same network environment: DeskIn allows projection even when devices are not on the same network, making it possible to share screens over long distances.
Screen adaptation: You can modify resolution, frame rate, and other settings to better adapt to remote screens.
Secure: DeskIn uses 256-bit encryption to ensure that your projected content remains private and secure.
Easy to use: No complicated setup is required.
Step 1: Install DeskIn on both your computer and the device you want to share your screen with.
Register for a free account and log in.
Note: On your first login to a new device, you will need to complete an email verification to protect the security of your account.
Step 2: Extend your screen
Open the DeskIn app on your Windows/Mac computer >> Go to the "Screen Mgt" tab >> Click “Mirror my screen."
Step 3: Select the device you want to share your screen with and click "Start Mirroring."
Step 4: You can find the device you are sharing your screen with in the「Device list」and adjust the resolution, frame rate, and other settings as needed.
Method 2: Use Windows Built-in Tool "Wireless Display" to Project Your Computer Screen
Step 1: On both the computer you want to share the screen from and the one you want to share it to select "Windows Start" >> "Settings" >> "System" >> "Optional Features".
Step 2: On the "Optional Features" page, click "View Features" next to "Add an optional feature.” Search for "Wireless Display," then click and install it.
Step 3: Once installed, go back to "Settings" >> "System" >> "Projecting to this PC" to manage your projection preferences.
Step 4: On the computer you want to share the screen to, search for "Wireless Display" in the taskbar search box and launch the app. The device will now be discoverable and ready to receive projected content.
Step 5: Press "Windows+K" on the computer you want to share screen from, select the device you want to share screen to on the device list that pops up.
You can also project your computer screen to a Miracast-enabled TV, projector, or other type of external display.
Conclusion
This article introduced two simple methods for projecting and sharing your screen on Windows 10/11. While Method 2 uses built-in Windows tools, the setup process is relatively complicated and is only applicable to Windows systems or displays that support Miracast. If you want to project your Windows computer screen to any macOS, iOS, Android, or Windows device, we recommend using the remote software DeskIn. It is not restricted by the operating system and does not require devices to be on the same network, making it a versatile solution for all your projection needs.
PRODUCTIVITY
3 Ways To Send Large Files That Exceed Email Size Limits
We usually use email to transfer files, but most email services refuse to accept attachments that exceed a certain size—claiming this helps prevent malicious attacks and reduce risks. Therefore, when sending large files, you cannot rely on this common method. However, there are other equally easy ways to transfer large files. This article will introduce you to three of them.
Method 1: Compress the file before emailing
Email providers often have limits on the size of attachments that can be uploaded. For example, Gmail only allows attachments of 25MB or smaller, and Outlook only allows attachments of 20MB or smaller. To work around this, you can compress the large file to a size that meets the email attachment requirements.
Advantage: Compressing files is the simplest and most direct way to reduce file size to fit attachment limits, allowing you to transfer large files via email directly.
Limitation: File compression typically reduces the file size to only about half of its original size. As a result, this method is only suitable when the file exceeds the size limit by a small margin. Additionally, compressing and decompressing files may lead to data loss or damage. For instance, the quality of videos or images may deteriorate.
Gmail only allows attachments under 25MB
Method 2: Use a cloud drive to transfer files
In addition to sending via email, there are other ways to send large files, such as using Cloud Drive.
Upload large files to a cloud drive (such as Google Drive), then you can send them to the other party by sharing a link.
Advantage: This method ensures better file quality and allows you to send much larger files compared to email attachments. Additionally, the files are saved in the cloud and can be accessed at any time.
Limitation:1. The free storage space on Google Drive is limited to 15GB. Other cloud drives also have similar free storage limits, so you may need to purchase additional storage space if required.
2.Since the file must first be uploaded to the cloud and then downloaded by the recipient, the transfer time depends on your network conditions. This process may take longer than traditional methods.
Method 3: Use DeskIn remote desktop software to transfer files (Most recommended)
Currently, most remote software on the market supports file transfer. DeskIn has enhanced the standard file transfer functionality to provide an even better experience:
1. The free version already supports file transfer with no limit on size and quantity;
2. Fast transmission speed, up to 12MB/s;
3. Ensure your files remain confidential and protected from unauthorized access using 256-bit end-to-end encryption;
4. There is no need to upload or download files like a cloud drive. You can directly transfer files from one device to another, time-saving;
5.DeskIn supports seamless file transfer between different devices and operating systems. Whether you are using a Windows PC, Mac or mobile device, DeskIn allows you to easily transfer files across platforms.
There are also security risks when using email to transfer files. Even if you enter just one wrong character, your email may be sent to another person and cannot be withdrawn, which may easily lead to information leakage. While using DeskIn, you need to match the device ID and password, or manual passwordless verification from the other party's computer, which avoids transferring to the wrong object.
How to use DeskIn for file transfer?
1.Download DeskIn respectively on the transmitting device and the target transmitting device, register a free account and log in separately. If you are logging in on a new device for the first time, you need to go to the registration email to complete verification.
2. After successful login, enter the device code of the device to be transferred, select file transfer, and then select Connection. You can choose a password or manual passwordless verification method.
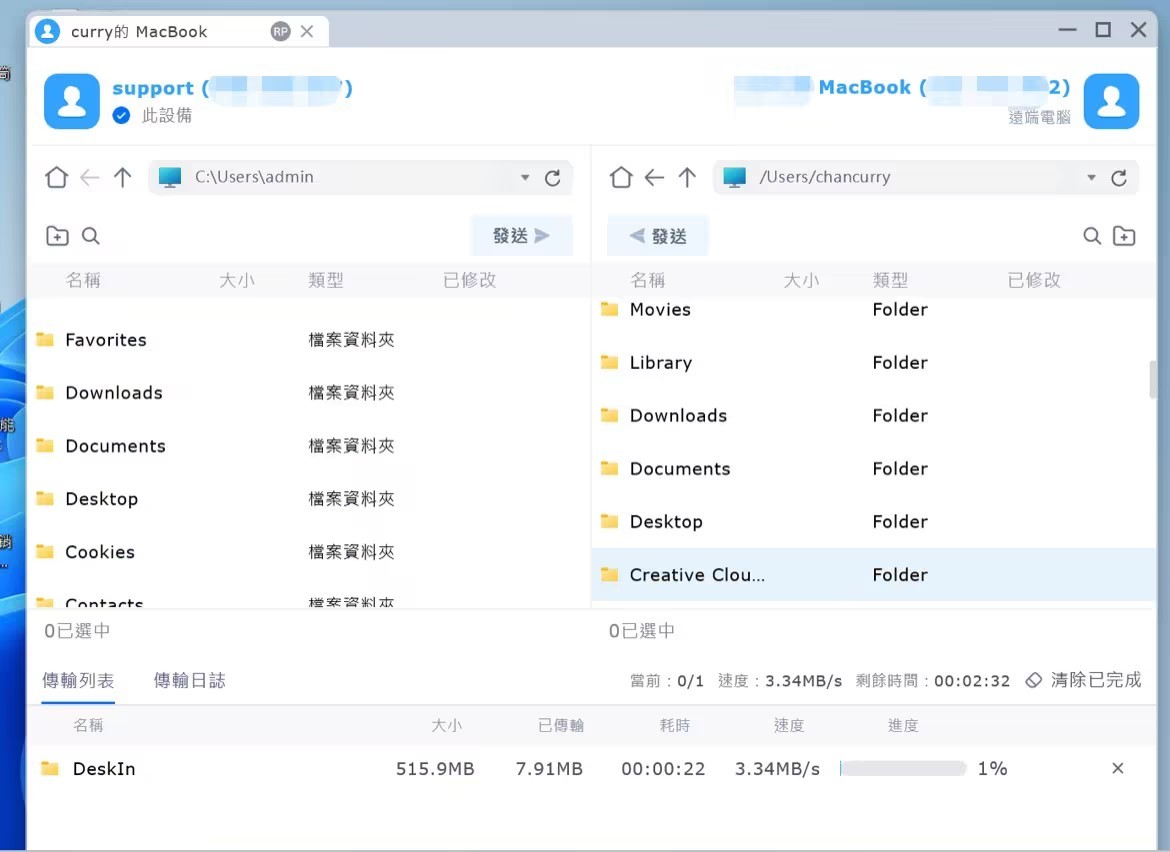
3.Three ways to find “File Transfer” on PC:
(1) In "Remote Control">>”Control Remote Device”>>Select "File Transfer">>"Connect".
(2) Find the device to which you want to transfer files in the "Device List" and select "File Transfer" in the right functional area.
(3) Find "File Transfer" in the toolbar of the DeskIn icon on the remote control page.
After finding "File Transfer", click to connect with password or manual verification. After the connection is successful, the file transfer page will appear.
In the file transfer page, click on the file you want to send, select the destination location for the transfer, and click the "Send" button on the sender to complete the transfer.
You can click “Send” or you can directly drag and drop the files that need to be transferred to complete the transfer.
4.Three ways to find "File Transfer" on mobile devices:
(1) "Remote Control" >> Remote control Device ID >> Select "File Transfer".
(2) Find the device to which you want to transfer files in the "Device List", click to enter and select "File transfer".
(3) After the remote control connection is successful, go to "Interact" >> "File transfer".
After finding "File Transfer", click to connect with password or manual verification. After the connection is successful, the file transfer page will appear.
Click "Send Files", select the file on your mobile device, "Change Path" to select the destination location for transfer, and finally click "Send".
Select "Download Files" to download files from the remote device. Select the file you want to download and click "Download".
Conclusion
This article introduces 3 methods of transferring large files and analyzes their advantages and limitations. It is recommended that you use the third method - use DeskIn to transfer files. It's free and it supports cross-platform transfers with no limits on file size and quantity, high transfer speeds, and you don't have to sacrifice file quality. This is the ideal choice for transmitting large files, you should definitely give it a try.
PRODUCTIVITY
3 Ways To Wirelessly Mirror iPhone Screen To TV
Wanna project movies or games on your iPhone to the TV at a party? Do you want to share the files on your mobile phone onto the big screen when doing a presentation? This article will introduce three methods of wirelessly projecting iPhone screen to TV. Check it out!
Method 1: Mirror iPhone to TV via Airplay
AirPlay is a built-in function of Apple devices, which allows you to project the screen of your iPhone to TV easily. Make sure your iPhone and TV are connected to the same Wi-Fi network and follow the steps below:
Go to Control Center: Swipe down from the top of the iPhone screen to open the Control Center.
Press Airplay icon: In the Control Center, find and press the Airplay icon.
Connect to TV: In the device list pops up, select your smart TV to connect.
Once the connection is successful, the screen of the iPhone will be projected onto the TV screen immediately.
If you only want to project a video, you need to first open the video you want to project on your iPhone and find the same"AirPlay" button (some programs require you to click the "Share" button first) and select the TV to be projected. In this case, the video will only be projected to the TV, which will not affect the normal use of the phone, and there is no need to worry about the phone notifications being seen.
Method 2: Use third-party screen casting software
If your Smart TVs do not support AirPlay, you can use third-party screen casting softwares like LetsView, Miracast ect. Some projection software even supports controlling the video playback with the iPhone. However, the free version may have low resolution, and you can pay for advanced features.
Method 3: Use the projection function of the streaming app
When you are watching a movie or tv-series on YouTube, Disney+ etc., you can directly use the built-in mirroring function of the software to project the iPhone screen to TV.
Step by step guide:
Open the streaming app: Open the show you want to watch.
Find the mirroring button: Find the TV-like "Mirroring" icon on the video playback interface and click in.
Choose your TV device: Select your smart TV on the pop-up device list that you want to connect to. After the connection is successful, the video will be automatically cast to the TV for playback.
High definition mirroring tool——DeskIn
DeskIn is a free remote software designed for individual users, supporting wireless screen mirroring between any mobile phone, computer, and tablet device. It supports up to 2K screen mirroring definition and is very easy to use.
High features of DeskIn:
System Compatibility: DeskIn allows seamless connection and screen mirroring between iOS, Android, Windows and Mac systems.
High definition: Supports up to 2K projection, the image quality is high and lossless.
Flexible: Your iPhone and TV don't need to be in the same network to mirror the screen.
Feature-rich: Supports adjusting frame rate, resolution and scale. In addition to the screen mirroring function, it also supports file transfer, audio call, and remote connection. One app fits all needs!
How to use DeskIn to project iPhone screen?
First install DeskIn on your iPhone and computer respectively, register a free account and log in. If you are logging in on a new device for the first time, you need email verification to keep your account safe.
Scan the QR code to cast the screen
Log in to the mobile DeskIn, click on the upper right corner of the main interface, and scan the QR code on desktop DeskIn>> Screen Mgt
Click to start the live broadcast on your mobile phone, and you will be able to cast the screen in a few seconds.
Conclusions:
This article introduces 3 ways to project iPhone screen to TV: use Airplay, use third-party screen casting software, and use the projection function of the streaming app. If you are looking for a screen mirroring tool that allows you to cast screen between iPhone, android phone, computer and tablet, you can also try high definition screen casting software DeskIn.
PRODUCTIVITY
4 Best Parental Control App 2025. What Should Pay Attention To When Using.
More and more kids have their own smartpgones. While bringing more communication convenience, it also exposes them to more dangers. Out of concern for their children's safety and excessive phone usage time, some parents use parental control app software to monitor their kid’s phone. What should parents pay attention to when using their app? This article gives you 4 tips and introduces 4 best parental control apps. Check it out.
Why Should Parents Monitor Their Children's Phones?
1. Manage phone usage time
Children may be addicted to games, short videos, social media, and use mobile phones uncontrollably. At this time, by monitoring their children's mobile phone usage time and managing app usage time, parents can guide their children to live a healthier, more time-managed life.
2. Detect harmful messages and programs
Children may not be able to distinguish toxic and harmful information on the Internet at their young age.Regularly checking your children’s mobile text messages, web browsing history and social media can prevent them from getting bad influence from sexual, violent, gambling, fraud and drug-related content. At the same time, you can give them proper guidence of using internet.
3. Avoid accidental payment
Currently the payment verification process on phones is becoming more and more simple, which brings convenience but also hidden dangers. Children may purchase in-game items, donate to streamers, or accidentally subscribe to an app. If not discovered in time, it may cause big losses.
4. Keep eyes on children and prevent dangers
Parents cannot be with their children at all times and cannot 100% be aware of what happens at school or with friends. By monitoring the text messages or chat records of children's mobile phones, they may be able to know at the first time when there are conflicts with classmates, school bullying (being bullied or bullying), violence, etc. Some monitoring programs can also track the location of kid’s phones, so when kids are in danger, parents can arrive as soon as possible.
5. Fix tech problems
When kids encounter technical problems with their phone, such as settings, backup problems, upload files etc,. parents can use remote programs to control their children's mobile phones and help fix it.
4 things to pay attention to before monitoring your children’s phones
1. Respect children
Although we understand that parents monitor their children's mobile phones out of concern. But please remember that the child also has their own ideas, secrets and privacy. Please remember this before using a monitoring program:always respect your child and their opinions. Don't go too far or you may cause the relationship to deteriorate.
2. Communicate with your children
Talk about your thoughts and reasons with your child before monitoring their phone. At the same time, listen to theirs, communicate to reach a consensus. Make sure you have your child's consent before downloading and using a phone monitoring program. If they strongly disagree with the idea, communitate and figure out other ways.
3. Make an agreement and stick to it
Make an agreement with your child when you can monitor their phone, what apps you can monitor and can’t and stick to it. Remember, trust and communication are more important than anything else.
4. Choose safe monitoring software
When you decide to use a monitoring program, remember to choose one with a high security level. Since these programs gain access to most of your phone's permissions, using unsafe programs may cause the risk of information leakage. In serious cases, it may also pose a threat to the safety of your children.
4 best parental control software 2024
DeskIn
DeskIn is a remote desktop software suitable for web, Android, ios, Windows and MacBook. This means that you can use not only your phone, but also a computer to remotely control your child's mobile phone. You can delete risky messages, check phone usage time, block apps by remotely accessing your kid’s phone. Compared to other programs, DeskIn will not record the browsing history, track location of the remote mobile phone. You can only view and operate the remote phone with its permission. This leaves space for kid’s privacy and makes it easier for children to accept.
Pros:
Secure: DeskIn only allows devices under the same account to remotely control the phone ,which can prevent children's phones from being monitored by strangers.
Cross-system compatible: DeskIn has Android, ios, Windows and MacBook versions. You can use a computer to remotely monitor your child's phone, or you can use your phone to remotely monitor your child's computer.
Voice call: DeskIn allows you to make voice calls while accessing your child's phone. When you discover some harmful apps or messages, even if the children are not around, you can ask your kids for more details and provide guidance. You can also conduct synchronous teaching when helping them fix tech problems.
Use the remote camera: You can also use DeskIn to access the front and rear camera of your kid’s phone. When your child is in danger, you can know where they are are what’s going on.
Flexible connection methods: DeskIn allows two connection methods, manual verification and unattended password connection, which makes it more acceptable to children. Under normal circumstances, you can ask your child to do manual verification when monitoring their phone, just to inform them. In an emergency, you can still use a password for unattended connection.
Cons:
Can't track the location of the kid's phone.
Family Link
Family Link is a parental control software developed by Google that allows users to manage Android phones. It essentially manages children’s phones by managing their Google accounts. It can block or allow individual apps, hide apps, find devices, set a bedtime and set app limits. But it also has loopholes that when using a hidden browser, kids can bypass browsing restrictions. Some netizens also reported that its time limit function is easy to be bypassed by children.
Pros:
Set time limit: You can set downtime for kids’ devices and time limit for apps.
Block software or websites: You can manage app permissions and website browsing permissions of your kid’s phone. Limit the display of adult content or even allow them to view only certain websites.
You can approve or block apps kids download from Playstore and .
Track your child’s location: You can use a map to track your child’s real-time location, or you can set to receive a reminder when your child reaches a certain location.
Cons:
Can manage Android phones only
Don't support remote control the mobile phone
Website browsing restrictions and control time can be bypassed
KidsGuard
KidsGuard is more of a “spyware”, it can monitor all operations of the mobile phone, obtain all files on the mobile phone and record chat messages. Basically, all usage information of the binded mobile phone will be scanned and recorded. However, it does not have many operational functions, such as setting usage time limits, restricting web pages to browse, etc.
Pros:
Free simulation demo screen is provided. You can simulate it first and then decide whether to pay.
Can monitor iPhone via iCloud, receive and manage emails, view contacts, photos, reminders, etc.
Track social media messages with keywords: You can query messages using keywords.
Payment monitoring: can record children’s subscription consumption in the app store
You can view all usage status and reports of the remote mobile phone through the web panel: usage time, mobile phone files, browsing history, chat history, etc.
Cons:
You need to pay to unlock advanced features
The mobile phone cannot be directly controlled and set.
Obtaining too many permissions on the mobile phone and recording too much content can easily lead to privacy leaks.
Airdroid
Airdroid is a comprehensive control application that allows you to control devices with AirDroid Kids through AirDroid Parental Control App. Supports monitoring remote mobile devices using mobile phones or web pages. After payment, it supports management of up to 10 devices.
Pros:
You can use the camera and microphone of your kid’s Android phone to view and listen to the environment and sounds around your child.
Synchronously receive notifications from apps on your child’s Android phone, such as Line and Facebook.
You can get the daily/weekly report of your child’s mobile phone usage through the report panel.
You can manage and limit the usage time or permissions of mobile phones, software, and web pages.
Keyword detection: Conduct keyword detection on social software to identify harmful content or potential bullying issues.
Track the location of the mobile phone.
Cons:
There is no free version, you need to pay to unlock all features
Obtaining too many permissions on mobile phones and recording too much content can easily lead to privacy leaks.
How to use DeskIn to access your child’s phone
Step 1: Install DeskIn on your device and your child’s phone, register and log in to a same DeskIn account.
Step 2: Ask your child to open DeskIn, toggle on “Allow remote control" button to allow accessing, and set a connection password.
Step 3: Then you can find your child's phone in the device list or use the device ID to access their phone. Your child can do manual verification, or you can use password to do unattended access.
Conclusion
This article introduces 4 parental control software to help parents monitor their children's mobile phone. Each software has its pros and cons, and you can choose according to your needs. Among the four softwares, DeskIn can full-control kid’s mobile phone and requires fewer permissions, making it easier for children to accept. Although parents have a good intention to monitor their children's mobile phones, parents should not go too far and give children space and respect their privacy. What’s important in a good parent and kid relationship is mutual trust.
COMPARISONS
5 Best Free LetsView Alternatives
If you're looking for a free screen mirroring app like LetsView, here are five well-reviewed alternatives, each with unique features and strengths, check it out!
Your number one choice – Deskln
DeskIn is a tool focused on efficient remote connection and screen management, known for its stability and high performance.
Strength:
The free version supports up to 2K image quality, clear and lossless
Adjustable frame rate, resolution and ratio to flexibly adapt to different screen
Supports multiple projection methods (wireless screen mirroring, scanning QR code to cast screen), no need to be on the same network.
System compatible, support using on Windows, Mac, iOS, Android
Provide additional functions such as file transfer, extend screen, remote control, etc.
Shortcoming:
Google TV is not supported yet
ApowerMirror
ApowerMirror is a comprehensive screen mirroring software that focuses on two-way control and multi-scenario use.
Strength:
The free version supports 720p image quality (with watermark), which can meet basic needs
Allows users to cast the screen between phone and computers.
Provides additional functions (such as screen recording, screenshots), suitable for making tutorials or sharing content
Shortcoming:
Unable to adjust parameters such as image quality or frame rate.
The free version has a watermark
Cross-platform free projection has time limit
Free version only support mirror to 1 screen
Free version doesn't support cast the sound
Vysor
Vysor is a screen mirroring tool designed specifically for developers, emphasizing simplicity and ready-to-use.
Strength:
Free version supports basic mirroring functions.
There is no need to install a special application, it can be used through the browser.
Shortcoming:
Free version has low image quality
Not supported on iOS devices
AirDroid Cast
AirDroid Cast is a tool suitable for teams, focusing on multi-device connection and remote control.
Strength:
Mirror screens can be used through the browser.
Quick connection via LAN and Internet.
Allow sharing multiple Android device screens to one PC
Shortcoming:
Free version has low image quality
Cross-platform control is paid features
iMyFone MirrorTo
iMyFone MirrorTo is an easy-to-use and powerful screen mirroring tool, specially designed for multi-platform projection needs and intuitive to operate.
Strength:
Supports multiple mobile devices to connect and project.
Supports scanning mobile codes, USB data cables, Wi-Fi and other methods to project the screen to the computer and synchronize the sound in seconds.
Support switching appearance skin
Shortcoming:
No free version
Only supports projection from mobile phone to computer. If you want to project a computer screen, you need to install other software.
Comparision of 5 screen mirroring tools:
How to mirror screen using Deskln
First install DeskIn on the devices you want to cast screen to and from, register a free account and log in.
Note: If you are logging in on a new device for the first time, you need to go to your registration email to complete verification.
Method 1: Screen Mirroring computer screen
Find the device you want to cast the screen to on the “Device List" on the DeskIn client. Easily just click “Screen Mgt” then you can mirror the screen.
Method 2: Scan QR code to cast the phone screen
Log in to DeskIn on mobile, click the Scan icon on the upper right corner of the main interface, and scan the QR code on “Screen Mgt” on the device you want to cast screen to.
Conclusion
The above five free software all provide a stable and efficient screen mirroring experience and are good alternatives to Letsview. If you are looking for the one that is free, stable and has high image quality, DeskIn is the impeccable first choice! Download and try it now!
PRODUCTIVITY
5 Best Remote Desktop Software For Windows
Remote desktop software revolutionizes the way we interact with technology, enabling seamless access and control of distant devices. This article explores the core functionalities of such tools and highlights five top solutions for Windows users, including the high-performance DeskIn.
What is remote desktop software?
Remote desktop software is a tool that allows people to remotely access and control remote computers with local devices. Through remote software, users can remotely operate applications, send files and change settings of other computers as if they were working locally.
Main functions of remote desktop software
Remote Access: Allows users to remotely access and control other computer devices.
File Transfer: Supports wireless file transfer between remote devices and local devices.
Remote Collaboration: Allows users to share clipboard between remote and local devices.
Remote printing: Allows users to print files from remote computers to local or network printers directly.
Multiplayer collaboration: Allows multiple users to access the same remote computer at the same time.
5 Best Remote Desktop Software for Windows
Deskln - High performance remote desktop software
DeskIn is a remote software designed for individual users. It runs smoothly on Windows systems and provides a seamless remote desktop experience. Not only does it have high definition and low latency, but also very stable connection. The writer myself tried to remote access a Macbook with Windows PC, and the connection was not lost even after one night! DeskIn supports cross-platform connection between Windows, Mac, iOS or Android. In addition to remote connection, it also has screen management and real-time communication features.
Pros:
High performance and low latency: DeskIn supports up to 4K image quality, and latency less than 40ms, allowing smooth remote connection experience.
System compatibility: DeskIn supports seamless connection and remote access between Windows, iOS, MacOS and Android. It also supports initiating remote connections from the Web, making it more flexible.
Rich features: Other than remote access, DeskIn provides multiple collaboration and screen management functions such as extend screen, cast screen, voice call, annotation, shared clipboard, etc. One app fits all needs.
High-speed file transfer: DeskIn supports cross-system file transfer with no restrictions on size, type, and quantity, and the speed is up to 12MB/S.
High security: 256-bit encryption, allowing to set black and white lists, security passwords, only allowing connections with the same account, locking the client, etc.
Cons:
Linux system and Google TV are not supported yet
TeamViewer-Great choice for enterprises user
As one of the earliest remote desktop software, TeamViewer has a wide user base in large enterprises. Its performance on Windows systems is remarkable, not only showing strong functionality and flexibility, but also making great efforts in user experience and security. It is undoubtedly the best choice for large enterprises to carry out remote management and control.
Pros:
System Compatibility:In addition to Windows, MacOS, iOS, and Android, it also supports use on Linux and Chrome OS.It gives a seamless remote connection experience for IT engineers. Remote collaboration can be realized no matter what device team members use.
Fully functional:In addition to various practical functions such as remote desktop, file transfer, and voice calls, TeamViewer also has many management features, allowing enterprises to uniformly manage internal devices.
Technical support and services:TeamViewer has a strong technical support team that can provide users with timely and effective technical support and solutions. This provides a strong guarantee for enterprise users to solve various problems during use.
Cons:
Expensive: The price of the commercial version of TeamViewer is relatively high, some features require additional payment to unlock, which makes it inaccessible for users with limited budgets.
Slow file transmission: After comparing multiple remote software, Teamviewer has the slowest file transfer speed, and there is a limit on file size——4GB or less at a time.
AnyDesk-Enable flexible remote access
With the core features of being lightweight, efficient, and safe, Anydesk aims to provide users with a smooth and convenient remote operation environment. Whether they are enterprise users, technical support teams, or individual users, they can get the remote access capabilities they need from AnyDesk.
Pros:
Lightweight and efficient:With an installation file of only 1.1 MB, AnyDesk is one of the most lightweight remote access solutions on the market. You can download it in just a few seconds.
Installation-free registration: You don't have to install and register an account before using Anydesk, which is quite convenient.
Low latency:AnyDesk is known for its fast remote access speeds, with latency lower to 19ms.
Fast file transfer speed:Anydesk's file transfer speed is relatively fast and supports cross-platform file transfer.
Cons:
Low definition:Anydesk's resolution is automatically adjusted.This results in the remote desktop display sometimes being poor, with average color and clarity, thus affecting the user experience.
System file access restrictions:If users need to change or access system files, they need to install AnyDesk software on their local machine. For security reasons, the browser does not have access to system files. This means that users may need additional settings or permissions to perform certain advanced operations.
Lacks advanced features:Although DeskIn is relatively easy to use, its functions are relatively simple and lacks some advanced features such asFunctions related to games, screen management, and voice collaboration.
Chrome Remote Desktop-Easy cross-platform control
Chrome Remote Desktop is a remote desktop control tool based on the Chrome browser provided by Google. It allows users to remotely access and control content through the Chrome browser or other supported devices (such as iOS and Android) at any time and anywhere. Control computers running Windows, Linux, MacOS, Chrome OS, and more. This tool is not only suitable for individual users, but also suitable for corporate environments for remote office, technical support, server management and other operations.
Pros:
Free services:Completely free, it is a very economical choice for individual users or small businesses with infrequent use and limited budget.
Cross-platform compatibility:Chrome Remote Desktop supports multiple operating systems. Whether the user is using Windows, MacOS, Linux, iOS, or Android, seamless connection can be achieved.
Easy to operate:As an extension of the Chrome browser, it can initiate remote connections from web pages. The function is relatively simple and easy for novices to use.
Cons:
Bind to Chrome browser: Chrome Remote Desktop is binded to Chrome browser, it may be inconvenient to people who are using other browsers.
Limited functionality: Compared with some professional remote desktop tools, the functions of Chrome Remote Desktop are basic and lack advanced functions.
Auto adjustment only: Chrome adjusts defination automatically, sometime may cause blurry. Its performance on image quality, clarity, color may not be as good as some professional tools.
Security risks: Chrome remote desktop is linked to Google account, once the information of your account is leaked, your device may be hacked.
Microsoft Remote Desktop - built-in remote tool on Windows
Microsoft Remote Desktop is a built-in tool on Windows operating system, it allows users to remotely access one computer from another, providing a convenient way to operate and achieve efficient collaboration among multiple workstations. It has good application potential at the enterprise level.
Pros:
Highly integrated with Windows system:It is built into the Windows system, so users do not need to install additional software and it is very convenient to use.
Powerful functionality:Supports a variety of functions, such as print redirection, clipboard sharing, etc., which improves the user experience and is especially suitable for business users.
Higher security: Provides enterprise-level encryption, ensuring the security of data transmission, which is very important for users that have confidential information on their device.
Cons:
Complexity:For users with non-technical background, initial setup may be cumbersome, especially when configuring firewall and port forwarding.
Windows platform only: You cannot do cross system connection with other devices of the Mac system.
Not all features available for free:Although basic remote desktop functions are free, in some advanced usage scenarios, you may need to purchase additional related Windows Server licenses.
Conclusion
This article introduces five remote desktop software suitable for Windows, including DeskIn, TeamViewer, AnyDesk, Chrome Remote Desktop and Microsoft Remote Desktop. Among them, DeskIn stands out for its ultra-high performance, seamless connection experience, rich functions, and high-speed file transfer. If you are looking for a remote desktop software suitable for Windows, DeskIn is undoubtedly the one you should try.
PRODUCTIVITY
5 Practical Ways To Transfer Files Between Android And Windows PC
If you are using Apple devices, you can do simple and fast file transfer between your iPhone and Macbook with Airdrop. But this only works with iOS and macOS systems. Besides using a USB flash drive, how can we transfer files from an Android phone or tablet to a Windows PC, or vice versa? This article will give you 5 simple and quick solutions.
Method 1: Send files via DeskIn remote desktop
DeskIn is a reliable remote desktop software that allows simple and fast file transfers between Android and Windows without the need to be on the same network. The speed and quality of transfer are not inferior to USB wired transfer. Now I will show you how to use DeskIn for quick file transfer.
Step 1: Download DeskIn
First install DeskIn on Android and Windows, register a free account and log in. When logging in to your account for the first time on a new device, you need to complete email verification to ensure account security.
Step 2: Connect and send files
After logging in: Click "Remote Control" >>enter the device ID of the target device>>"File Transfer" .
If you want to send files from Android to Windows, click "Send">>Select the photos or files you want to transfer >>” Change Path” to choose the transfer location.
If you want to transfer files from Windows to Android, click "Download" and select the files you want to transfer.
Method 2: Send files via Bluetooth
Transferring files via Bluetooth is also a common method. Here is how you can do:
1. Activate Bluetooth on both your Windows and Android device: Go to Settings >> Bluetooth and toggle on the Bluetooth option.
2. Pair the two devices
(1) Connect from windows: "Settings" >> "Bluetooth & other devices" >> "Add a device" >> Select the Android device>> "Connect".
(2) Connect from Android: "Settings" >> "Bluetooth" >> "Available devices" >> Select the Windows device to connect.
3. Transfer files from Windows to Android: Find "Send or receive files via Bluetooth" in Bluetooth settings >> "Send files" >> Select the Android device to send files >> "Next" >> "Select the files to send".
Note: During the process of transferring files, you should pay attention to the pop-up reminder of "Accept incoming file?" on your Android device, and click "Accept" in time, otherwise the transfer will fail.
4.Transfer files from Android to Windows: select the file to be transferred on Android and click "Share" >> "Bluetooth" >> select the target Windows device and start transmission.
Limitations: This method requires the two devices to be nearby and under the same WIFI. It is not suitable for long-distance file transfer.
Method 3: Send files via email
We can also transfer data between Android and Windows through email. It’s the most common and easiest way.
1. Log in to the same email account on your Android and Windows devices.
2. Send Files as attachment to your mailbox
3. Download the file in the email on another device
Limitations: Email service providers usually have restrictions on the size of attachment files. This method is not suitable for sending large files.
Method 4: Send files via communication app
Most communication software (such as Line, WhatsApp, etc.) have Windows and Android versions and allow simultaneous log in. It’s convenient using it to send files to yourself or friends. Taking Line as an example, log in to the same account on your mobile phone and computer. upload the files that need to be transferred to "Keep Notes" and then download them on the other end.
Limitations: To ensure transmission speed, communication software usually compresses the files. So, it is not suitable for transmitting videos or photos since the image quality may be compromised. Some software also has restrictions on file type and size.
Method 5: Send files via Google Drive
Using Google Drive to transfer files is also a very convenient method. Just upload the files on Android or Windows to Google Drive. Log in to the same Google account on another device, then you can download the files. Files can also be stored in the cloud for a long time. If you need to share data to multiple devices, you can choose this method. Google Drive also supports managing the access permissions of file data, which can better prevent data leakage.
Limitations: This method is relatively time-consuming than direct transfer, and the free storage space of Google Drive is only 15GB. If you need more space to transfer a large file, you need to purchase additional space.
Conclusion
The above are 5 simple and free ways to transfer files wirelessly between Android devices and Windows devices. They each have their own advantages and limitations. You can choose according to your actual needs. It is most recommended to use the first method, DeskIn remote software, for file transfer, because it not only does not need to be carried out under the same network——supports long-distance transfer; but also has no limitation on size, type and quantity of transferred files.The most important thing is that it maintains high transfer speed up to 12MB/S without sacrificing file quality. It can be said to be the best solution for cross-system file transfer between Android and Windows.
COMPARISONS
5 Remote Desktop Software Test: Remote Work, Gaming, and Video Streaming
Due to work requirements, I frequently use remote desktop software. I spent time testing five free options: TeamViewer, DeskIn, AnyDesk, Awesun, and Parsec. Below, I share their performance in remote work, gaming, and video streaming to help those seeking reliable remote tools. Most tests were conducted via phone-to-PC and MacBook-to-PC connections.
Free Remote Desktop Software Spec Comparison
Note: The "four major platforms" refer to Windows, Mac, iOS, and Android.
Remote Work: DeskIn Outperforms Awesun
Among the five, only DeskIn and Awesun allow commercial use in their free versions. TeamViewer, AnyDesk, and Parsec require paid upgrades. Thus, I focused on DeskIn and Awesun for work scenarios.
Basic Operation: DeskIn Feels More Intuitive
Both DeskIn and Awesun have clean desktop interfaces, with quick access to features like text chat and dual-screen switching. However, DeskIn offers faster and more stable connections, while Awesun feels laggier.
Awesun’s scroll wheel sensitivity is too low, making navigation clunky compared to DeskIn’s smooth scrolling.
DeskIn Desktop/Phone Versions
DeskIn’s mobile app is the most user-friendly I’ve tried. Its touch + mouse hybrid mode and gestures (e.g., window switching, web browsing) work seamlessly. The screen response is lightning-fast, even on phones.
Bonus features: messaging/voice calls with remote devices and a Task View shortcut for quick window switching.
Awesun’s mobile app also has a hybrid mode and a single-layer menu (phone-friendly). However, it lacks Task View shortcuts and communication tools (e.g., voice calls), forcing users to rely on third-party apps for collaboration.
File Transfer: DeskIn Has No Speed/Size Limits
DeskIn’s mobile file transfer is paywalled (desktop is free). Speeds are impressive: 5GB over Wi-Fi takes ~3 minutes. Awesun allows free transfers on all platforms but limits files to 1GB, restricting usability.
Remote Input: DeskIn’s Shortcuts Shine
For the typing section, the desktop versions are quite similar, so I won’t compare them. Instead, I’ll share the experience of using a phone to remotely control a computer.
Both DeskIn and Awesun mobile versions have keyboards that occupy about half the screen, making typing relatively comfortable.
However ,DeskIn has a significant advantage: it allows users to pin frequently used shortcuts (like copy and paste) above the keyboard or on the remote screen. This makes it easy to copy desired content while typing and paste it where needed. Users can also customize shortcut keys:
Awesun, on the other hand, hides shortcuts in a menu. When I want to copy selected content, I need to switch to the shortcut menu, press copy, then switch back to the keyboard. The same applies for pasting, making the process quite cumbersome.Additionally, after using a shortcut, returning to the keyboard requires pressing "Default" instead of "X." The naming is confusing, and I often pressed the wrong button initially, which was really frustrating.
Other Three Apps Briefly Reviewed:
TeamViewer: Feature-Rich but Slow Transfers, Clunky Mobile UI
Slow connections (free version), especially on mobile.
Full-featured desktop with a “leave message” function post-session.
Painfully slow transfers: 5GB took 30+ minutes.
Mobile mouse controls lack touch integration; copy/paste shortcuts are buried.
Annoying commercial-use pop-ups on both devices after sessions.
AnyDesk: Fast Transfers, Chinese Input Issues
No installation needed for desktop, but UI feels outdated.
Blazing transfer speeds rival DeskIn, but laggy visuals (1-2 sec delays).
Mobile menu hidden on the right edge (minimalist design).
Input bugs: iOS struggles with third-party Chinese IMEs; Android lacks delete functionality.
Parsec: Great for Gaming, Useless for Work
No Chinese support, but setup is simple.
Desktop version lacks basic features (no file transfer).
Mobile app (Android-only) is barebones: no zoom, no Chinese input.
Ideal for gaming (smooth, adjustable bandwidth), but avoid for productivity.
Remote Gaming Scenario Comparison
For the gaming section, I tested "using a MacBook to remotely play Diablo IV on a PC" to evaluate each software’s connection quality and latency. This scenario reflects my occasional use case: taking a MacBook Pro out for work and wanting to game during breaks if my home PC is on.
TeamViewer
First, I tested TeamViewer. While playable, it felt noticeably sluggish, with delayed movements and occasional screen freezes, resulting in a subpar experience. Setting the quality to "Speed Priority" did not improve performance.
DeskIn
Next, DeskIn impressed me. The visuals were sharp, and gameplay remained smooth for 30 minutes. It also displays real-time FPS and latency stats. DeskIn offers 4K 60fps and 144fps options (paid version only), which would enhance gaming further.
AnyDesk
AnyDesk delivered the best image quality among the five and smooth gameplay. However, I noticed a critical issue: the remote PC’s CPU usage spiked to 70-80%, causing loud fan noise and raising concerns about long-term hardware strain.
Awesun
Awesun performed smoothly except for brief stutters during scene transitions (e.g., returning to town). Its Mac version had stability issues—crashing after one session and requiring reinstallation. It also lacked audio.
Parsec
Parsec excelled in gaming, offering flawless Diablo IV performance with adjustable bandwidth settings to minimize latency. It also supports multiplayer rooms. If gaming is your sole focus, Parsec is a no-brainer.
Remote Video Streaming Comparison
Streaming videos via phone-to-PC tests each software’s latency. I tested YouTube, Netflix, and local files. Three performed smoothly: TeamViewer, DeskIn, and Parsec, but with caveats.
TeamViewer: Smooth playback but extremely low volume (no mute option), forcing sound output if the PC plays audio.
Parsec: Great speed and audio, but mobile lacks zoom (full-screen only).
DeskIn: Flawless sync and no issues.
AnyDesk: Mobile audio is broken (iOS/Android)—no sound despite settings.
Awesun: Choppy audio and desynced visuals, indicating poor connection quality.
How to Choose Remote Desktop Software
Prioritize features (file transfer, device communication, keyboard ease) and low-latency connections. Additional tools like DeskIn’s screen extension and voice calls add value. Cross-platform support (iOS/Android/Windows/Mac) ensures future flexibility.
Conclusion
I expected the renowned TeamViewer to dominate, but testing revealed flaws. DeskIn emerged as the top choice for its balanced performance, stability, and features. If you’re seeking reliable remote software, give DeskIn a try!
PRODUCTIVITY
5 Tools to Extend Mac/Windows Screen-Easy Dual Screen Set Up
Screen extension tech is becoming more and more popular in our daily lives. Here we introduce 5 tools can extend Mac/Windows screen easily.
1. DeskIn Rating ⭐⭐⭐⭐⭐
DeskIn is a one-stop remote desktop software designed for individual users. Besides remote access functions, it provides free screen management features - cross-system extended screen and mirror screen. It supports resolution up to 2K60FPS, and allows you to adjust resolution and frame rate manually. If you are looking for a free extended screen tool, DeskIn is the most recommended one.
Supported Systems: Support extending Windows 10 1903+, MacOS 10.15+ screen wirelessly to Android 6+、iOS10、Mac 10.15+、Windows 10 1903+ devices
Resolution: Up to 2K 60FPS
Limitations: Linux system is not supported yet, and wired screen extension is not supported.
Strengths: No need to manually enter the device ID or use it under the same Wi-Fi. Supports Mac, Windows, iOS, and Android platforms. High-definition image quality and high stability.
Free Trial: Extend screen feature is free to use
2. Spacedesk Rating ⭐⭐⭐⭐
Spacedesk is a completely free screen management tool (Note: commercial use requires a paid license) and has no ads. It allows extending screen to up to 3 screens at the same time, wired and wireless connections, and adjusting parameters such as image quality, resolution, frame rate, etc. The only drawback is that it does not support Mac systems yet.
Supported Systems: Support extending screen from Windows 8+ devices wirelessly, wiredly to Android 4.1+, iOS9.3+, Windows 7+ , HTML5
Resolution: Supports up to 8K 60FPS (The extended device needs to support 8K)
Limitation: Mac system is not supported, and wireless screen expansion is unstable and easy to disconnect. The main device and the device used as an extended screen need to download two different softwares, which is relatively troublesome. Devices need to be on the same Wifi to use the feature.
Free trial: Completely free to use.
3. Duet Display Rating ⭐⭐⭐
Duet is developed by a team of former Apple engineers, providing remote access and screen management functions. The software does not provide a free version. Its remote service and screen management service need to be purchased separately. Its screen management service includes extended screens and mirrored screens, and provides 4 paid versions. You can choose to subscribe annually or purchase a lifetime license. Since there is no free version, the following only introduces the performance of its cheapest paid version.
Supported Systems: Supports wired or wireless extension from MacOS10.13+, Windows 10+ to iOS 7.0+ , Android 7+, MacOS10.9+, Windows 10+ devices
Resolution: Supports up to 60FPS, supported resolution is not declared
Limitations: No free version
Free trial: 7 days trial
Paid plan: US $48~$72 per year
4. GlideX Rating ⭐⭐⭐
GlideX is a remote desktop software developed by ASUS, but in addition to ASUS's own products, it also supports use on other computers. The software provides rich functionalities, but many of them require purchase to unlock, and the free version has many restrictions. The free version only supports screen extension and projection from Windows to Android and iOS.
Supported Systems: Only supports extending screen from Windows 10 1090+ devices to Android 9+, iOS14+ version devices.
Resolution: Up to 720P 30FPS
Limitations: Has ads, does not support mac system-related functions, and does not support dynamically adjusted streaming quality.
Free trial: Register for ASUS, ROG laptops and desktops to enjoy a 1-year trial of "Glidex Professional Edition"
Paid plan: US $11.88~US $71.88 per year
5. LetsView Rating ⭐⭐
LetsView is a projection tool and you can pay to unlock the extended screen feature. It can be used without logging in, but the connection is a bit unstable. When using it on a Windows system, the editor often encounters the problem of being unable to successfully expand the screen and crashing.
Supported Systems: Supports wireless screen expansion from Windows 10+ to Android 5+ and iOS 9.0+ devices
Resolution: The cheapest plan supports up to 720P 30FPS
Limitations: It requires payment to unlock and cannot expand the Mac screen. When using it on Mac, you need to turn off the "Airplay" feature first and the 2 devices need to be on the same network to use the extended screen feature.
Free trial: No
Paid plan: US$ 29.99~US$ 39.99 per year
Conclusion
The above introduces 5 software that can extend the Mac and Windows screen to mobile devices: DeskIn, Spacedesk, GlideX, Duet display, and Letsview. Although they all provide screen extension functions, the supported systems, prices, and resolutions are different. If you are looking for an extension tool that is completely free, can be extended wirelessly, supports both Mac and Windows and has good performance, DeskIn is definitely your best choice. Download and give it a try!
PRODUCTIVITY
6 Dual-screen Productivity Tips! Guide to Turn iPad/Android Tablet Into A Second Monitor
Working with dual screens can greatly improve work efficiency, especially for designers and engineers who need multitask. But do you really need to buy an extra screen? The best screen may already be around you – that’s a tablet! This article will introduce you to 6 dual-screen productivity tips and how to turn your tablet into a second monitor for your computer.
6 dual-screen productivity tips:
1. Save time switching windows
When multitasking, you can open windows separately on two screens, saving time switching back and forth between windows and making your workspace cleaner and more organized.
2. Improve proofreading efficiency
When proofreading text or data, using the split-screen function may cause the text to be too small to be read clearly. You can open the file in two screens respectively to ensure that the font size is moderate, and the layout is consistent, making the proofreading work easier.
3. Improve editing efficiency
When editing, you can open the editing software on the main screen and find footage and materials on the other screen to improve editing efficiency.
4. Better view with portrait orientation
When you need to browse videos or files in vertical format, you can switch the dual screens to portrait orientation for more visual comfort.
5. Compile while consulting information
Whether you are a student writing an essay or an editor writing an article, you may need to search for information when writing. Dual screens allow you to do these simultaneously, you can also do copy-and-paste between 2 screens seamlessly.
6. Zoom in on detail
When you are doing design work or photoshop, you can zoom in on part of the image on the second screen to better view the details. You can also move a certain workspace in PS or PR to the second screen, enlarging it for more convenient use.
How to turn iPad/Android tablet into a second monitor?
Method 1: Use DeskIn remote software
Applicable system: Support cross-platform screen extension between Windows, iOS, Mac, Android computers and tablets
Step 1: Download and register a DeskIn account
Download DeskIn on your PC and iPad, register for a free account and log in separately
Note: If you are logging in on a new device for the first time, you need email verification to ensure the security of your account.
Step 2: Extend screen
On DeskIn on the computer >> Go to "Screen Mgt" >> Click "Expand my screen"
Select the device you want to expand the screen on and click "Start Extending".
After the connection is successful, your iPad will become a second screen for Windows/Mac, and windows can be flexibly moved between the two screens..
Computer screen (left) and iPad screen (right)
Step 3: System display settings
After extending the screen, if you find that your iPad only mirrors the content on your computer screen, please go to Windows System Settings>>Display Settings and set the screen option to "Extend these displays".
Method 2: Use Apple "Sidecar" Function
Applicable system: Extend Mac to Mac or iPad
Apple’s built-in feature Sidecar allows you to use the iPad as an external display for a MacBook and iMac.
Requirements:
1. The two devices should log into the same Apple ID or are on the same network.
2. Both devices should have Bluetooth, Wi-Fi turned on, and the distance cannot exceed 10 meters (about 10 meters).
Step 1 Display Setting
Open the Mac System Settings >> Click "Display" in the sidebar >> Click the "+" pop up menu on the right and choose your iPad.
Select the iPad, change the Use as settings to "Extended Display". Check the Airplay settings on the top toolbar of the mac and set iPad as "Use As Separate Display".
Step 2: Extend screen
After completing the settings, your iPad will become the second display for your Mac. You can drag windows from your Mac to your iPad smoothly. You can also use the sidebar on the iPad or change the position of the sidebar on the system display settings.
MacBook screen (Left) and iPad screen (Right)
Method 3: Use Samsung “Second screen” function
Applicable system: Extend your Windows computer to your Samsung tablet
Step 1: Enter the "Second Screen" page
Go to the "Quick Settings Panel" by swiping down from the top of the tablet screen, tap the "Second Screen" icon to enter.
Follow the system prompts to select the desired connection mode "Drawing/Game" or "Video". After that, stay on the "Second Screen" page and do not leave.
Step 2: Expand computer screen to tablet
Press "Windows+K" on your computer and select the tablet you want to extend in the pop-up device list. (Keep your tablet on the Second Screen page and your tablet will appear in the device list)
Conclusion
This article introduces 6 tips on how to use dual screens to improve work efficiency and also introduces 3 methods so that you can turn the tablet at hand into a "second screen" for Windows or Mac computers without buying another dual screen. This is especially useful for people who need to multitask or use multiple applications at the same time. Try it now!
Load More
Blog
Search Docs…
ALL TOPICS
COMPARISONS
GAME
PRODUCTIVITY
TROUBLESHOOTING
PRODUCTIVITY
2 Simple Ways To Share Window 10/11 Screen
Do you want to share your computer screen with your colleagues during a meeting or project videos/photos onto a larger screen? This article will introduce two simple methods to project your Windows 10/11 computer screen.
Method 1: Use professional projector app DeskIn to share screen
Advantages of using DeskIn remote desktop for projection:
Cross-platform support: DeskIn supports screen sharing between iOS, Windows, Android, and macOS systems.
No need for the same network environment: DeskIn allows projection even when devices are not on the same network, making it possible to share screens over long distances.
Screen adaptation: You can modify resolution, frame rate, and other settings to better adapt to remote screens.
Secure: DeskIn uses 256-bit encryption to ensure that your projected content remains private and secure.
Easy to use: No complicated setup is required.
Step 1: Install DeskIn on both your computer and the device you want to share your screen with.
Register for a free account and log in.
Note: On your first login to a new device, you will need to complete an email verification to protect the security of your account.
Step 2: Extend your screen
Open the DeskIn app on your Windows/Mac computer >> Go to the "Screen Mgt" tab >> Click “Mirror my screen."
Step 3: Select the device you want to share your screen with and click "Start Mirroring."
Step 4: You can find the device you are sharing your screen with in the「Device list」and adjust the resolution, frame rate, and other settings as needed.
Method 2: Use Windows Built-in Tool "Wireless Display" to Project Your Computer Screen
Step 1: On both the computer you want to share the screen from and the one you want to share it to select "Windows Start" >> "Settings" >> "System" >> "Optional Features".
Step 2: On the "Optional Features" page, click "View Features" next to "Add an optional feature.” Search for "Wireless Display," then click and install it.
Step 3: Once installed, go back to "Settings" >> "System" >> "Projecting to this PC" to manage your projection preferences.
Step 4: On the computer you want to share the screen to, search for "Wireless Display" in the taskbar search box and launch the app. The device will now be discoverable and ready to receive projected content.
Step 5: Press "Windows+K" on the computer you want to share screen from, select the device you want to share screen to on the device list that pops up.
You can also project your computer screen to a Miracast-enabled TV, projector, or other type of external display.
Conclusion
This article introduced two simple methods for projecting and sharing your screen on Windows 10/11. While Method 2 uses built-in Windows tools, the setup process is relatively complicated and is only applicable to Windows systems or displays that support Miracast. If you want to project your Windows computer screen to any macOS, iOS, Android, or Windows device, we recommend using the remote software DeskIn. It is not restricted by the operating system and does not require devices to be on the same network, making it a versatile solution for all your projection needs.
PRODUCTIVITY
3 Ways To Send Large Files That Exceed Email Size Limits
We usually use email to transfer files, but most email services refuse to accept attachments that exceed a certain size—claiming this helps prevent malicious attacks and reduce risks. Therefore, when sending large files, you cannot rely on this common method. However, there are other equally easy ways to transfer large files. This article will introduce you to three of them.
Method 1: Compress the file before emailing
Email providers often have limits on the size of attachments that can be uploaded. For example, Gmail only allows attachments of 25MB or smaller, and Outlook only allows attachments of 20MB or smaller. To work around this, you can compress the large file to a size that meets the email attachment requirements.
Advantage: Compressing files is the simplest and most direct way to reduce file size to fit attachment limits, allowing you to transfer large files via email directly.
Limitation: File compression typically reduces the file size to only about half of its original size. As a result, this method is only suitable when the file exceeds the size limit by a small margin. Additionally, compressing and decompressing files may lead to data loss or damage. For instance, the quality of videos or images may deteriorate.
Gmail only allows attachments under 25MB
Method 2: Use a cloud drive to transfer files
In addition to sending via email, there are other ways to send large files, such as using Cloud Drive.
Upload large files to a cloud drive (such as Google Drive), then you can send them to the other party by sharing a link.
Advantage: This method ensures better file quality and allows you to send much larger files compared to email attachments. Additionally, the files are saved in the cloud and can be accessed at any time.
Limitation:1. The free storage space on Google Drive is limited to 15GB. Other cloud drives also have similar free storage limits, so you may need to purchase additional storage space if required.
2.Since the file must first be uploaded to the cloud and then downloaded by the recipient, the transfer time depends on your network conditions. This process may take longer than traditional methods.
Method 3: Use DeskIn remote desktop software to transfer files (Most recommended)
Currently, most remote software on the market supports file transfer. DeskIn has enhanced the standard file transfer functionality to provide an even better experience:
1. The free version already supports file transfer with no limit on size and quantity;
2. Fast transmission speed, up to 12MB/s;
3. Ensure your files remain confidential and protected from unauthorized access using 256-bit end-to-end encryption;
4. There is no need to upload or download files like a cloud drive. You can directly transfer files from one device to another, time-saving;
5.DeskIn supports seamless file transfer between different devices and operating systems. Whether you are using a Windows PC, Mac or mobile device, DeskIn allows you to easily transfer files across platforms.
There are also security risks when using email to transfer files. Even if you enter just one wrong character, your email may be sent to another person and cannot be withdrawn, which may easily lead to information leakage. While using DeskIn, you need to match the device ID and password, or manual passwordless verification from the other party's computer, which avoids transferring to the wrong object.
How to use DeskIn for file transfer?
1.Download DeskIn respectively on the transmitting device and the target transmitting device, register a free account and log in separately. If you are logging in on a new device for the first time, you need to go to the registration email to complete verification.
2. After successful login, enter the device code of the device to be transferred, select file transfer, and then select Connection. You can choose a password or manual passwordless verification method.
3.Three ways to find “File Transfer” on PC:
(1) In "Remote Control">>”Control Remote Device”>>Select "File Transfer">>"Connect".
(2) Find the device to which you want to transfer files in the "Device List" and select "File Transfer" in the right functional area.
(3) Find "File Transfer" in the toolbar of the DeskIn icon on the remote control page.
After finding "File Transfer", click to connect with password or manual verification. After the connection is successful, the file transfer page will appear.
In the file transfer page, click on the file you want to send, select the destination location for the transfer, and click the "Send" button on the sender to complete the transfer.
You can click “Send” or you can directly drag and drop the files that need to be transferred to complete the transfer.
4.Three ways to find "File Transfer" on mobile devices:
(1) "Remote Control" >> Remote control Device ID >> Select "File Transfer".
(2) Find the device to which you want to transfer files in the "Device List", click to enter and select "File transfer".
(3) After the remote control connection is successful, go to "Interact" >> "File transfer".
After finding "File Transfer", click to connect with password or manual verification. After the connection is successful, the file transfer page will appear.
Click "Send Files", select the file on your mobile device, "Change Path" to select the destination location for transfer, and finally click "Send".
Select "Download Files" to download files from the remote device. Select the file you want to download and click "Download".
Conclusion
This article introduces 3 methods of transferring large files and analyzes their advantages and limitations. It is recommended that you use the third method - use DeskIn to transfer files. It's free and it supports cross-platform transfers with no limits on file size and quantity, high transfer speeds, and you don't have to sacrifice file quality. This is the ideal choice for transmitting large files, you should definitely give it a try.
PRODUCTIVITY
3 Ways To Wirelessly Mirror iPhone Screen To TV
Wanna project movies or games on your iPhone to the TV at a party? Do you want to share the files on your mobile phone onto the big screen when doing a presentation? This article will introduce three methods of wirelessly projecting iPhone screen to TV. Check it out!
Method 1: Mirror iPhone to TV via Airplay
AirPlay is a built-in function of Apple devices, which allows you to project the screen of your iPhone to TV easily. Make sure your iPhone and TV are connected to the same Wi-Fi network and follow the steps below:
Go to Control Center: Swipe down from the top of the iPhone screen to open the Control Center.
Press Airplay icon: In the Control Center, find and press the Airplay icon.
Connect to TV: In the device list pops up, select your smart TV to connect.
Once the connection is successful, the screen of the iPhone will be projected onto the TV screen immediately.
If you only want to project a video, you need to first open the video you want to project on your iPhone and find the same"AirPlay" button (some programs require you to click the "Share" button first) and select the TV to be projected. In this case, the video will only be projected to the TV, which will not affect the normal use of the phone, and there is no need to worry about the phone notifications being seen.
Method 2: Use third-party screen casting software
If your Smart TVs do not support AirPlay, you can use third-party screen casting softwares like LetsView, Miracast ect. Some projection software even supports controlling the video playback with the iPhone. However, the free version may have low resolution, and you can pay for advanced features.
Method 3: Use the projection function of the streaming app
When you are watching a movie or tv-series on YouTube, Disney+ etc., you can directly use the built-in mirroring function of the software to project the iPhone screen to TV.
Step by step guide:
Open the streaming app: Open the show you want to watch.
Find the mirroring button: Find the TV-like "Mirroring" icon on the video playback interface and click in.
Choose your TV device: Select your smart TV on the pop-up device list that you want to connect to. After the connection is successful, the video will be automatically cast to the TV for playback.
High definition mirroring tool——DeskIn
DeskIn is a free remote software designed for individual users, supporting wireless screen mirroring between any mobile phone, computer, and tablet device. It supports up to 2K screen mirroring definition and is very easy to use.
High features of DeskIn:
System Compatibility: DeskIn allows seamless connection and screen mirroring between iOS, Android, Windows and Mac systems.
High definition: Supports up to 2K projection, the image quality is high and lossless.
Flexible: Your iPhone and TV don't need to be in the same network to mirror the screen.
Feature-rich: Supports adjusting frame rate, resolution and scale. In addition to the screen mirroring function, it also supports file transfer, audio call, and remote connection. One app fits all needs!
How to use DeskIn to project iPhone screen?
First install DeskIn on your iPhone and computer respectively, register a free account and log in. If you are logging in on a new device for the first time, you need email verification to keep your account safe.
Scan the QR code to cast the screen
Log in to the mobile DeskIn, click on the upper right corner of the main interface, and scan the QR code on desktop DeskIn>> Screen Mgt
Click to start the live broadcast on your mobile phone, and you will be able to cast the screen in a few seconds.
Conclusions:
This article introduces 3 ways to project iPhone screen to TV: use Airplay, use third-party screen casting software, and use the projection function of the streaming app. If you are looking for a screen mirroring tool that allows you to cast screen between iPhone, android phone, computer and tablet, you can also try high definition screen casting software DeskIn.
PRODUCTIVITY
4 Best Parental Control App 2025. What Should Pay Attention To When Using.
More and more kids have their own smartpgones. While bringing more communication convenience, it also exposes them to more dangers. Out of concern for their children's safety and excessive phone usage time, some parents use parental control app software to monitor their kid’s phone. What should parents pay attention to when using their app? This article gives you 4 tips and introduces 4 best parental control apps. Check it out.
Why Should Parents Monitor Their Children's Phones?
1. Manage phone usage time
Children may be addicted to games, short videos, social media, and use mobile phones uncontrollably. At this time, by monitoring their children's mobile phone usage time and managing app usage time, parents can guide their children to live a healthier, more time-managed life.
2. Detect harmful messages and programs
Children may not be able to distinguish toxic and harmful information on the Internet at their young age.Regularly checking your children’s mobile text messages, web browsing history and social media can prevent them from getting bad influence from sexual, violent, gambling, fraud and drug-related content. At the same time, you can give them proper guidence of using internet.
3. Avoid accidental payment
Currently the payment verification process on phones is becoming more and more simple, which brings convenience but also hidden dangers. Children may purchase in-game items, donate to streamers, or accidentally subscribe to an app. If not discovered in time, it may cause big losses.
4. Keep eyes on children and prevent dangers
Parents cannot be with their children at all times and cannot 100% be aware of what happens at school or with friends. By monitoring the text messages or chat records of children's mobile phones, they may be able to know at the first time when there are conflicts with classmates, school bullying (being bullied or bullying), violence, etc. Some monitoring programs can also track the location of kid’s phones, so when kids are in danger, parents can arrive as soon as possible.
5. Fix tech problems
When kids encounter technical problems with their phone, such as settings, backup problems, upload files etc,. parents can use remote programs to control their children's mobile phones and help fix it.
4 things to pay attention to before monitoring your children’s phones
1. Respect children
Although we understand that parents monitor their children's mobile phones out of concern. But please remember that the child also has their own ideas, secrets and privacy. Please remember this before using a monitoring program:always respect your child and their opinions. Don't go too far or you may cause the relationship to deteriorate.
2. Communicate with your children
Talk about your thoughts and reasons with your child before monitoring their phone. At the same time, listen to theirs, communicate to reach a consensus. Make sure you have your child's consent before downloading and using a phone monitoring program. If they strongly disagree with the idea, communitate and figure out other ways.
3. Make an agreement and stick to it
Make an agreement with your child when you can monitor their phone, what apps you can monitor and can’t and stick to it. Remember, trust and communication are more important than anything else.
4. Choose safe monitoring software
When you decide to use a monitoring program, remember to choose one with a high security level. Since these programs gain access to most of your phone's permissions, using unsafe programs may cause the risk of information leakage. In serious cases, it may also pose a threat to the safety of your children.
4 best parental control software 2024
DeskIn
DeskIn is a remote desktop software suitable for web, Android, ios, Windows and MacBook. This means that you can use not only your phone, but also a computer to remotely control your child's mobile phone. You can delete risky messages, check phone usage time, block apps by remotely accessing your kid’s phone. Compared to other programs, DeskIn will not record the browsing history, track location of the remote mobile phone. You can only view and operate the remote phone with its permission. This leaves space for kid’s privacy and makes it easier for children to accept.
Pros:
Secure: DeskIn only allows devices under the same account to remotely control the phone ,which can prevent children's phones from being monitored by strangers.
Cross-system compatible: DeskIn has Android, ios, Windows and MacBook versions. You can use a computer to remotely monitor your child's phone, or you can use your phone to remotely monitor your child's computer.
Voice call: DeskIn allows you to make voice calls while accessing your child's phone. When you discover some harmful apps or messages, even if the children are not around, you can ask your kids for more details and provide guidance. You can also conduct synchronous teaching when helping them fix tech problems.
Use the remote camera: You can also use DeskIn to access the front and rear camera of your kid’s phone. When your child is in danger, you can know where they are are what’s going on.
Flexible connection methods: DeskIn allows two connection methods, manual verification and unattended password connection, which makes it more acceptable to children. Under normal circumstances, you can ask your child to do manual verification when monitoring their phone, just to inform them. In an emergency, you can still use a password for unattended connection.
Cons:
Can't track the location of the kid's phone.
Family Link
Family Link is a parental control software developed by Google that allows users to manage Android phones. It essentially manages children’s phones by managing their Google accounts. It can block or allow individual apps, hide apps, find devices, set a bedtime and set app limits. But it also has loopholes that when using a hidden browser, kids can bypass browsing restrictions. Some netizens also reported that its time limit function is easy to be bypassed by children.
Pros:
Set time limit: You can set downtime for kids’ devices and time limit for apps.
Block software or websites: You can manage app permissions and website browsing permissions of your kid’s phone. Limit the display of adult content or even allow them to view only certain websites.
You can approve or block apps kids download from Playstore and .
Track your child’s location: You can use a map to track your child’s real-time location, or you can set to receive a reminder when your child reaches a certain location.
Cons:
Can manage Android phones only
Don't support remote control the mobile phone
Website browsing restrictions and control time can be bypassed
KidsGuard
KidsGuard is more of a “spyware”, it can monitor all operations of the mobile phone, obtain all files on the mobile phone and record chat messages. Basically, all usage information of the binded mobile phone will be scanned and recorded. However, it does not have many operational functions, such as setting usage time limits, restricting web pages to browse, etc.
Pros:
Free simulation demo screen is provided. You can simulate it first and then decide whether to pay.
Can monitor iPhone via iCloud, receive and manage emails, view contacts, photos, reminders, etc.
Track social media messages with keywords: You can query messages using keywords.
Payment monitoring: can record children’s subscription consumption in the app store
You can view all usage status and reports of the remote mobile phone through the web panel: usage time, mobile phone files, browsing history, chat history, etc.
Cons:
You need to pay to unlock advanced features
The mobile phone cannot be directly controlled and set.
Obtaining too many permissions on the mobile phone and recording too much content can easily lead to privacy leaks.
Airdroid
Airdroid is a comprehensive control application that allows you to control devices with AirDroid Kids through AirDroid Parental Control App. Supports monitoring remote mobile devices using mobile phones or web pages. After payment, it supports management of up to 10 devices.
Pros:
You can use the camera and microphone of your kid’s Android phone to view and listen to the environment and sounds around your child.
Synchronously receive notifications from apps on your child’s Android phone, such as Line and Facebook.
You can get the daily/weekly report of your child’s mobile phone usage through the report panel.
You can manage and limit the usage time or permissions of mobile phones, software, and web pages.
Keyword detection: Conduct keyword detection on social software to identify harmful content or potential bullying issues.
Track the location of the mobile phone.
Cons:
There is no free version, you need to pay to unlock all features
Obtaining too many permissions on mobile phones and recording too much content can easily lead to privacy leaks.
How to use DeskIn to access your child’s phone
Step 1: Install DeskIn on your device and your child’s phone, register and log in to a same DeskIn account.
Step 2: Ask your child to open DeskIn, toggle on “Allow remote control" button to allow accessing, and set a connection password.
Step 3: Then you can find your child's phone in the device list or use the device ID to access their phone. Your child can do manual verification, or you can use password to do unattended access.
Conclusion
This article introduces 4 parental control software to help parents monitor their children's mobile phone. Each software has its pros and cons, and you can choose according to your needs. Among the four softwares, DeskIn can full-control kid’s mobile phone and requires fewer permissions, making it easier for children to accept. Although parents have a good intention to monitor their children's mobile phones, parents should not go too far and give children space and respect their privacy. What’s important in a good parent and kid relationship is mutual trust.
COMPARISONS
5 Best Free LetsView Alternatives
If you're looking for a free screen mirroring app like LetsView, here are five well-reviewed alternatives, each with unique features and strengths, check it out!
Your number one choice – Deskln
DeskIn is a tool focused on efficient remote connection and screen management, known for its stability and high performance.
Strength:
The free version supports up to 2K image quality, clear and lossless
Adjustable frame rate, resolution and ratio to flexibly adapt to different screen
Supports multiple projection methods (wireless screen mirroring, scanning QR code to cast screen), no need to be on the same network.
System compatible, support using on Windows, Mac, iOS, Android
Provide additional functions such as file transfer, extend screen, remote control, etc.
Shortcoming:
Google TV is not supported yet
ApowerMirror
ApowerMirror is a comprehensive screen mirroring software that focuses on two-way control and multi-scenario use.
Strength:
The free version supports 720p image quality (with watermark), which can meet basic needs
Allows users to cast the screen between phone and computers.
Provides additional functions (such as screen recording, screenshots), suitable for making tutorials or sharing content
Shortcoming:
Unable to adjust parameters such as image quality or frame rate.
The free version has a watermark
Cross-platform free projection has time limit
Free version only support mirror to 1 screen
Free version doesn't support cast the sound
Vysor
Vysor is a screen mirroring tool designed specifically for developers, emphasizing simplicity and ready-to-use.
Strength:
Free version supports basic mirroring functions.
There is no need to install a special application, it can be used through the browser.
Shortcoming:
Free version has low image quality
Not supported on iOS devices
AirDroid Cast
AirDroid Cast is a tool suitable for teams, focusing on multi-device connection and remote control.
Strength:
Mirror screens can be used through the browser.
Quick connection via LAN and Internet.
Allow sharing multiple Android device screens to one PC
Shortcoming:
Free version has low image quality
Cross-platform control is paid features
iMyFone MirrorTo
iMyFone MirrorTo is an easy-to-use and powerful screen mirroring tool, specially designed for multi-platform projection needs and intuitive to operate.
Strength:
Supports multiple mobile devices to connect and project.
Supports scanning mobile codes, USB data cables, Wi-Fi and other methods to project the screen to the computer and synchronize the sound in seconds.
Support switching appearance skin
Shortcoming:
No free version
Only supports projection from mobile phone to computer. If you want to project a computer screen, you need to install other software.
Comparision of 5 screen mirroring tools:
How to mirror screen using Deskln
First install DeskIn on the devices you want to cast screen to and from, register a free account and log in.
Note: If you are logging in on a new device for the first time, you need to go to your registration email to complete verification.
Method 1: Screen Mirroring computer screen
Find the device you want to cast the screen to on the “Device List" on the DeskIn client. Easily just click “Screen Mgt” then you can mirror the screen.
Method 2: Scan QR code to cast the phone screen
Log in to DeskIn on mobile, click the Scan icon on the upper right corner of the main interface, and scan the QR code on “Screen Mgt” on the device you want to cast screen to.
Conclusion
The above five free software all provide a stable and efficient screen mirroring experience and are good alternatives to Letsview. If you are looking for the one that is free, stable and has high image quality, DeskIn is the impeccable first choice! Download and try it now!
PRODUCTIVITY
5 Best Remote Desktop Software For Windows
Remote desktop software revolutionizes the way we interact with technology, enabling seamless access and control of distant devices. This article explores the core functionalities of such tools and highlights five top solutions for Windows users, including the high-performance DeskIn.
What is remote desktop software?
Remote desktop software is a tool that allows people to remotely access and control remote computers with local devices. Through remote software, users can remotely operate applications, send files and change settings of other computers as if they were working locally.
Main functions of remote desktop software
Remote Access: Allows users to remotely access and control other computer devices.
File Transfer: Supports wireless file transfer between remote devices and local devices.
Remote Collaboration: Allows users to share clipboard between remote and local devices.
Remote printing: Allows users to print files from remote computers to local or network printers directly.
Multiplayer collaboration: Allows multiple users to access the same remote computer at the same time.
5 Best Remote Desktop Software for Windows
Deskln - High performance remote desktop software
DeskIn is a remote software designed for individual users. It runs smoothly on Windows systems and provides a seamless remote desktop experience. Not only does it have high definition and low latency, but also very stable connection. The writer myself tried to remote access a Macbook with Windows PC, and the connection was not lost even after one night! DeskIn supports cross-platform connection between Windows, Mac, iOS or Android. In addition to remote connection, it also has screen management and real-time communication features.
Pros:
High performance and low latency: DeskIn supports up to 4K image quality, and latency less than 40ms, allowing smooth remote connection experience.
System compatibility: DeskIn supports seamless connection and remote access between Windows, iOS, MacOS and Android. It also supports initiating remote connections from the Web, making it more flexible.
Rich features: Other than remote access, DeskIn provides multiple collaboration and screen management functions such as extend screen, cast screen, voice call, annotation, shared clipboard, etc. One app fits all needs.
High-speed file transfer: DeskIn supports cross-system file transfer with no restrictions on size, type, and quantity, and the speed is up to 12MB/S.
High security: 256-bit encryption, allowing to set black and white lists, security passwords, only allowing connections with the same account, locking the client, etc.
Cons:
Linux system and Google TV are not supported yet
TeamViewer-Great choice for enterprises user
As one of the earliest remote desktop software, TeamViewer has a wide user base in large enterprises. Its performance on Windows systems is remarkable, not only showing strong functionality and flexibility, but also making great efforts in user experience and security. It is undoubtedly the best choice for large enterprises to carry out remote management and control.
Pros:
System Compatibility:In addition to Windows, MacOS, iOS, and Android, it also supports use on Linux and Chrome OS.It gives a seamless remote connection experience for IT engineers. Remote collaboration can be realized no matter what device team members use.
Fully functional:In addition to various practical functions such as remote desktop, file transfer, and voice calls, TeamViewer also has many management features, allowing enterprises to uniformly manage internal devices.
Technical support and services:TeamViewer has a strong technical support team that can provide users with timely and effective technical support and solutions. This provides a strong guarantee for enterprise users to solve various problems during use.
Cons:
Expensive: The price of the commercial version of TeamViewer is relatively high, some features require additional payment to unlock, which makes it inaccessible for users with limited budgets.
Slow file transmission: After comparing multiple remote software, Teamviewer has the slowest file transfer speed, and there is a limit on file size——4GB or less at a time.
AnyDesk-Enable flexible remote access
With the core features of being lightweight, efficient, and safe, Anydesk aims to provide users with a smooth and convenient remote operation environment. Whether they are enterprise users, technical support teams, or individual users, they can get the remote access capabilities they need from AnyDesk.
Pros:
Lightweight and efficient:With an installation file of only 1.1 MB, AnyDesk is one of the most lightweight remote access solutions on the market. You can download it in just a few seconds.
Installation-free registration: You don't have to install and register an account before using Anydesk, which is quite convenient.
Low latency:AnyDesk is known for its fast remote access speeds, with latency lower to 19ms.
Fast file transfer speed:Anydesk's file transfer speed is relatively fast and supports cross-platform file transfer.
Cons:
Low definition:Anydesk's resolution is automatically adjusted.This results in the remote desktop display sometimes being poor, with average color and clarity, thus affecting the user experience.
System file access restrictions:If users need to change or access system files, they need to install AnyDesk software on their local machine. For security reasons, the browser does not have access to system files. This means that users may need additional settings or permissions to perform certain advanced operations.
Lacks advanced features:Although DeskIn is relatively easy to use, its functions are relatively simple and lacks some advanced features such asFunctions related to games, screen management, and voice collaboration.
Chrome Remote Desktop-Easy cross-platform control
Chrome Remote Desktop is a remote desktop control tool based on the Chrome browser provided by Google. It allows users to remotely access and control content through the Chrome browser or other supported devices (such as iOS and Android) at any time and anywhere. Control computers running Windows, Linux, MacOS, Chrome OS, and more. This tool is not only suitable for individual users, but also suitable for corporate environments for remote office, technical support, server management and other operations.
Pros:
Free services:Completely free, it is a very economical choice for individual users or small businesses with infrequent use and limited budget.
Cross-platform compatibility:Chrome Remote Desktop supports multiple operating systems. Whether the user is using Windows, MacOS, Linux, iOS, or Android, seamless connection can be achieved.
Easy to operate:As an extension of the Chrome browser, it can initiate remote connections from web pages. The function is relatively simple and easy for novices to use.
Cons:
Bind to Chrome browser: Chrome Remote Desktop is binded to Chrome browser, it may be inconvenient to people who are using other browsers.
Limited functionality: Compared with some professional remote desktop tools, the functions of Chrome Remote Desktop are basic and lack advanced functions.
Auto adjustment only: Chrome adjusts defination automatically, sometime may cause blurry. Its performance on image quality, clarity, color may not be as good as some professional tools.
Security risks: Chrome remote desktop is linked to Google account, once the information of your account is leaked, your device may be hacked.
Microsoft Remote Desktop - built-in remote tool on Windows
Microsoft Remote Desktop is a built-in tool on Windows operating system, it allows users to remotely access one computer from another, providing a convenient way to operate and achieve efficient collaboration among multiple workstations. It has good application potential at the enterprise level.
Pros:
Highly integrated with Windows system:It is built into the Windows system, so users do not need to install additional software and it is very convenient to use.
Powerful functionality:Supports a variety of functions, such as print redirection, clipboard sharing, etc., which improves the user experience and is especially suitable for business users.
Higher security: Provides enterprise-level encryption, ensuring the security of data transmission, which is very important for users that have confidential information on their device.
Cons:
Complexity:For users with non-technical background, initial setup may be cumbersome, especially when configuring firewall and port forwarding.
Windows platform only: You cannot do cross system connection with other devices of the Mac system.
Not all features available for free:Although basic remote desktop functions are free, in some advanced usage scenarios, you may need to purchase additional related Windows Server licenses.
Conclusion
This article introduces five remote desktop software suitable for Windows, including DeskIn, TeamViewer, AnyDesk, Chrome Remote Desktop and Microsoft Remote Desktop. Among them, DeskIn stands out for its ultra-high performance, seamless connection experience, rich functions, and high-speed file transfer. If you are looking for a remote desktop software suitable for Windows, DeskIn is undoubtedly the one you should try.
PRODUCTIVITY
5 Practical Ways To Transfer Files Between Android And Windows PC
If you are using Apple devices, you can do simple and fast file transfer between your iPhone and Macbook with Airdrop. But this only works with iOS and macOS systems. Besides using a USB flash drive, how can we transfer files from an Android phone or tablet to a Windows PC, or vice versa? This article will give you 5 simple and quick solutions.
Method 1: Send files via DeskIn remote desktop
DeskIn is a reliable remote desktop software that allows simple and fast file transfers between Android and Windows without the need to be on the same network. The speed and quality of transfer are not inferior to USB wired transfer. Now I will show you how to use DeskIn for quick file transfer.
Step 1: Download DeskIn
First install DeskIn on Android and Windows, register a free account and log in. When logging in to your account for the first time on a new device, you need to complete email verification to ensure account security.
Step 2: Connect and send files
After logging in: Click "Remote Control" >>enter the device ID of the target device>>"File Transfer" .
If you want to send files from Android to Windows, click "Send">>Select the photos or files you want to transfer >>” Change Path” to choose the transfer location.
If you want to transfer files from Windows to Android, click "Download" and select the files you want to transfer.
Method 2: Send files via Bluetooth
Transferring files via Bluetooth is also a common method. Here is how you can do:
1. Activate Bluetooth on both your Windows and Android device: Go to Settings >> Bluetooth and toggle on the Bluetooth option.
2. Pair the two devices
(1) Connect from windows: "Settings" >> "Bluetooth & other devices" >> "Add a device" >> Select the Android device>> "Connect".
(2) Connect from Android: "Settings" >> "Bluetooth" >> "Available devices" >> Select the Windows device to connect.
3. Transfer files from Windows to Android: Find "Send or receive files via Bluetooth" in Bluetooth settings >> "Send files" >> Select the Android device to send files >> "Next" >> "Select the files to send".
Note: During the process of transferring files, you should pay attention to the pop-up reminder of "Accept incoming file?" on your Android device, and click "Accept" in time, otherwise the transfer will fail.
4.Transfer files from Android to Windows: select the file to be transferred on Android and click "Share" >> "Bluetooth" >> select the target Windows device and start transmission.
Limitations: This method requires the two devices to be nearby and under the same WIFI. It is not suitable for long-distance file transfer.
Method 3: Send files via email
We can also transfer data between Android and Windows through email. It’s the most common and easiest way.
1. Log in to the same email account on your Android and Windows devices.
2. Send Files as attachment to your mailbox
3. Download the file in the email on another device
Limitations: Email service providers usually have restrictions on the size of attachment files. This method is not suitable for sending large files.
Method 4: Send files via communication app
Most communication software (such as Line, WhatsApp, etc.) have Windows and Android versions and allow simultaneous log in. It’s convenient using it to send files to yourself or friends. Taking Line as an example, log in to the same account on your mobile phone and computer. upload the files that need to be transferred to "Keep Notes" and then download them on the other end.
Limitations: To ensure transmission speed, communication software usually compresses the files. So, it is not suitable for transmitting videos or photos since the image quality may be compromised. Some software also has restrictions on file type and size.
Method 5: Send files via Google Drive
Using Google Drive to transfer files is also a very convenient method. Just upload the files on Android or Windows to Google Drive. Log in to the same Google account on another device, then you can download the files. Files can also be stored in the cloud for a long time. If you need to share data to multiple devices, you can choose this method. Google Drive also supports managing the access permissions of file data, which can better prevent data leakage.
Limitations: This method is relatively time-consuming than direct transfer, and the free storage space of Google Drive is only 15GB. If you need more space to transfer a large file, you need to purchase additional space.
Conclusion
The above are 5 simple and free ways to transfer files wirelessly between Android devices and Windows devices. They each have their own advantages and limitations. You can choose according to your actual needs. It is most recommended to use the first method, DeskIn remote software, for file transfer, because it not only does not need to be carried out under the same network——supports long-distance transfer; but also has no limitation on size, type and quantity of transferred files.The most important thing is that it maintains high transfer speed up to 12MB/S without sacrificing file quality. It can be said to be the best solution for cross-system file transfer between Android and Windows.
COMPARISONS
5 Remote Desktop Software Test: Remote Work, Gaming, and Video Streaming
Due to work requirements, I frequently use remote desktop software. I spent time testing five free options: TeamViewer, DeskIn, AnyDesk, Awesun, and Parsec. Below, I share their performance in remote work, gaming, and video streaming to help those seeking reliable remote tools. Most tests were conducted via phone-to-PC and MacBook-to-PC connections.
Free Remote Desktop Software Spec Comparison
Note: The "four major platforms" refer to Windows, Mac, iOS, and Android.
Remote Work: DeskIn Outperforms Awesun
Among the five, only DeskIn and Awesun allow commercial use in their free versions. TeamViewer, AnyDesk, and Parsec require paid upgrades. Thus, I focused on DeskIn and Awesun for work scenarios.
Basic Operation: DeskIn Feels More Intuitive
Both DeskIn and Awesun have clean desktop interfaces, with quick access to features like text chat and dual-screen switching. However, DeskIn offers faster and more stable connections, while Awesun feels laggier.
Awesun’s scroll wheel sensitivity is too low, making navigation clunky compared to DeskIn’s smooth scrolling.
DeskIn Desktop/Phone Versions
DeskIn’s mobile app is the most user-friendly I’ve tried. Its touch + mouse hybrid mode and gestures (e.g., window switching, web browsing) work seamlessly. The screen response is lightning-fast, even on phones.
Bonus features: messaging/voice calls with remote devices and a Task View shortcut for quick window switching.
Awesun’s mobile app also has a hybrid mode and a single-layer menu (phone-friendly). However, it lacks Task View shortcuts and communication tools (e.g., voice calls), forcing users to rely on third-party apps for collaboration.
File Transfer: DeskIn Has No Speed/Size Limits
DeskIn’s mobile file transfer is paywalled (desktop is free). Speeds are impressive: 5GB over Wi-Fi takes ~3 minutes. Awesun allows free transfers on all platforms but limits files to 1GB, restricting usability.
Remote Input: DeskIn’s Shortcuts Shine
For the typing section, the desktop versions are quite similar, so I won’t compare them. Instead, I’ll share the experience of using a phone to remotely control a computer.
Both DeskIn and Awesun mobile versions have keyboards that occupy about half the screen, making typing relatively comfortable.
However ,DeskIn has a significant advantage: it allows users to pin frequently used shortcuts (like copy and paste) above the keyboard or on the remote screen. This makes it easy to copy desired content while typing and paste it where needed. Users can also customize shortcut keys:
Awesun, on the other hand, hides shortcuts in a menu. When I want to copy selected content, I need to switch to the shortcut menu, press copy, then switch back to the keyboard. The same applies for pasting, making the process quite cumbersome.Additionally, after using a shortcut, returning to the keyboard requires pressing "Default" instead of "X." The naming is confusing, and I often pressed the wrong button initially, which was really frustrating.
Other Three Apps Briefly Reviewed:
TeamViewer: Feature-Rich but Slow Transfers, Clunky Mobile UI
Slow connections (free version), especially on mobile.
Full-featured desktop with a “leave message” function post-session.
Painfully slow transfers: 5GB took 30+ minutes.
Mobile mouse controls lack touch integration; copy/paste shortcuts are buried.
Annoying commercial-use pop-ups on both devices after sessions.
AnyDesk: Fast Transfers, Chinese Input Issues
No installation needed for desktop, but UI feels outdated.
Blazing transfer speeds rival DeskIn, but laggy visuals (1-2 sec delays).
Mobile menu hidden on the right edge (minimalist design).
Input bugs: iOS struggles with third-party Chinese IMEs; Android lacks delete functionality.
Parsec: Great for Gaming, Useless for Work
No Chinese support, but setup is simple.
Desktop version lacks basic features (no file transfer).
Mobile app (Android-only) is barebones: no zoom, no Chinese input.
Ideal for gaming (smooth, adjustable bandwidth), but avoid for productivity.
Remote Gaming Scenario Comparison
For the gaming section, I tested "using a MacBook to remotely play Diablo IV on a PC" to evaluate each software’s connection quality and latency. This scenario reflects my occasional use case: taking a MacBook Pro out for work and wanting to game during breaks if my home PC is on.
TeamViewer
First, I tested TeamViewer. While playable, it felt noticeably sluggish, with delayed movements and occasional screen freezes, resulting in a subpar experience. Setting the quality to "Speed Priority" did not improve performance.
DeskIn
Next, DeskIn impressed me. The visuals were sharp, and gameplay remained smooth for 30 minutes. It also displays real-time FPS and latency stats. DeskIn offers 4K 60fps and 144fps options (paid version only), which would enhance gaming further.
AnyDesk
AnyDesk delivered the best image quality among the five and smooth gameplay. However, I noticed a critical issue: the remote PC’s CPU usage spiked to 70-80%, causing loud fan noise and raising concerns about long-term hardware strain.
Awesun
Awesun performed smoothly except for brief stutters during scene transitions (e.g., returning to town). Its Mac version had stability issues—crashing after one session and requiring reinstallation. It also lacked audio.
Parsec
Parsec excelled in gaming, offering flawless Diablo IV performance with adjustable bandwidth settings to minimize latency. It also supports multiplayer rooms. If gaming is your sole focus, Parsec is a no-brainer.
Remote Video Streaming Comparison
Streaming videos via phone-to-PC tests each software’s latency. I tested YouTube, Netflix, and local files. Three performed smoothly: TeamViewer, DeskIn, and Parsec, but with caveats.
TeamViewer: Smooth playback but extremely low volume (no mute option), forcing sound output if the PC plays audio.
Parsec: Great speed and audio, but mobile lacks zoom (full-screen only).
DeskIn: Flawless sync and no issues.
AnyDesk: Mobile audio is broken (iOS/Android)—no sound despite settings.
Awesun: Choppy audio and desynced visuals, indicating poor connection quality.
How to Choose Remote Desktop Software
Prioritize features (file transfer, device communication, keyboard ease) and low-latency connections. Additional tools like DeskIn’s screen extension and voice calls add value. Cross-platform support (iOS/Android/Windows/Mac) ensures future flexibility.
Conclusion
I expected the renowned TeamViewer to dominate, but testing revealed flaws. DeskIn emerged as the top choice for its balanced performance, stability, and features. If you’re seeking reliable remote software, give DeskIn a try!
PRODUCTIVITY
5 Tools to Extend Mac/Windows Screen-Easy Dual Screen Set Up
Screen extension tech is becoming more and more popular in our daily lives. Here we introduce 5 tools can extend Mac/Windows screen easily.
1. DeskIn Rating ⭐⭐⭐⭐⭐
DeskIn is a one-stop remote desktop software designed for individual users. Besides remote access functions, it provides free screen management features - cross-system extended screen and mirror screen. It supports resolution up to 2K60FPS, and allows you to adjust resolution and frame rate manually. If you are looking for a free extended screen tool, DeskIn is the most recommended one.
Supported Systems: Support extending Windows 10 1903+, MacOS 10.15+ screen wirelessly to Android 6+、iOS10、Mac 10.15+、Windows 10 1903+ devices
Resolution: Up to 2K 60FPS
Limitations: Linux system is not supported yet, and wired screen extension is not supported.
Strengths: No need to manually enter the device ID or use it under the same Wi-Fi. Supports Mac, Windows, iOS, and Android platforms. High-definition image quality and high stability.
Free Trial: Extend screen feature is free to use
2. Spacedesk Rating ⭐⭐⭐⭐
Spacedesk is a completely free screen management tool (Note: commercial use requires a paid license) and has no ads. It allows extending screen to up to 3 screens at the same time, wired and wireless connections, and adjusting parameters such as image quality, resolution, frame rate, etc. The only drawback is that it does not support Mac systems yet.
Supported Systems: Support extending screen from Windows 8+ devices wirelessly, wiredly to Android 4.1+, iOS9.3+, Windows 7+ , HTML5
Resolution: Supports up to 8K 60FPS (The extended device needs to support 8K)
Limitation: Mac system is not supported, and wireless screen expansion is unstable and easy to disconnect. The main device and the device used as an extended screen need to download two different softwares, which is relatively troublesome. Devices need to be on the same Wifi to use the feature.
Free trial: Completely free to use.
3. Duet Display Rating ⭐⭐⭐
Duet is developed by a team of former Apple engineers, providing remote access and screen management functions. The software does not provide a free version. Its remote service and screen management service need to be purchased separately. Its screen management service includes extended screens and mirrored screens, and provides 4 paid versions. You can choose to subscribe annually or purchase a lifetime license. Since there is no free version, the following only introduces the performance of its cheapest paid version.
Supported Systems: Supports wired or wireless extension from MacOS10.13+, Windows 10+ to iOS 7.0+ , Android 7+, MacOS10.9+, Windows 10+ devices
Resolution: Supports up to 60FPS, supported resolution is not declared
Limitations: No free version
Free trial: 7 days trial
Paid plan: US $48~$72 per year
4. GlideX Rating ⭐⭐⭐
GlideX is a remote desktop software developed by ASUS, but in addition to ASUS's own products, it also supports use on other computers. The software provides rich functionalities, but many of them require purchase to unlock, and the free version has many restrictions. The free version only supports screen extension and projection from Windows to Android and iOS.
Supported Systems: Only supports extending screen from Windows 10 1090+ devices to Android 9+, iOS14+ version devices.
Resolution: Up to 720P 30FPS
Limitations: Has ads, does not support mac system-related functions, and does not support dynamically adjusted streaming quality.
Free trial: Register for ASUS, ROG laptops and desktops to enjoy a 1-year trial of "Glidex Professional Edition"
Paid plan: US $11.88~US $71.88 per year
5. LetsView Rating ⭐⭐
LetsView is a projection tool and you can pay to unlock the extended screen feature. It can be used without logging in, but the connection is a bit unstable. When using it on a Windows system, the editor often encounters the problem of being unable to successfully expand the screen and crashing.
Supported Systems: Supports wireless screen expansion from Windows 10+ to Android 5+ and iOS 9.0+ devices
Resolution: The cheapest plan supports up to 720P 30FPS
Limitations: It requires payment to unlock and cannot expand the Mac screen. When using it on Mac, you need to turn off the "Airplay" feature first and the 2 devices need to be on the same network to use the extended screen feature.
Free trial: No
Paid plan: US$ 29.99~US$ 39.99 per year
Conclusion
The above introduces 5 software that can extend the Mac and Windows screen to mobile devices: DeskIn, Spacedesk, GlideX, Duet display, and Letsview. Although they all provide screen extension functions, the supported systems, prices, and resolutions are different. If you are looking for an extension tool that is completely free, can be extended wirelessly, supports both Mac and Windows and has good performance, DeskIn is definitely your best choice. Download and give it a try!
PRODUCTIVITY
6 Dual-screen Productivity Tips! Guide to Turn iPad/Android Tablet Into A Second Monitor
Working with dual screens can greatly improve work efficiency, especially for designers and engineers who need multitask. But do you really need to buy an extra screen? The best screen may already be around you – that’s a tablet! This article will introduce you to 6 dual-screen productivity tips and how to turn your tablet into a second monitor for your computer.
6 dual-screen productivity tips:
1. Save time switching windows
When multitasking, you can open windows separately on two screens, saving time switching back and forth between windows and making your workspace cleaner and more organized.
2. Improve proofreading efficiency
When proofreading text or data, using the split-screen function may cause the text to be too small to be read clearly. You can open the file in two screens respectively to ensure that the font size is moderate, and the layout is consistent, making the proofreading work easier.
3. Improve editing efficiency
When editing, you can open the editing software on the main screen and find footage and materials on the other screen to improve editing efficiency.
4. Better view with portrait orientation
When you need to browse videos or files in vertical format, you can switch the dual screens to portrait orientation for more visual comfort.
5. Compile while consulting information
Whether you are a student writing an essay or an editor writing an article, you may need to search for information when writing. Dual screens allow you to do these simultaneously, you can also do copy-and-paste between 2 screens seamlessly.
6. Zoom in on detail
When you are doing design work or photoshop, you can zoom in on part of the image on the second screen to better view the details. You can also move a certain workspace in PS or PR to the second screen, enlarging it for more convenient use.
How to turn iPad/Android tablet into a second monitor?
Method 1: Use DeskIn remote software
Applicable system: Support cross-platform screen extension between Windows, iOS, Mac, Android computers and tablets
Step 1: Download and register a DeskIn account
Download DeskIn on your PC and iPad, register for a free account and log in separately
Note: If you are logging in on a new device for the first time, you need email verification to ensure the security of your account.
Step 2: Extend screen
On DeskIn on the computer >> Go to "Screen Mgt" >> Click "Expand my screen"
Select the device you want to expand the screen on and click "Start Extending".
After the connection is successful, your iPad will become a second screen for Windows/Mac, and windows can be flexibly moved between the two screens..
Computer screen (left) and iPad screen (right)
Step 3: System display settings
After extending the screen, if you find that your iPad only mirrors the content on your computer screen, please go to Windows System Settings>>Display Settings and set the screen option to "Extend these displays".
Method 2: Use Apple "Sidecar" Function
Applicable system: Extend Mac to Mac or iPad
Apple’s built-in feature Sidecar allows you to use the iPad as an external display for a MacBook and iMac.
Requirements:
1. The two devices should log into the same Apple ID or are on the same network.
2. Both devices should have Bluetooth, Wi-Fi turned on, and the distance cannot exceed 10 meters (about 10 meters).
Step 1 Display Setting
Open the Mac System Settings >> Click "Display" in the sidebar >> Click the "+" pop up menu on the right and choose your iPad.
Select the iPad, change the Use as settings to "Extended Display". Check the Airplay settings on the top toolbar of the mac and set iPad as "Use As Separate Display".
Step 2: Extend screen
After completing the settings, your iPad will become the second display for your Mac. You can drag windows from your Mac to your iPad smoothly. You can also use the sidebar on the iPad or change the position of the sidebar on the system display settings.
MacBook screen (Left) and iPad screen (Right)
Method 3: Use Samsung “Second screen” function
Applicable system: Extend your Windows computer to your Samsung tablet
Step 1: Enter the "Second Screen" page
Go to the "Quick Settings Panel" by swiping down from the top of the tablet screen, tap the "Second Screen" icon to enter.
Follow the system prompts to select the desired connection mode "Drawing/Game" or "Video". After that, stay on the "Second Screen" page and do not leave.
Step 2: Expand computer screen to tablet
Press "Windows+K" on your computer and select the tablet you want to extend in the pop-up device list. (Keep your tablet on the Second Screen page and your tablet will appear in the device list)
Conclusion
This article introduces 6 tips on how to use dual screens to improve work efficiency and also introduces 3 methods so that you can turn the tablet at hand into a "second screen" for Windows or Mac computers without buying another dual screen. This is especially useful for people who need to multitask or use multiple applications at the same time. Try it now!
Load More


Products
Download
Resources
Contact Us
Email: support@zulertech.com
Office: 6 Shenton Way, #36-01 OUE Downtown 1, Singapore 068809
Copyright © 2025 Zuler Technology PTE. LTD. All rights reserved.
Products
Download
Resources
Contact Us
support@zulertech.com
6 Shenton Way, #36-01 OUE Downtown 1, Singapore 068809
Copyright © 2025 Zuler Technology PTE. LTD. All rights reserved.
Contact Us
Email: support@zulertech.com
Office: 6 Shenton Wy, #36-01 OUE Downtown 1, Singapore 068809
Products
Download
Resources
Copyright © 2025 Zuler Technology PTE. LTD. All rights reserved.